
Wednesday, December 29, 2010
Monday, December 27, 2010
Wicked Bad.

The picture above was shamelessly taken from a friend's posting over on Facebook. (Can you tell she lives near Boston? - Only place in the world I know of where something can be "wicked good" or "wicked bad" - and may mean the same thing!) If you live along the east coast of the US, you'll know exactly what I'm talking about. We got our first real snowstorm of this season. Some places got upwards of 20" of snow in what was billed as a blizzard.
For those who aren't familiar with what a blizzard is, it really doesn't have anything to do with snow accumulation.
Blizzard : (n) - A violent snowstorm with winds blowing at a minimum speed of 35 miles (56 kilometers) per hour and visibility of less than one-quarter mile (400 meters) for three hours.
We definitely had some pretty bad weather conditions around here - snow and wind that lasted for about 20 some-odd hours, but not that much accumulation. There seemed to be about 2" on the ground with drifts up to about a foot. The other 3" that fell seem to have been plastered to the sides of trees and buildings and as drifts in the lee of anything big and stationary - like my car in the driveway. The winds were so strong and fickle that my any signs of my attempt to clear the driveway with the snowblower were all but erased by the time that I finished!
Saturday, December 25, 2010
Friday, December 24, 2010
Thursday, December 23, 2010

Wednesday, December 22, 2010

Tuesday, December 14, 2010
Tech Tip Tuesday
The old adage that good workmanship is it's own reward is very true. It takes time and patience to build a nice boat and as you're doing all of your preparation work, it may seem that you will never finish.
First, the students built the strongback and set up the forms. They then ripped strips and made stems.
A post from last fall shows the preparation and good workmanship that went into the building of the building of the feature strip on their canoe.
They stripped the hull and fitted the outer stems.
These students shaped stems, applied filler, faired the hull and long-boarding the hull.
This past Saturday, they finally applied the sealer coat of epoxy. The contrasting feature strip "popped" against the hull and proved that the work was worth it.
Here are the proud builders posing with their beautiful boat in a fresh coat of epoxy sealer:

Isn't that Walnut and Basswood feature strip a stunner?
Friday, December 10, 2010

Wednesday, December 8, 2010

Monday, December 6, 2010
Tech Tip Tuesday
I would guess that this is one of my more overdue posts.
It is about the steps between the finishing process and the 'glassing process. After the canoe is stripped, outer stems (if you have them...) are installed and shaped, and any fasteners used to hold strips in place have been removed (if you didn't go staple-less..) you need to fair the hull. At this point, the hull has facets made up of the individual strips.
You want a nice, smooth, fair hull - by fair, I mean "canoe shaped" without dips or lumps. Fairing is accomplished with planes, spokeshaves and longboards. I've talked about fairing and longboarding before so I will not go into detail here.
After you've faired, take a cloth with warm water and dampen the hull slightly - this will make any residual glue spots show up more clearly. Circle these areas with a pencil (lightly - so as not to make dents!) so when they dry you will know where to sand to remove the glue. It will show up as light spots when you fiberglass the hull.
In the process of building a cedar strip canoe, most beginning builders will have some small areas where there are gaps, checks or holes in your boat. First, I should explain that they're not a problem for how waterproof the canoe will be - they're mostly cosmetic, but can cause some problems during the fiber-glassing process. The major problems are bubbles caused by air escaping from the gaps and epoxy running between the hull and the forms - either bonding the hull to the forms or the forms to the strongback. This can also lead to "starved" spots in the fiberglass cloth.
To deal with any of these areas, we make what Nick Shade of Guillemot Kayaks refers to as "Dookie Shmutz". This is a mixture of epoxy that has wood flour added to it to color the epoxy and some fumed silica to make a non-sagging mixture. Wood flour is simply what it sounds like - fine wood dust - you can get a good color match by saving any sanding dust from the fairing process. By non-sagging, I mean that it doesn't run. The mixture should be about the consistency of peanut butter.
Some people have recommended mixing white glue with the wood flour to make a paste filler, using wood putty (i.e. "plastic wood"), auto body fillers or even some of the pre-thickened epoxies such as System Three's Quick Fair or Gel Magic. First, I can't recommend wood putty or auto-body fillers as they are brittle. I don't recommend using wood glue mixed with wood flour for two reasons - the epoxy doesn't bond to the glue and cosmetically it's not very good-looking on a bright-finished canoe. If you are not going to have a bright finished canoe, (i.e. a painted canoe) you could use the other epoxy-based fillers.
So, if you are going to have a nice looking bright finished boat, you'll mix yourself up some Dookie Shmutz. We usually use poly squeegees to apply the filler to the cracks. The best way to think of it like spackle for holes in the wall, but for your boat - you want it in the cracks, but not all over the wall. Dookie Shmutz that gets on the lighter colored wood will show if you don't remove it by sanding later. This material is very, very hard when cured, so you don't want to get too much excess on the hull. It's not out of line to use some masking tape around the gaps to help keep as much of the filler off the hull as you can.
This is what the bow of the Prospector Ranger looks like after some filler has been applied:


In the bottom picture, you can see that some of the material near the stem has been sanded away. In the next image, you can see some dark lines that are showing between the strips and all the excess has been removed from the wood.

While the filler looks dark now, once the hull is saturated with epoxy and 'glassed, it will darken. Over time, the cedar will mellow and darken, getting closer in color to the the filler. Still, you must keep in mind that both the Dookie Shmutz and any areas of the cedar that have been damaged by staples, nails or any other mechanical damage, will be slightly darker because the fibers have been damaged and simply are darker in color.

Saturday, December 4, 2010
My Holiday Card to You All
Well, quite frankly, with the number of readers around here, the bill for cards and postage would be killer. Here's hoping everyone has a happy, healthy holiday. Please enjoy this little holiday video card courtesy of Straight No Chaser:
Wednesday, December 1, 2010

Thursday, November 25, 2010

Wednesday, November 24, 2010

Monday, November 22, 2010
A little cleaning is good for the soul...

When I was first approached about teaching my canoe-building class, I was told that we would be able to use the barn in the school's parking lot. I was under the impression that we would actually be building the boats in the barn at first. When I was finally given a key to the barn to clean up some space in the barn, I discovered that the place was pretty packed. We managed to clean up some space - about 1/2 of the first floor. The administrator then let me know that I'd only be storing the boats in the barn, but building them in the shop.
The barn in which we store our boats in received a very thorough cleaning this weekend. Before we started, we could not physically get to the second floor of the barn to do the cleaning because it was so jam-packed. Along with 6 boats and and boat-building equipment, there was lots of old equipment that had come out of the school building when it had been renovated in the past.
The building was probably built in the 1880's along with the house that originally (but not longer stands there...) stood in front of it. To be honest, I think some of the things that we cleaned out of the barn have been there since the 1920's or even earlier. We even discovered things about the barn that we didn't even know - such as that the barn had a full basement with a set of access stairs in the floor.
Now there will be plenty of space to move around in the barn!
Amazing.
Cleansing is good for the soul!
Friday, November 19, 2010
A diversion from boatbuilding...
DS and a couple of his buddies were interested in being Cub Scouts and I managed to get myself roped in to being a Den Leader. I guess it must be fate.
As part of one of their requirements for the Bear badge, they had to build something useful out of wood. We discussed a few options for things that they could make out of wood. These included the usual suspects of a shelf, birdhouses and the like. From the list of presented options they decided that they would like to build some journeyman style toolboxes.
Fortunately, I have a friend who is a tree farmer and a sawyer who had sold me some nice Eastern White Pine which I had in the cellar. The pine had been in the basement for a number of years waiting for an appropriate use and I figured that the time had come. Based on a design that I'd seen, I sat down at my work computer at lunch-time and designed a tool box in the CAD system. I then made a prototype from the drawing which was nice. I bought some screws and a few oak dowels and cut enough parts for the 6 boys in the Den to make their own toolboxes. Quite frankly it was a labor of love as there were lots of parts.
Last Wednesday night we had our Den meeting where the boys and their parents worked as a team to put together these toolboxes. They got to clamp together the assemblies, drill the holes for the screws that went into the boxes and screw them together. I brought along a small compressor and pneumatic stapler which they used to assemble the drawers with a little help. I think they had a good time building the tool boxes and that Santa Claus may hear some requests for pneumatic staple guns over the next month or so....
Here are the results of DS's work:


It's not clothes that make the man - it's the tools!
Wednesday, November 17, 2010

Monday, November 15, 2010
Tech Tip Tuesday

Well, according to Robert Heinlein, TANSTAAFL.
TAANSTAAFL?
For the rest of us, that means, "There ain't no such thing as a free lunch."
Well almost. There is a wonderful place that is paid for by the US taxpayer. It is a division of the Forestry Service under the auspices of the Department of Agriculture called the Forest Products Laboratory. They say about themselves:
Our mission: To identify and conduct innovative wood and fiber utilization research that contributes to conservation and productivity of the forest resource, thereby sustaining forests, the economy, and quality of life.Which really doesn't do the variety of research that they do justice - or the services that they provide doing wood identification. One of the marvelous things they publish which almost any woodworker would find useful is their Wood Handbook. This document is available as a free download. However, this isn't to say that the information is limited to the engineering properties of wood - if you can think of anything to do with wood, they've probably done research on the subject. They provide an amazing amount of information and have been doing it now for one hundred years.
Well worth a look!
Friday, November 12, 2010
Over my shoulder...

As I was having lunch today, I was reflecting on the router table that I designed to mold the cove and bead features on the strips we use to build canoes. It struck me that it is about time to get serious about designing an improved version.
I've also got some improvements that I'd like to make to the strip-cutting operation and some new jigs and fixtures for other little things that we do when we build canoes.
What drives me?
Well, having students looking over your shoulder and looking for better ways of doing things certainly is one reason. People have many different experiences in life and one of the things that makes everyone's life a bit richer is to share those experiences. In the shop it takes the form of, "Well, I used to do this:", or "How come we can't try it this way?"
This is why I like to have people looking over my shoulder as I teach things. I hear the different questions and different points of view - and that is wonderful.
Wednesday, November 10, 2010

Monday, November 8, 2010
A Happy Day for Cat
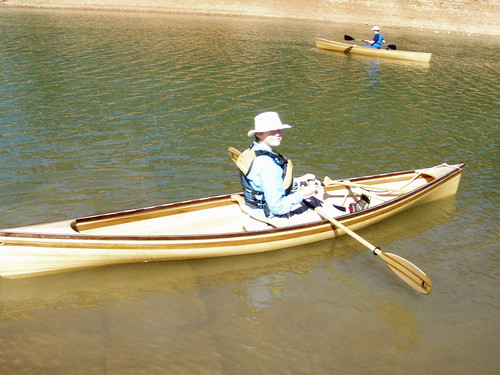
A hearty congratulations goes out to Catherine. Cat has been a reader of this blog for a while and has just finished and launched her (second?) hand-built canoe - a Wee Lassie II:
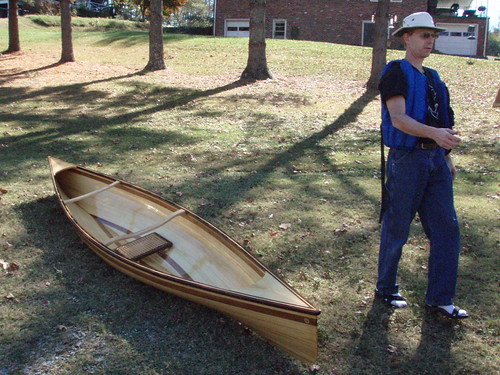
The canoe is named Constance and is a slightly stretched version of Mac's design. As you can see from the pictures, Cat did a beautiful job of building and finishing Constance and should be justifiably proud of her new canoe.
However, launch day for many builders is both a bit nerve-wracking ("Oh no! I might scratch my new boat!") and leaves them feeling a little bit lost. ("Ok, I'm really done building my canoe? Now what?") I've noticed that there are paddlers and there are boat-builders and there are those who are both.
When working with two of my current students outside of class, I happened to meet a man who had tried to sign up for my class last year. Unfortunately, the class was full. He decided that he couldn't wait another year and ordered a kit from Newfound Woodworks for a Wee Lassie. He has since completed the kit and has spent some time paddling, but would like to build another boat. While he said that he liked to paddle, he admitted that he's one of those people who feels like more of a boat-builder than a paddler. I think we'll find that he builds more boats in the future.
One of my students who completed his boat last Spring enjoyed the class, but I think will probably not build another canoe. He was a paddler before he started the class and when his wife signed him up to take the class, I think for him it was a means to an end - paddling a home-made canoe. He's been having fun paddling his canoe and will probably continue to enjoy it for a long time to come.
Cat is one of those people who seems to fall into both categories. She appears to enjoy her paddling and her boat-building. Can't you tell?
Cat - time to make some home-made paddles now! (Just kidding!)
Sunday, October 31, 2010
Happy Halloween!

This year's crop of Jack O'lanterns seems to be a decent mix. The owl on the left is DW's first attempt - a good one, I think! The spider was DD's artwork, executed by DW. Good teamwork!
Wednesday, October 27, 2010
Wordless Wednesday

Okay, okay... I can't resist. "You can never be too rich, too good-looking or have too many clamps."
Tuesday, October 26, 2010
Tech Tip Tuesday

This week's Tech Tip Tuesday is devoted to an often misunderstood and often abused subject - solvents.
Solvents can be very helpful in removing cured epoxy resin and for preparing surfaces for a new layer of epoxy. They should, however, be used carefully. I say misunderstood and abused as people often do not read and understand the MSDS documents for the solvents that they are using, and use solvents when something else would suffice.
Before you start, read the manufacturer's instructions for the epoxy/coating that you'll be using. Find out what solvents the manufacturer recommends and read the MSDS documents for both the solvent and the epoxy/coating that you'll be dealing with.
When working with solvents, you should be using the proper protective materials. This includes gloves, eye protection, a respirator with the appropriate cartridges (usually "organic vapor" cartridges), a powered respirator which brings in fresh air from a slightly distant source. The manufacturer will more than likely list what is appropriate. Be aware that the protection offered by these cartridge respirators is limited and they may become "saturated" with the vapors.
These solvents can damage your internal organs, particularly your brain and liver. You should be working in a well-ventilated area without a source of ignition. (sparks, heaters, open flame, etc.) Your protective equipment must be made from the materials that are indicated in the MSDS as some materials may be dissolved by the solvent that you are using. Remember that what may be the "right " protective material for one solvent may be the "wrong" on for a different solvent."
Never use solvents to clean up bare skin that has epoxy on it. This is a very bad practice as it can actually act as a delivery system to help the chemicals in the epoxy pass through your skin. For un-cured epoxy, vinegar is very useful in preventing the epoxy from curing. Once the cure has been inhibited with the vinegar, you can clean up using soap and water. Some people find waterless hand cleaners to be very good for this purpose.
Use the least volatile solvent that you can. While we could use acetone, instead we use denatured alcohol to prepare surfaces for subsequent coats of epoxy because of where and how we work. If we were working in different circumstances, a soap and water wash or a rinse with ammonia would do the same job to help remove any amine blush that might prevent layers of epoxy from bonding to one-another.

People often underestimate the flammability of solvents until they have a flash fire. Solvents may have vapors that "pool" and create the conditions for spark to ignite the vapors leading back to the can or cloths used with the solvent. We recently had an incident at work where we received some shipping containers that had an open can of Xylol that had spilled. As the vendor who shipped these contianers sheepishly pointed out, it was good that nobody at our facility was a smoker!
Last but not least, be very careful about how you dispose of the materials that are saturated with solvents. Depending on what you're doing, if you have cloths with solvent and products that contain linseed oil, when the solvent evaporates, you can wind up with a situation where the remaining linseed oil can spontaneously combust! This is an altogether too common occurrence.
Please, read and understand how to handle the solvents that you'll be using for your own safety as well as that of those around you.
Monday, October 25, 2010
More Ultralight.
We've started a new session of classes in my cedar-strip canoe building class. I have two new students joining the class this year along with previous students returning to complete boats that are in-progress. One thing I am pleased about is that my two new students are experienced woodworkers. One is a retired contractor and the other still works in the trade running his own business.
These two students are building the Wee Lassie II design to Mac McCarthy's plans. After our successful use of box-beam construction last year for the Prospector Ranger we opted to use this strongback style for the Wee Lassies as well. We've also removed material from the station molds to remove weight there as well.
One thing to remember is that a strongback and station molds need to be robust. Most builders do not move the forms once built so that the shape of the canoe doesn't change as it is being built. For our class, we need to move the boats on a weekly basis so the forms need to be both light and rigid. The box beam does this for us.
The box beam consists of a 1/2" thick plywood deck 1/4" thick Luan ply sides and 2x6" blocking. It is remarkably stiff once assembled and has the advantage of being stable with temperature and moisture changes.
We rip the 1/2" plywood deck to be 7-1/2" wide and the 2x6 blocking to match. Because the ply is only 8' long, we glue and screw the blocks to the underside of the ply with a block beneath the center joint.

The Luan is ripped to be the width of the 2x6 (actually 5-1/2") and the thickness of the ply (*close* to 1/2", but not exact), so it is nearly 6" wide. Again, because the sheet goods aren't long enough for a continuous piece the sides have a patch that is 5" wide and 2' long that gets glued to the side panels at the joint. We stagger the joints so that they are not in the same place, weakening the structure.

Once the sides have cured, the whole structure is glued and screwed (or in this case stapled - one of the students had a pneumatic stapler which made life very easy) to assemble the beam. When the cut edges are lined up, the structure is straight and flat. The large surface area that is glued up when the sides are assembled makes the structure very rigid.


We then mark the centerline and lay out the location of station molds. The station molds get screwed (but NOT glued) to the 1/2" plywood deck.

You will note the unsupported ends which have a taper cut on them. The taper is to clear the hull that we'll be building on the forms. We're also avoiding fiberglassing the hull to the strongback with this clearance cut. It is likely that we will support this with a small piece of 2x4 screwed into the end blocking and to the deck so it isn't flapping in the breeze. You will also note that the stem molds are not in place yet - we use them as forms to laminate the stems before they are installed on the strongback.
We have decided that there are a few flaws here, however. The old method, which used dimensional lumber, gave us a "ledge" which we could clamp to when screwing down the station molds. I'm concerned that we could crush the 1/4" sides if we clamped to them, so I need to either design in a ledge, or have a removable block to fit under the deck to clamp to when screwing down the molds. The other concern is how to support this at a reasonable work height. Small sawhorses seem to be the best solution for this at the moment. The Luan is also a bit splintery, but not bad - a little sanding at the top edge seems to solve that problem.
Sunday, October 24, 2010
Travel? Wow.
 I think my head has almost stopped spinning.
Can't say I can remember a few weeks when I've been so busy. I've also been a bit sick, which hasn't helped things. I spent three days last week traveling for business. Before I get into the details about what we've been doing in class, I thought I'd give you a little bit about what I've been up to.
We flew down to El Paso, Texas on business via Dallas-Fort Worth airport. With the advent of baggage fees and the reduction of amenities on domestic flights, I have to say that dining in airports has gotten more expensive than I ever dreamed of and carry-on baggage and the jostling for overhead space has become a fine art. I also can't say that I can ever remember more crowded flights (all four legs with full planes) or being treated like more like cattle than on this trip.
*MOO!*
I had the misfortune on two of the longest legs of my journey to have the center seat on a 737 and find myself sitting next to little old ladies with very sharp elbows. On the short legs from Dallas to El Paso, I was fortunate enough to have the aisle seat.
Our journey's destination was Las Cruces, NM and when we touched down in El Paso, we were treated to a truly spectacular sunset that made me wish I'd brought my camera along for the trip. (Sorry! No pictures!) We drove our rental Hummer H3 (not our first choice) from El Paso up to Las Cruces for the night. Along the way we were treated to the view of an illuminated star - 468 feet tall! - on the mountainside near El Paso's community college. After checking into our hotel in Las Cruces, we enjoyed a nice, but late, meal at a place called La Posta that was located in La Mesilla, NM - a cute little town on the outskirts of Las Cruces with traditional adobe houses and a relatively long history including being a stop on the Butterfield Stage Coach trail and the location of courthouse and the trial of Billy the Kid.
The next day when we awoke, the sun was rising behind the mountains and the clouds above were lit up with orange, pink and red hues that you seem to only see in the desert Southwest. Very rugged, but very beautiful. We spent most of the day shut away in a conference room and a shop doing out jobs, but enjoyed a lunch outside with a wonderful view of the mountains again. After our meeting, we drove back down to El Paso, just missing a severe thunderstorm that we later learned had dumped 2" hail on the area.

After checking in to our hotel, we drove over to the Stateline BBQ - it's right on the Texas/New Mexico border. It is an area with a large number of casinos and race tracks to tempt Texans to cross into New Mexico and spend their money. It's an interestingly decorated BBQ and steak restaurant which had some melt-in-your-mouth baby back ribs and perfectly cooked steaks. What's particularly interesting is that there is a hallway by the bar that runs between the restaurant (in Texas where there are some strict liquor laws) and a liquor store. (in New Mexico with more lax liquor laws) The idea here is that when alcoholic beverages can't be sold in Texas, you walk over the border to New Mexico for a drink and bring it back to your table in Texas.
When we left the restaurant it was a moonlit night with broken cloud, but we could see the lightning playing over the top of the mountains and off to the east - the result of the severe storms. The fellow that I was traveling with was fascinated by the fact that we were so very close to the Mexican border - a fact advertised by a flagpole several hundred feet high with a massive Mexican flag flying. He wanted to drive a along the border on our trip back to the hotel which we did, but I was pleased he didn't want to go over the border into Juarez - one of the most dangerous towns in all of Mexico due to the drug trade.
It is a stunningly beautiful and rugged place. I don't mind visiting, but I can't say I'd like to live there. Not enough places to paddle!
Wednesday, October 13, 2010

Friday, October 8, 2010

Thursday, October 7, 2010
Rollin Thurlow - A "Neighbors" Essay.
Photographer Doug Bruns of Portland, Maine posted a great interview with Rollin Thurlow of Northwoods Canoe.
Enjoy.
Enjoy.
Wednesday, October 6, 2010

Tuesday, October 5, 2010
Tech Tip Tuesday
 Picture by Feather Canoes
First I need to mention a little about the design : the Wee Lassie and Wee Lassie II canoes that were an interpretation of the classic Rushton designs by Mac can be found in his book, Featherweight Boatbuilding which is available from numerous sources, including the publisher, WoodenBoat. I say these are an interpretation because Mac made some small changes to the boat's shape to carry a bit more volume aft of the paddler. This was because the original canoe design tended to "squat" in shallow water when paddled hard. I should also point out that there are some small errors in the mold data that have been corrected (see here) and in full size plans available from Feather Canoes and Newfound Woodworks
When you're locating seats in a canoe, you want to be balanced from side-to-side and fore and aft - this is so you're not riding bow high, or digging the bow in the water - you want the waterline of the canoe one the waterline... The reasons for this are good stability and good handling as you paddle as well as ease of paddling. If you're fighting to stay level or the boat's attitude in the water is poor, you will not have much fun paddling it. The hull shape might be fine, but poor weight distribution turns it into a pig. I'm sure you've seen the guy all by himself in a tandem canoe, sitting in the stern seat with the bow riding high and fighting to keep the thing going straight and trying to overcome every gust of wind...

But back to Cat's question - in Mac's plans, he shows the position of the thwart, but not the actual location of the seat - in scale, the seat is located about 2" forward of the thwart. First, I find this to be a bit close - with a life jacket on, this simply isn't enough room to lean back comfortably without having the thwart hitting me in the small of the back. Don't ask me how I know this...
 Lines image by Newfound Woodworks
Here's how we locate the canoe's seats and thwart when we build our canoes in class: First, we build the canoes up until the point that they're 'glassed, and have decks, grab-handles (if any) and gunwales installed. We then take a piece of pipe and put it underneath the canoe running athwart. (side-to-side) We then move the canoe back and forth and find the point where it balances on the pipe and put a piece of tape on the inside of the floor. Unless you have a significantly asymmetrical hull, unusually disproportionate decks, or a huge honkin' 10 pound piece of "ego bronze" for a fore-deck tie-down (i.e. : 1939 Packard hood ornament...) this is usually the center of the canoe's volume. This is where we locate the front rail of the seat - just behind this point. A paddler's body weight distribution is pretty evenly divided between your legs and the rest of the torso, so in a solo double-paddle canoe, your legs basically begin at the front rail of the seat and your torso is behind it. Voila - good balance.
We then locate the front edge of the thwart about 4" behind the rear rail of the seat. Unless you put in a swivel backrest like on Tom Hill's Charlotte, or a wide one the location of the thwart wants to be far enough back that you can lean back a bit as it isn't very comfortable to lean on. Keep in mind that personal geometry varies quite a bit, so you'll probably want to mock up the seat and thwart location to see how it will feel. Be sure to put on your life jacket when you do this as these can add a bit of thickness. Also, pay particular attention to the height difference between the seat surface and the thwart as well as the shape you've chosen for your thwart. A traditionally shaped thwart may want to be a bit further back than a gently curved one to cradle your back a bit.
Personally, I use a Crazy Creek canoe chair strapped down to my caned seat. It winds up looking like this:
 Image by Newfound Woodworks
One creative student came up with a removable swiveling backrest that was built into his thwart. This year, I have a student who wants a removable backrest that will "stake" into the rear rail of the seat frame, but be like a Howda seat. I'm sure I'll be updating this as we go along.
When considering seat location for a tandem canoe, the process is a bit different. Tandem canoes need to take into account the differing weight of paddlers. As I noted before it is a balancing act. In Ted Moores excellent book Canoecraft, he has a very clear and concise picture showing basically the following:

What this shows is the "ball" at the center of the canoe marks the balance point as shown above (with the previous caveats...) This would be the middle of a symmetrical canoe and is the point at which the portaging yoke should be placed. (usually a tad tail heavy to allow for easier portaging...) The "ball" on the edge of the stern seat (on the left) is the center of the stern paddler's center of gravity. The "ball" on the right is the center of the bow paddler's center of gravity. To figure where the seats go, you use the equation shown in the image - Sternman's weight times distance "A" is equal to the Bowman's weight times distance "B". Relatively simple math.
Unless...
You paddle with people of significantly different weight - like either children or adults in the bow of your boat. - might be over 100 pounds difference in the paddler weight. How to deal with that conundrum? Sliding seats to move the paddler's center of gravity!
 Beautiful sliding seat by Green Valley Boat Works
Some canoes have bow seats only that slide and some have both bow and stern seats that slide. It really depends on how much weight difference you have.
Another thing to keep in mind is that if you are carrying gear, you can re-position your cargo in the canoe to improve trim to account for different paddler weight.
Hope this helps!
Monday, October 4, 2010
Out of Sorts

I've been feeling out of sorts a bit lately. Two weekends ago I went to help a friend stack his firewood and when I came home, I was feeling the cold coming on. It has been tenaciously hanging about for the past week as I've been trying to do my job and keep moving along with my life. Last weekend, I had things to do around the house and needed to help my father with things at his house. I'm not whining, mind you, (OK, maybe a little...) but I'm missing some of my favorite paddling.
Fall paddling is wonderful in the Northeast, United States and is some of my favorite. There can be occasional warm days until about mid October. The bugs are gone and the foliage is colorful. Most paddlers have put their boats away as they think it will be too cold to get out on the water, so there are fewer people to contend with at the put-in. A tart, fresh, crisp apple makes a fantastic afternoon snack out on the water and the warm sun on you feels that little bit nicer than usual. Migrating birds are passing through on their way South.
I haven't gotten as much paddling in this year as I'd like as it has been quite a busy one and we've not had much rain so the water levels have been low. As I was helping my father last weekend, I was looking out the back windows at two of his canoes in the back yard that really drove home the fact that I need to paddle a bit more.
Wednesday, September 29, 2010

Wednesday, September 22, 2010

Tuesday, September 21, 2010
Tech Tip Tuesday
My students always seem to panic when they start working with epoxy because they're concerned that they're not going to have enough time to work with it and that it's going to cure before they're done.
Bah.
Working with epoxy has nothing on steaming wood.

Steaming takes place fairly quickly - after you get the part out of the steam box you have a limited amount of time before the wood starts cooling to the point where it will not bend well anymore. Typically, something like 30 seconds to a minute depending on the type and thickness of wood that you're working with.
So, before you even begin, I recommend that you have your stock wet or pre-soaked, all of your clamps ready, your fixtures ready, any backing straps (either plastic or metal straps used to keep the grain from "running". You should be able to lay your hands on everything you need almost without thinking about it. Plan to have extra hands if you can and absolutely no interruptions. Think through what you're going to do and how you're going to do it before you start.
Put your stock in the steam box and wait the prescribed amount of time - about 15 minutes of steaming time per quarter inch of stock thickness. If it is a thick piece of stock, you may want to swab it with hot water during the steaming process to keep it from drying out and becoming brittle.
When the stock is ready, put your gloves on pull the stock out and start bending! Support the bend with your gloved hands or your strap to help it bend - almost like you're trying to stretch the wood around the bend and clamp or tack in place as is appropriate.
There.
That wasn't so hard, was it? Now all you need to do is to let the parts cool and dry on your form until you're ready to use them!
Here are some pieces that I steamed this evening for the kayak's coaming and storage hatch rim and cover. The pictures aren't pretty, but you get the idea:


The inner rim of the gear hatch is two layers of 1/8" cherry and has been glued around the plywood hatch form after the earlier steaming session. I steamed another thinner layer of scrap - about 1/16" thick as a spacer and taped that around the inner rim as a spacer (so the cover will go on easily) and steamed and bent another two layers for the hatch cover. As I've said before, the goal is a hatch that looks a bit like a Shaker oval box cover.
The coaming is 5 layers of wide (1-1/4") cherry that are 1/8" thick. Two or more layers of narrower (1/2" wide) cherry will be used to form the cockpit rim after the wider portion of the rim has been glued up.
Both the coming and inner rim will have a series of holes drilled through them after finishing to allow them to be sewn into the skin. Obviously more to come, here.
Saturday, September 18, 2010

Subscribe to:
Posts (Atom)


