Saturday, December 31, 2011

Preparation, Preparation, Preparation.

For Christmas this year, DD, who has been playing the flute in her school band for the past year and a half, received a lovely gift from her grandfather.  It is a Shaker-style music stand in cherry with ash pegs and tapered rails for the back of the stand.  It is truly an elegant thing, but these pictures don't do it justice.  I'll post some more pictures when the stand is complete.  I say that because of anything my father hates to do, it is to finish furniture.  He loves to build it, but hates to finish it.  He often says that he'd rather build two complete pieces of furniture than build and apply finish to one. Why? 

Preparation.

To get a good finish requires a good deal of preparation.  The music stand as received was in great shape - very little sanding was going to be required.  However, there were certain to be some random spots of glue left behind from the assembly process.  I had raised the grain with a damp sponge and gone over it with paper when dry before she'd received it, but I knew that I hadn't gotten all of the glue spots.  So yesterday, when she wanted to start finishing the piece, I told DD to take and sand it all over with some 320 grit wet-or-dry sandpaper looking for spots of glue and rough areas.  I told her to let me know when she thought she was done.

All-in-all, she'd done a good job and I only touched up a few spots that I could feel were still a bit rough when I ran my hands over the piece.  We're using Watco's natural oil finish on this as it is more forgiving than a hard finish for DD to work with.  She can wipe it on and wipe the excess off with ease.  As the first coat went on, she could feel some rough spots that were still there and we found some more glue spots that had been missed.  A piece of the 320 grit paper quickly solved those issues and banished any trace of glue. 

Here's the head, precariously balanced on a piece of cardboard with the adjustment pegs barely visible to the left.


Here is the base - still waiting for another coat or two of finish.


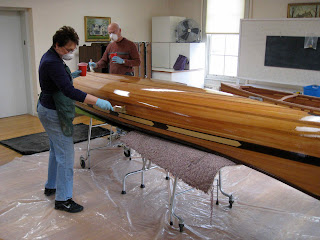
I try to impress upon the canoe builders in my class that preparation is the key to a good finish as well.  The couple building the Prospector Ranger 15 were a bit frustrated by the amount of scraping and sanding that they did before finishing the outside of the hull.  They spent about two and a half class sessions doing this work to prepare the surface.  They were tired and, "just want to be done".  So, after scraping, sanding and inspecting the hull, they brought it up to the dust free area upstairs from the shop and wiped the hull down with denatured alcohol to prepare the surface.  As they applied the first coat of spar varnish to the hull, the beauty began to shine through.


While people may think I'm a task-master when I tell them to go back and do a bit more sanding or a bit more scraping, I think they find that it is worth it in the end.  There's no substitute for good preparation.

Sunday, December 25, 2011

Merry Christmas!


Merry Christmas to all.  

Here's hoping that you don't get too many presents with "some assembly required"!

Saturday, December 24, 2011

Friday, December 23, 2011

Thursday, December 22, 2011

Talk about planning ahead...

Reuters photo by Stefan Wermuth

6 year-old Leo Park is really planning ahead (and kudos to Jeremy Paxton):


LONDON (Reuters) - A worried letter from six-year old Leo Park sparked a mammoth operation to test what is believed to be the world's first chimney specifically designed to accommodate Santa Claus.
The little boy's parents are having a house custom built and when Leo viewed the plans he was concerned that the chimney wasn't big enough for Father Christmas and his famous belly that shakes when he laughs like a bowl full of jelly.

As he was penning his traditional letter to Santa, Leo decided to also write a heartfelt missive about the chimney design problem to Jeremy Paxton, who owns the estate on which the new house is being built.
In childish scrawl the letter reads: "Dear Mr Paxton, I am worried that my mummy's house does not have a big enough chimney. I think Santa Claus will get stuck. Please can you help. Love Leo Park."
Paxton, founder and owner of luxury holiday home development Lower Mill Estate in the southwestern English region of the Cotswolds decided to commission a special formula to satisfy Leo's concerns.
Obviously size was the key consideration to ensure Santa won't get wedged tight on his way to stuffing the stockings and so Paxton enlisted a mathematician to take on the challenge and save the jolly old elf from turning red for the wrong reasons.

The Santa-friendly formula looked at risk factors of chimney entry, the size of St Nick's girth versus the width of the chimney at its narrowest point.

To test what they said was the perfect chimney, Paxton enlisted the help of a stand-in Santa Claus in full padded outfit, a crane, a harness and winch to put the new chimney through its paces.

Leo was invited to watch as the great experiment got underway.

"Go on Santa" he shouted out as the faux Father Christmas was lifted into the air towards the chimney.
A few seconds later and Santa was successfully lowered into the chimney of the half-built house, re-emerging shortly after to deliver a hearty: "Ho Ho Ho."

"I can guarantee that this chimney is big enough for Santa and all the presents," he told Leo.

An excited Leo gave a thumbs up to the St. Nicholas impersonator and rushed to hug him.

"I'm absolutely delighted not just that Santa fitted into the chimney, but that that little boy, Leo, said to me: 'That was the best day of my life' which made the whole thing worthwhile," said Paxton.
The Park family won't be able to inhabit their new holiday home until next December, just in time to get the milk and biscuits ready for their very special Yuletide visitor.

(Reporting by Georgina Cooper, editing by Paul Casciato)

Now then : will Santa be able to get a canoe down that chimney?

Wednesday, December 21, 2011

Wednesday, December 14, 2011

Tuesday, December 13, 2011

Tech Tip Tuesday

 
I'm going to bring up cabinet scrapers again.   I've covered their care and feeding in this earlier post.  They are really a wonderful tool that many woodworkers and boat-builders ignore at their own peril -   particularly for anyone who does any kind of work with epoxy or other hard finishes.

My students who are building the Ranger had some issues when they were rolling on their epoxy to build the coating up to "kill the weave" of the fiberglass cloth.  I'm not sure if they pressed too hard with the roller or kept the epoxy in the cup for too long and it was starting to "kick".  At any rate, the end result was a surface with a great deal of "orange peel".  If you're not familiar with this, it is a texture on a finished surface that has the look of the outside of an orange - the fruit - with all of the requisite divots and contours that go with it.

I'll say this - I'm not a fond fan of letting my students sand on the outside of the hull with power sanders.  It raises an immense amount of dust in the shop, the sandpaper clogs relatively quickly because they tend to exert too much pressure on the sander to speed the process up, and they have a tendency to cut into the cloth without noticing.   None of these things are good.  Usually, the finish is good enough that a little hand-sanding will suffice to prepare the surface for spar varnish or spar urethane, depending on the type of epoxy used.

With the amount of texture on the Ranger's surface, this wasn't going to take a little bit of hand sanding.  It was going to take a lot.

Students tend to be a bit reluctant to try the cabinet scrapers as they're unfamiliar things to them.  They've been taught about them and watched me use them, but rarely use them on their own.  I find that the cabinet scraper does an excellent job of removing runs from the epoxy and leveling badly textured areas quickly.  It is nice because it makes curls of epoxy rather than dust which are a bit easier to clean up than the dust and don't settle like fall-out on every level surface in the shop.  It is also fairly fast and doesn't clog up the same way that sandpaper does.  It is a lot quieter than a power sander on a large, hollow hull, which makes for more pleasant working conditions, too.

I have a method to deal with this reluctance.

I borrowed it from Mark Twain.  (Think Tom Sawyer and white-washing the fence.)

Let me explain the method.

First, I give the students some sandpaper and tell them what needs to happen to prepare the surface of the canoe for varnish.  I let them sand for about 10-15 minutes which is much more tedious than it sounds.

While they are sanding, I sharpen up a few cabinet scrapers per the instructions in the previous post noted above.  I then take one of the scrapers and proceed to do a relatively quick job of preparing a large area of the canoe with the scraper.  This usually coincides with the point in time when they are getting fed-up with sanding.

When they see what an "easy" job it is with a cabinet scraper, they ask if I have some more scrapers they could borrow and, oh yeah, could I give them a quick refresher course on how to sharpen the scrapers.

Works every time.

Monday, December 12, 2011

Monday Again?


Dang.  Somebody either put me out of my misery today or bring me a triple espresso.