Tuesday, January 31, 2012

Tech Tip Tuesday

I've said it before, and I'll say it again:


It's not the clothes that make the man, it's the tools. 

                                                                        -Canoez


In this case, we're talking about planes.  There is a great variety out there, the good, the bad, and the just plain ugly.  For the type of small boat building that I do, I find a pretty large variety of planes to be pretty useful.  For most novice boat-builders, it can be challenging to learn the skills you need, and this is even worse when you've got bad tools.  Selecting good tools can be hit-or-miss, even if you are careful.  The best way to select a good tool is to try one out.  This can sometimes be done at woodworking trade shows.  If that's not possible, see if you can find someone who has the tool that you're interested in so that you can try it out.  Usually, this helps weed out the really bad ones.

Let me mention at the outset that you can go and buy some great planes right off the shelf from makers like Lie-Nielsen Toolworks and Lee Valley Tools.   For slightly less money, I've also been hearing some good things about the re-worked Stanley Sweetheart line of planes, too. Then again, you can get into some seriously rarified air with infill planes from the likes of Karl Hotley.   Beautiful, but certainly out of the reach of most of us.

These are some of the planes that I use and I'll point out some of the good and bad.

My first go-to plane tends to be a block plane.  I do prefer a low-angle plane for working soft cedar.  These planes are used for shaping stems, fairing the hull and smoothing the sheer.  Handy as all get-out.  From the bottom up we have a Stanley #102, a Stanley 12-247, two Stanley 60 1/2 low-angle, and a Borg brand plane.


The first plane I ever bought was the 12-247 at the top of the image below.  It's really a carpenter's tool and lacks some sophistication.  It and the #102 (at the bottom of the image below - purchased last year.) are very similar in that they don't have adjustable throats (you can't limit the chip you're taking off), the blade is set at a high angle, which is fine for many operations, but to adjust them is very difficult for a beginner as there is no skew adjustment lever on the blade and no threaded adjustment.  I usually stack the plane's sole on a piece of paper to get the proper cut depth.  Simple trick, but makes these planes relatively easy to adjust. 


The second plane I bought was one of the 60 1/2's in the early '90's.  It's a workhorse and has been made for some time.   It was a world of difference from the 12-247 for what I do - and it was reasonable.  It did need a bit of tweaking out of the box, but it wasn't long before it became a trusted and reliable tool.  It has a skew adjustment for the blade, the throat opening can be adjusted and the blade adjustment can be done with a knob that moves a fine screw thread.  I needed another one about five years later and figured I'd buy the exact same model.  It was not the same.  The differences are subtle, but represent manufacturing changes made to lower the cost.

First is the locking lever for the cap.  On the left in the image below is the older unit and on the right is the newer one.  The old locking lever and cam was cast - a robust and effective thing.  The new locking lever is stamped steel and doesn't stay locked.  It's horrible.


While not a disaster, you can see the difference in the quality of the knobs on these planes - can you guess which is which?


If you guessed that the plane on the left with the nice crisp looking knob is the older one, you'd be right.  There are other subtle and not-so subtle differences.  The opening for the throat plate was not well machined and required a file to clean it up before it moved smoothly.  Then, the cam that is underneath the knob in the picture above, doesn't appear to have been either properly designed or cut as it wouldn't let the throat open and close the way it should.  (i.e. the opening was limited and too small.)  The quality of the grinding of the castings was also not as good on the newer unit.  Quite frankly, I have retired it - it's not fit for use.

I then got a Borg brand low angle block plane from our friends up at the WoodenBoat Store.  Sadly, they no longer carry this plane.  It is very similar to some older Stanley designs, is almost exactly like one of the Lie Neilsen planes and is very nice for the price.  It is very comfortable to hold and use, has an adjustable throat, a nice threaded blade adjustment and a secure locking wheel to hold the blade in position.  Oh, and the fit and finish were excellent and the tool was ready to go out of the box.  

One big difference between the Borg and the Stanley 60 1/2 planes is the blade thickness (and probably the material (Borg on the left, Stanley on the right - note the shear mark on the Stanley's edge versus the nicely ground Borg) :


That's a significant difference in thickness.  Thicker blades tend to chatter less and cut better.  You can upgrade tools by purchasing new blades (irons) from Ron Hock at Hock Tools or one of his distributors.  They offer drop-in replacements for common planes that are thicker than the originals and made from high quality tool steels that are properly heat-treated.  A better quality iron can make a big difference in the performance of the tool.  That's worth repeating.  A better quality iron can make a big difference in the performance of the tool.

This is another plane purchased from the WoodenBoat Store and is unfortunately a bit of a disappointment.  It is an Anant brand rabbet (or rebate) plane that is a copy of a - you guessed it - Stanley product.  The tool's fit and finish is questionable as is the perpendicularity of the side of the casting to the sole.  No matter what I do, I can't seem to get the blade to hold an edge - I should probably spend some time tuning this up and getting a replacement blade, but I can't seem to get myself to do it.  Rabbet planes are very helpful in establishing a rolling bevel on a cedar strip canoe that doesn't use cove-and-bead strips because the blade runs the full width of the tool.


 The next planes that I use a lot are spokeshaves.  Very useful in shaping stems or fairing the hull.  I find the flat-soled spokeshave best for stems and the round-soled spokeshave good for getting into some of the hollow shapes on the outside of canoe hulls during fairing.  The two blue-handled planes are Record A151's in both round and flat soles.  (Model 151 is a Stanley number - surprised?)  The 151's are easy to use and adjust and have a nice set of double adjusters at the top to allow depth and skew of the iron to be adjusted.  The green handled spokeshave with the axial curve is a Groz brand plane.  I'm planning to use it on paddle shafts after going from rectangle to octagon cross-section.   It just has the single screw to adjust the blade.  It is definitely not ready for use yet and will need sharpening and clean up of the sole before I can use it.  Adjustment of the blade looks to be difficult.  Groz also makes a 151 model today with similar adjustments to the Record in both flat and round soles and looks to be a better quality tool than the one I'm showing.


The Record spokeshaves need some Hock blades, methinks.

The planes below are from Lee Valley - I tend to have one or the other in my shop apron for tasks that I just can't do with a larger block plane.  They are tiny.  The top plane is a reproduction of the famous Leonard Bailey #51 plane.  My father has an original that I've tuned up and sharpened up for him, but he would never part with it so I had to get my own.  The bottom plane is a copy of a Stanley #100 Squirrel-tail plane.  Both are fantastic tools for lots of odd jobs - the quality was outstanding and they were producing shavings right out of the box.  The soles and blades are lapped (a sharpening method that produces excellent finish and flat parts.)


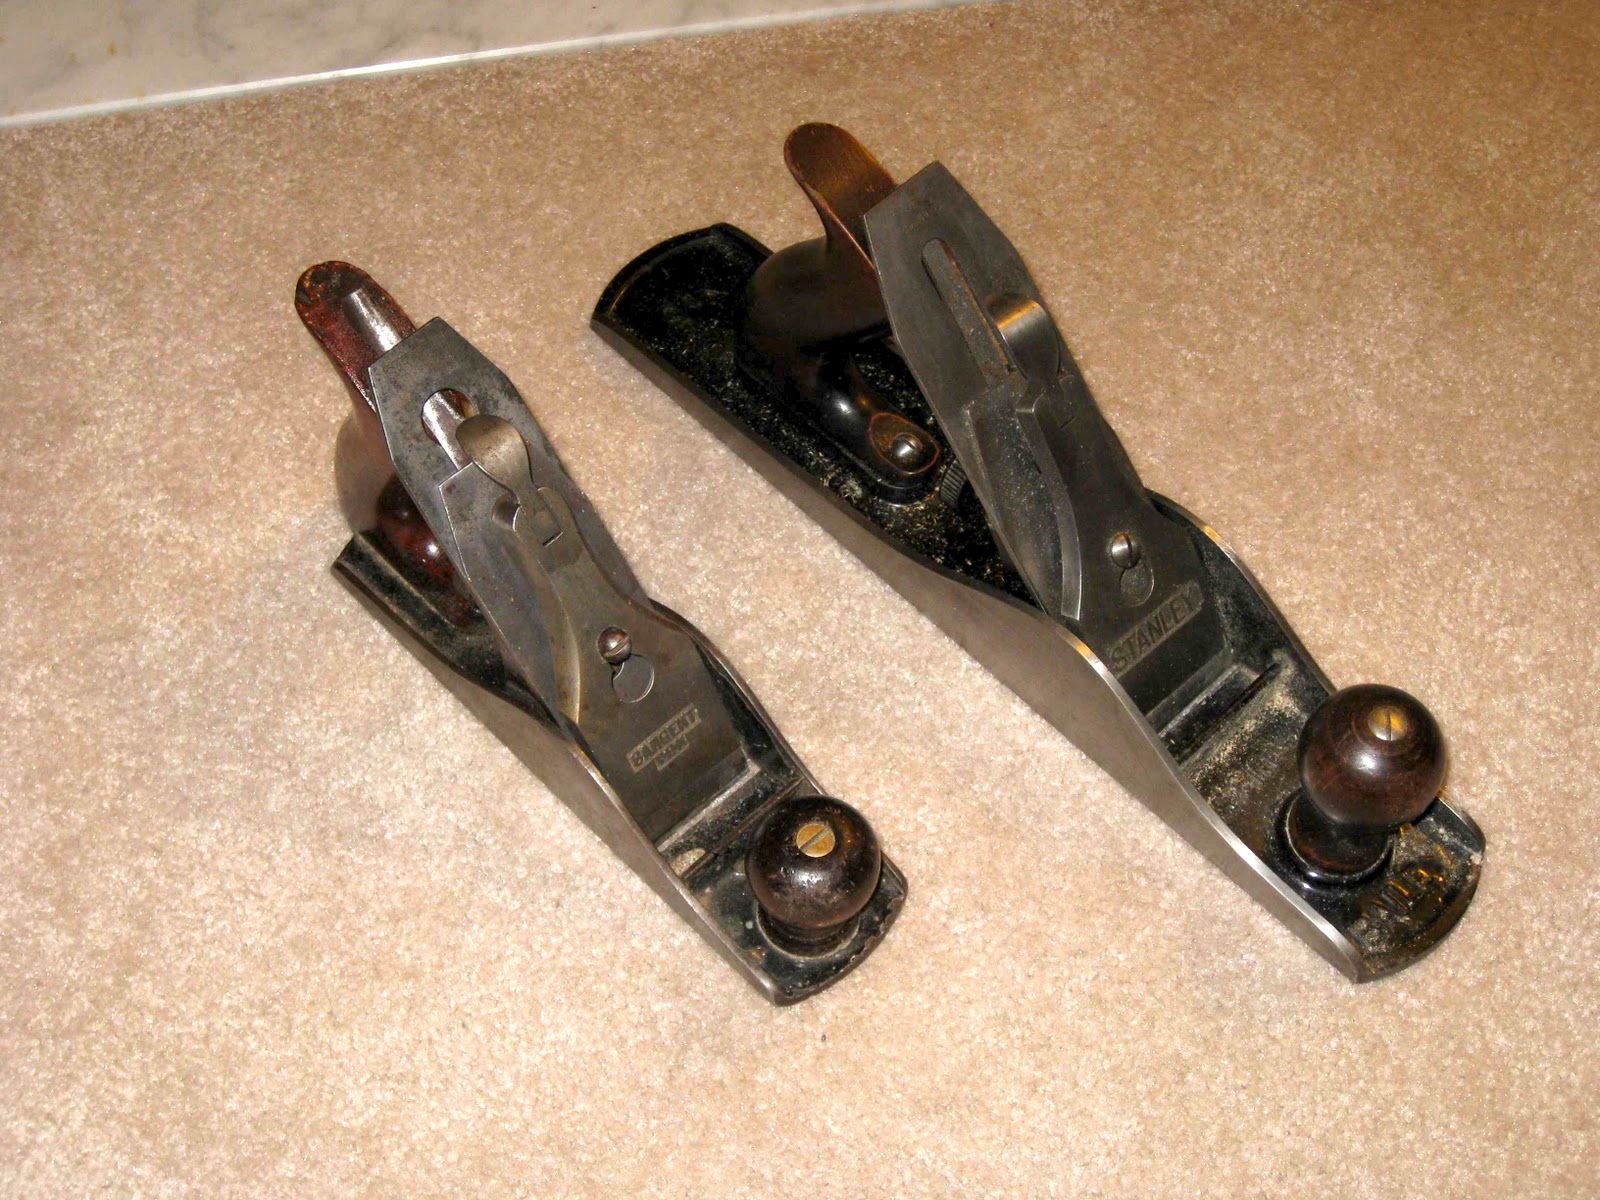
These planes see less use, but are still handy.  One is a Sargent smooth plane (on the left) and the other is a Stanley 5-1/2 bench plane.  I use them both for truing up edges on boards before I put them on the jointer. (power, jointer, that is, not jointer plane)  Usually this involves taking off a high spot.  I also find these useful for trimming the centerline of the hull's "football".  Both of these planes were given to me by a co-worker in return for a table top.  When the arrived, they were both covered in rust and looked horrid.  A little careful cleaning, flattening and sharpening has returned them to good working order.  I'd love to know what the steel is in the Sargent's iron, as it is very, very hard and holds an incredible edge.


These planes - and ones like them at the school where I teach will be instrumental in the shaping of paddle blades for the canoe paddles.

Older tools are often available from used tool vendors, at flea markets, tag sales, on eBay, or Craigslist.  Very often, older tools can be had for a good price.  You should, however do your homework to make sure that it is a good tool and is in good physical shape (i.e. is the casting cracked?  are all the parts there?  is it damaged in some way?)  Also, not all older tools were good or successful - which is why they are available.  A quick trip to Patrick's Blood and Gore (yes, that's the name!)  pages will provide some good information on Stanley tools, and there are many others with information on Record, Sargent and others.  Learn about the tools you're planning to buy and what a fair price might be - sometimes they can be had quite cheaply!

One other thought is to learn to make your own wood-bodied planes - there are several books and web pages on the subject.  I'd try it myself, but I'm worried that it would become rather addictive.

All of this is useless, however, if you don't know how to sharpen, adjust, and maintain these tools.  A dull plane is useless - even a $4000 Hotley!

Wednesday, January 25, 2012

Tuesday, January 24, 2012

Tech Tip Tuesday

Digging for resources can be a significant amount of my time when I'm working on something.  For that reason, I've got a pretty extensive boat-building library here at home that I've posted about before.  It's not as extensive as the library at WoodenBoat's office - I really wish that I could get there more often, because it's pretty impressive.  Inter-library loan often has some of the books I'm looking for.

Another place that I go looking for information is the Web.  The Wooden Canoe Heritage Association (WCHA) website has excellent canoe-related resources and the WoodenBoat Forum has more general boating-related.  Qajaq USA has some neat things related to traditional kayaking - specifically Greenland-style kayaks and accessories.

One of the best places to go is to trade-shows.  Vendors of materials, hardware and as well as builders and designers.  Other home-builders at these shows are often willing to talk about their craft and some of the lessons that they've learned.  I often find that you learn more from the amateurs than you do from the professionals.  There is not substitute for getting out and talking to people.

Museum are fantastic repositories of the unique, the rare and the historically important that you'll find nowhere else.  Many have both books, documents and artifacts that you can review if you're willing to take the time to make an appointment and go work with an archivist.  Places like Mystic Seaport, The Penobscot Marine Museum, the Adirondack Museum, the Antique Boat Museum, the Canadian Canoe Museum,  the Peterborough Museum - I could go on and on.

Resources for paddle and oar making are pretty thin, indeed.  They are generally treated as an after-thought in books on boat building and usually a chapter in the rear of the book is devoted to the construction of paddles or oars.  While anyone can make a paddle, it takes some knowledge to make a great paddle - things like design, and performance issues, wood selection and aesthetics - let along, fitting for the user and the boat.   

I know of two books on Greenland Style paddles, one on canoe paddles,  and none specifically on oar or double-bladed paddle fabrication.  The Greenland style books are available from Brian Nystrom (Greenland Paddles : Step-by-Step)  and Qajaq USA in the form of a free PDF written by Chuck Holst - Making a West Greenland Paddle. The two best resources that I've found for what I'm doing are Murat's aptly named blog Paddlemaking (and other Canoe Stuff) and the book, Canoe Paddles : A Complete Guide to Making Your Own. by Graham Warren and David Gidmark.  Graham also runs Moosehead Canoes and Paddles in the UK and offers great information there and DVD information on paddle making.

What are some of your sources of information?

Sunday, January 22, 2012

Happy Birthday L.L. Bean!


This year marks  L.L. Bean's 100th anniversary.  The well known outfitter has been doing business supporting the needs of outdoor people since 1912.  While I'm sure L.L. Bean himself would recognize some portions of his company, I think he would find some portions of the modern company unrecognizable.  In recognition of this anniversary, they've put the "Bootmobile" (seen above in front of their flagship store in Freeport, Maine) on the road for a tour.

In addition, they have also offered a series of special limited edition offerings for the celebration of this milestone.  Included are the following items:


Produced by Shaw & Tenney in Orono, Maine will be a series of paddles that are made from re-claimed "sinker" softwoods recovered from the Penobscot river.  It's entirely possible that the wood in the paddles is as old as L.L. Bean!


Another delight that is being produced for L.L. Bean is the limited edition Old Town 16' canoe.  I'm not sure exactly what Old Town model that it is and they're not specific.  Whisperings indicate that this canoe is produced for Old Town by Jerry Stelmok up at Island Falls Canoe company in Atkinson, Maine.  Only 10 of these beauties will be built, so if you want yours, you'd better hurry up and place your order - only $7,500.00 with a $300.00 freight charge.  Sadly, I think that these will wind up as collector's items, not canoes to be paddled and enjoyed.
Certainly this company has a well-deserved reputation for excellent product quality and customer service.  Here's looking forward to their next 100 years!

Wednesday, January 18, 2012

Monday, January 16, 2012

The New Challenge.

Well, I've started in on a new challenge.  I'm making a change for a semester of teaching from cedar-strip canoe building to paddle making.  I'm going to be offering a class in how to build you own single-bladed canoe paddle, double-bladed canoe or kayak paddle, Greenland style "stick" paddle or, for those adventurous sorts, oars.  I've built them all before, but haven't taught a class on the subject, so this should be an interesting challenge.

Sign-up for classes was last Saturday morning and I was amazed to not only fill the class, but wind up with two more students for a total of 12. 

I've got a bit of teaching material to put together before next weekend, but otherwise I'm prepared. 

Here's looking forward to the mayhem and posting on paddles for a bit!

Wednesday, January 11, 2012

Tuesday, January 10, 2012

Tech Tip Tuesday


 Boatbuilders are peculiar creatures.  They tend to be very picky about the things they use to build their boats and will go to the ends of the earth to get them.  One of these items (obviously) is wood screws.  First of all, it should be recognized that there are myriad sizes, types and materials of screws.  The choice is really endless.  However, for boatbuilders, the list tends to narrow considerably.  

We'll work with material first.  Typical materials are brass, stainless steel and bronze.  Brass tends to be a bit lower on the list because of it's softness and it's zinc erosion in salt water.  Brass also tarnishes to a greenish color.   Stainless steel is nice for corrosion resistance, is harder than the brass and doesn't tend to discolor.  Bronze is very nice because of it's hardness and good corrosion resistance and weathers to a brownish patina.

Screw driving types are next.   Allen (hex) drive, tend to be rarely found (except on machine screws and some flat-head screws) and there are those traditionalists who will use Robertson (square drive) screws - mostly on Canadian canoes to keep them "original".  Philips screw drive is also found but rarely.  The reason these three types tend to lag is that they can fill with finish and then be difficult to remove or replace.  Slotted or "straight" drive tends to be the screw drive of preference as they can be cleaned out relatively easily and if not, a piece of hacksaw blade can generate a slot quickly where one didn't exist.  


As far as driving screws goes, I like to use a taper-drill bit set.  The one below is from Fuller.  While they aren't the only supplier of these bits, they are one of the better ones - and made in the USA!   With this set you can set up the counter-sink to drive the screws flush with the wood, or counter-bore it so the screw head us beneath the surface.  Also in the kit are stop collars to set the depth and tapered plug cutters to make plugs to fit the counter-bores.  A very nice kit, indeed.

On the lid of the box is beeswax.  I use beeswax to lubricate the screws as they are being driven.  I prefer this to soap or other lubricants as the pH of the soap and some other lubes can cause corrosion of the screws - this doesn't seem to be the case with the beeswax.  One good tip here is that if I'm driving brass screws I tend to use a steel screw of the same size to create the threads in the wood for the brass screw and remove it.  This way, I'm reducing the torque applied to the brass screw to drive it, and reducing the chances of twisting off the screw or stripping the head.

Below the box is one of my favorite driving tools - a reversible, ratcheting screwdriver (with interchangeable tips)  I really prefer to drive screws by hand.  The feel lets you know if the screw is biting or if you're over-torquing the screw and are about to twist it off.  A bit-brace works well, also.  I tend to avoid using my electric drill to drive screws (even with the clutch), but I've gotten a nice small Bosch power driver that I'm trying out.  So far, it doesn't seem to be over-torquing the screws, but I'm still skeptical and prefer hand-driving to power driving.


There are times, no matter how careful you are, when you will be "screwed".  The head will strip,  or even snap off and you want to remove the remainder of the screw.  There are two good options.  The first is a tubular screw extractor like the one below:


They go in a drill and remove a cylindrical piece of wood which you can then plug with a dowel.  I've seen home-made versions of these ground from large roll pins using a Dremel tool.
If you've just stripped the head, or think there is enough material, another alternative is the Alden Grabit.  The Grabit is a combination of center drill and screw thread made from hardened material.  You chuck it in your drill and drive it in reverse to create a pocket with the center drill and then turn the bit around and drive it in reverse to set the screw thread in the pocket and un-screw the damaged hardware.  It really has to be tried to be believed.  It works really well - better than an Easy-out, in my opinion.


Happy screwing!

Monday, January 9, 2012

Monday again?

Isn't it great to get that pesky weekend out of the way?

Wednesday, January 4, 2012

Tuesday, January 3, 2012

Tech Tip Tuesday


While the above video may seem to be a bit out of place for a Tech Tip Tuesday, I assure you that it is not.  We all manage to get by with a little help from our friends.  This is especially true of boat builders of all kinds - and it makes life a whole lot easier and cheaper.

When building a boat you will require a lot of skills, a lot of materials, and a lot of tools.  Generally, unless you've been building boats for quite some time, you will not have accumulated all of these.  Reading books only goes so far. 

Let's start with skills.  Boat building uses a wide variety of skills - chief among them wood working. (because we're talking about wooden boats, here!) Because many people have had at least a little exposure to wood working or know someone who does, finding some of those basic skills is not hard.  Working alongside an experienced woodworker or boat builder is a fantastic way to learn if they're willing to share.  Even if they may not know much about boatbuilding, they may have networked and can introduce you to someone who does.  Alternatively, many classes are available in your community - either via night school classes or a technical school.   Last but not least, there are online communities such as the WoodenBoat Forum, the Wooden Canoe Heritage Association, and Yahoo! Groups, just to name a few where you can run into skilled people, make friends, learn and network.  Just remember : none of us are as smart as all of us.

Materials can be hard to come by - some are pretty unique.  Friends are a good starting point to find vendors for bronze hardware, wood and other marine supplies and hardware.  Sometimes, they even have a stash of these items that they are willing to part with for little or no money - that item you're looking for that they were saving for that boat that they were planning to build "sometime".  Wood workers who build furniture for a hobby are fairly common (we are - really!) and usually have a handle on good sources for the type of wood that you're looking for or, as I've previously mentioned, they may have a stash of wood.

It also takes a variety of tools to build a boat.  Hand tools are relatively easy to find and most people have some of them.  Power tools - and in particular, stationary power tools are less common.   This is where you find out who your real friends are.  They're the ones who will let you use or help you to mill stock with their power tools.  They are also the ones who will loan tools to you.  When that type of friend comes along, realize that they are a "keeper".  They are few and far between.  To loan out your tools is putting serious faith in the person that they are being loaned to.  Never betray that trust.  Always treat those tools like they were your own and return them in a timely manner.  You never know when you might need a tool again!

We all do a little bit better with some help from our friends!