
Wednesday, June 27, 2012
Tuesday, June 26, 2012
Tech Tip Tuesday
After you build your boat, you need to outfit it. With canoes, this is usually a relatively simple task - a few holes or a pad eye for mounting lines to the bow and stern, maybe a few foam blocks to carry the boat, a bailer made from half a milk jug, a couple of pieces of rope, some paddles and maybe a thwart bag, wanigan, or duck boards if you want to get really fancy.
Not so with a kayak.
Let's start with the fact that the boat cost me about $275 to build.
When I built the kayak, I added grab loops to the hull as part of a reinforcing strip at bow and stern that I was going to add anyway, so essentially, it was "free". These are simply stitched to the hull fabric. I think they came out looking nice and will let me attach a line at bow or stern for carrying the boat on the car or tying the boat to a dock or float if I wish.

I chose to add elastic deck rigging in front of my cockpit, so I added that as a convenience to hold my paddle, a compass, maps or a small deck bag. I needed to make some loops to attach the elastic rigging to the hull. To do this, I cut equal lengths of webbing and heat-sealed the ends. I then folded the fabric in half to create a loop. Using my grommet kit, I cut holes through the webbing and crimped the grommets in place which closed the loop. A #8 flat-head brass screw fit perfectly into the grommet hole and was what I planned to use to attach the loops to the frame. To do this, I had to make two holes - one in the fabric and one in the frame. To make the hole in the fabric, I heated a nail until cherry red with a torch and melted a small hole in the fabric where the screw would go to prevent the fabric from fraying. I then drilled a pilot hole in the frame for the screw. Once the hole was ready for the rigging, I applied some Dolfinite bedding compound to the screws and drove them into the pilot hole. This cost me a few bucks, but probably not more than $5.

For the gear hatch, I lined the inside edge of the cover with weather-stripping to seal the cover to the rim. I then made up two nylon straps with grommets in the ends and side-release buckles to keep the hatch closed. Using the process above, I mounted the straps to the hull. Probably about $7 for material.

Earlier during the build process, we added sliding foot braces to the frame with supplied hardware. Cost? $40.

As you could see in the picture above, there was something in the end of the boat. Actually both ends. Those are boyancy bags or float bags to keep the kayak above the surface of the water in the event of severe damage. They simply tuck into the ends of the kayak and were $42 for both. In my opinion, these are an indispensable safety item for this design.

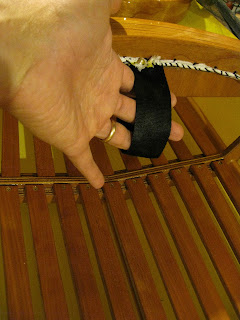
In the cockpit, I wanted to have a bilge pump at hand - another safety item. Fortunately, I already had the pump. (Typically around $20...) To hold the pump in place, I took some strips of two-sided Velcro, sewed a tab on one end of the strips (as a pull tab) and screwed the strips to the frame with a screw and finishing washer like so:

Cost? Less than $2 for both.
Here's a picture with the pump on place:

One of my personal mottoes is "Why Suffer?" Because I like to be comfortable, I bought a Seattle Sports inflatable seat/backrest combination. It has a self-inflating Therma-Rest style seat and a foam back panel with a small pouch on the back. To hold it in place in the kayak, I sewed a loop of webbing at the back of the cockpit and two other loops at the front with D-rings to clip the back-rest to.

The seat cost me $85 and the mounting points were maybe $4. Looks comfy, doesn't it?

To help keep water out of the boat when I'm paddling, I bought a spray skirt. The Seals Tropical Spray Skirt looked ideal for the type of paddling I like to do, so I pried open my wallet for the $100 that they wanted for the thing.

To keep water and debris out of the hull when I'm transporting the boat, I purchased a Seals cockpit cover - another $35.
Paddling? A life jacket is a must. Cost? From $80-$200 for a good one. Don't leave home without one.
Finally, you've got to have a paddle. A good paddle can run you anywhere from about $100-$300 for a modern touring paddle or a nice Greenland "stick". Fortunately, yours truly makes his own paddle and has a nice Greenland style stick ready to go!
It truly amazed me to think that the cost to outfit the kayak was more than the cost of the boat itself, but I guess I shouldn't be surprised. This is one of the reasons that I make gear when I can rather than buying it. Guess I've got to learn to make more gear!
Not so with a kayak.
Let's start with the fact that the boat cost me about $275 to build.
When I built the kayak, I added grab loops to the hull as part of a reinforcing strip at bow and stern that I was going to add anyway, so essentially, it was "free". These are simply stitched to the hull fabric. I think they came out looking nice and will let me attach a line at bow or stern for carrying the boat on the car or tying the boat to a dock or float if I wish.

I chose to add elastic deck rigging in front of my cockpit, so I added that as a convenience to hold my paddle, a compass, maps or a small deck bag. I needed to make some loops to attach the elastic rigging to the hull. To do this, I cut equal lengths of webbing and heat-sealed the ends. I then folded the fabric in half to create a loop. Using my grommet kit, I cut holes through the webbing and crimped the grommets in place which closed the loop. A #8 flat-head brass screw fit perfectly into the grommet hole and was what I planned to use to attach the loops to the frame. To do this, I had to make two holes - one in the fabric and one in the frame. To make the hole in the fabric, I heated a nail until cherry red with a torch and melted a small hole in the fabric where the screw would go to prevent the fabric from fraying. I then drilled a pilot hole in the frame for the screw. Once the hole was ready for the rigging, I applied some Dolfinite bedding compound to the screws and drove them into the pilot hole. This cost me a few bucks, but probably not more than $5.


As you could see in the picture above, there was something in the end of the boat. Actually both ends. Those are boyancy bags or float bags to keep the kayak above the surface of the water in the event of severe damage. They simply tuck into the ends of the kayak and were $42 for both. In my opinion, these are an indispensable safety item for this design.

In the cockpit, I wanted to have a bilge pump at hand - another safety item. Fortunately, I already had the pump. (Typically around $20...) To hold the pump in place, I took some strips of two-sided Velcro, sewed a tab on one end of the strips (as a pull tab) and screwed the strips to the frame with a screw and finishing washer like so:

Cost? Less than $2 for both.
Here's a picture with the pump on place:

One of my personal mottoes is "Why Suffer?" Because I like to be comfortable, I bought a Seattle Sports inflatable seat/backrest combination. It has a self-inflating Therma-Rest style seat and a foam back panel with a small pouch on the back. To hold it in place in the kayak, I sewed a loop of webbing at the back of the cockpit and two other loops at the front with D-rings to clip the back-rest to.


The seat cost me $85 and the mounting points were maybe $4. Looks comfy, doesn't it?


To keep water and debris out of the hull when I'm transporting the boat, I purchased a Seals cockpit cover - another $35.
Paddling? A life jacket is a must. Cost? From $80-$200 for a good one. Don't leave home without one.
Finally, you've got to have a paddle. A good paddle can run you anywhere from about $100-$300 for a modern touring paddle or a nice Greenland "stick". Fortunately, yours truly makes his own paddle and has a nice Greenland style stick ready to go!
It truly amazed me to think that the cost to outfit the kayak was more than the cost of the boat itself, but I guess I shouldn't be surprised. This is one of the reasons that I make gear when I can rather than buying it. Guess I've got to learn to make more gear!
Wednesday, June 20, 2012


Tuesday, June 19, 2012
Tech Tip Tuesday

I was having a discussion with someone the other day regarding the use of plywood in the skin-on-frame kayaks and canoes that I'm building this person took exception to the fact that plywood could be a "traditional material" while my build method I consider to be "non-traditional". While the building method is non-traditional in that I don't use steam-bent ribs to provide hoop strength in the hull of the boat, I really do consider plywood to be a traditional building material.
How so you say? Plywood has been around as a building material since the ancient Egyptians. Check this out:
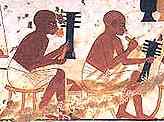
The oldest piece of plywood was found in a third dynasty coffin, made of six layers of wood each 4 mm thick and held together by wooden pegs. [11] Like modern plywood the grain of its layers was arranged crosswise to give it added strength. [12] From 1750 BCE onwards this plywood technique became widespread. The thickness of the layers was reduced to less than three millimetres and they were stuck together with a glue made from bone, sinew and cartilage applied hot. [13]
(http://www.reshafim.org.il/ad/egypt/timelines/topics/wood.htm)
So, why is plywood such a great material? Well, for one thing, it usually starts out flat and rectangular in common sizes. The use of unequal numbers of layers (or plies) of wood helps to keep the plywood from warping. It's made from layers of wood with the grain of the plies at 90° to one-another and bonded together. This makes it relatively dimensionally stable with changes in moisture content. It can be formed to make shapes. It doesn't split all the way through if you nail or screw it together without pre-drilling. The strength is consistent in both directions. It generally takes finish well. It doesn't tend to check through and through. It can have decorative veneers on the faces to be pretty. The adhesives used to bond the sheets together can be made from water resistant resins. The use of some modern marine plywoods have made some great boat designs affordable and achievable by those without extensive woodworking or boat building skills.
All of those things being said, not all plywood is created equally - there are softwood, hardwood, marine, aircraft and decorative plywoods to name just a few. Some plywoods have voids or patches in the middle or outer laminations. Some have no flaws allowed on the exterior, but voids or patches allowed on the interior. Whatever your application, be sure to select the best plywood for your application and remember the long history of this venerable material. Above all, don't forget to do your homework!
Monday, June 18, 2012
Father's Day

I've got to say, I had a very enjoyable Father's Day yesterday. We'd been thinking about going on the Father's Day paddle with the Norumbega WCHA folks, but it's a bit of a hike. (Sometime, Fitz, sometime.) Instead, we decided to break in DW's new Tupperyak and to do a mild shake-down for an up-coming paddling trip.
One of our favorite "accessible" places to paddle is a local state park with an easy put-in and decent parking. The paddle is usually not difficult, but the scenery is pretty and if you're there at the right time of year, you can pick wild blueberries right from the boat. The weather was perfect, so we figured we'd better go. We were, however, a bit taken aback when we arrived to find all of the parking was taken - we'd have to park in the woods along the access road. Once we got to the water, the reason became apparent:

There was some sort of kayak skills class going on with a large group of people. It was mostly a sea of plastic and fiberglass with the exception of these two wooden beauties. One appeared to be a Pygmy or CLC kayak and I couldn't place the design of the cedar strip kayak, but it was reminiscent of Nick Schade's design work.

Our contribution to the line-up was DW's new Tupperyak, the Charlotte (solo lapstrake canoe) and a Wabnaki (tandem cedar strip canoe):

DW appeared to be enjoying her new boat and it appeared to do quite well keeping pace with the rest of us.

Mountain Laurel was in bloom all around the edge of the lake and was quite spectacular. I don't know if it is due to the relatively mild winter or not, but we seem to have had particularly impressive displays of Rhododendron and Mountain Laurel this year. The Laurel ranged from a white to a pale pink in color.

We did a leisurely circuit of the lake keeping relatively close to shore to be able to see the flowers and other plants growing at the edge. DS is getting used to paddling in the front of a tandem canoe - he's not done that before. I do need to start feeding that boy cheeseburgers or something as the front of the canoe was up in the air. (-and no, the author does not need to go on a diet!) DD was doing well, but seemed to me to be using a great deal of the initial stability of the canoe she was paddling.

When we got back to the ramp, DS decided that he should take the boat that DD was paddling out for a spin. Still needs a bit of practice, but he's getting there. It's mostly his sense of balance that hasn't fully developed yet.

Sunday, June 17, 2012
Happy Father's Day!

There once was a dad with a boat
On which he would constantly dote
His wife said, "Oh, honey
You've spent all our money!"
"Perhaps, but the family's afloat!"
- Courtesy of our friends at Hamilton Marine.
Thursday, June 14, 2012

Wednesday, June 13, 2012

Monday, June 11, 2012
Forgive me Father, for I have sinned...

I have a confession to make.
Something I never thought that I would do.
Ever.
Never, never, ever.
To be honest, I still feel a little bit dirty about it, but I knew what I was doing and the consequences of my actions. I think that the priest at the Church of the Holey Wooden Boat would make me say about 9 Hail Mary Celeste's and tell me to repent my sins. Maybe a few extra.
Still, over the weekend, I half expected this:

What prompted my sin? Well, it's all because of sandals and a raincoat. Herein likes the story.
On Saturday, DW decided that we should take DS and DD over to a local outdoor goods store to get some sandals for the three of them and a new raincoat for DD so she could pass along her old one to DS in preparation for a paddling trip we will be taking later in the month. When we arrived, somehow we wound up gravitating over to the boat display. Some of the boats were 50% off and were really quite good prices. If you bought a boat, there was also a discount on the accessories. DW spent a remarkably long period of time looking the boats over. We then went and purchased the requisite sandals and jacket.
Fast forward to Sunday.
I'm getting ready to run out and do some errands with DS for a tree-house that we are planning to build. DW and DD had already headed out for a class the DD takes on Sunday afternoons. Coincidentally, the outdoor goods store is on the way to the class and unbeknownst to me, DW & DD decided that a pair of water shoes was in order and made a stop at the store. Shortly thereafter, my cell phone rings. It's DD. Mind you, DD doesn't have a cell phone, so she's calling from her mother's phone. The exchange went something like this:
"Daddy, we're at the store and they only have two of the (sale priced) boats that Mommy likes left."
"Uh-huh."
"Well, Daddy, you'd better hurry up and get over here before they're gone."
*CLICK*
So, being the nice guy that I am, I went over to the outdoor goods store and picked up the boat of SWMBO's wishes - along with a paddle for her, some Yakgrips and a new pair of Hullraisers for my roof rack.
What was the boat of SWMBO's wishes? A Tupperware(tm) bathtub:

It's an Old Town Vapor 12XT. It's wide, stable and nearly indestructible. Last summer, she borrowed a very similar small plastic kayak from friends we were visiting and liked it. Not as much as the Charlotte lapstrake canoe that she'd been paddling earlier that day, but she liked it.
So. "Why? Why? Why? " I can hear you ask - "Canoez - you're a boat-builder. Why does your wife have a plastic boat?" Well, I haven't gotten around to building DW a boat and I guess it boils down to keeping the women in my life happy. Both DW and DD both like to paddle the Charlotte, but for some reason aren't particularly comfortable with my Wee Lassie. They're not really that different dimensionally, but they claim that the lapstrake boat is more stable.
Both of them wanted to paddle the Charlotte for the upcoming canoe trip, while DS and I will be paddling a tandem canoe. Being that we only have one Charlotte at the time-being and it's not likely that I'll be building one in the next few weeks, I had a dilemma. DW decided that I should solve that with the new Tupperyak.
So, if you see me out flagellating myself with throw bag lines or beating myself over the head with a paddle, just remember that I'm atoning for my sins...
Saturday, June 9, 2012
Leaving the Nest
There comes a time when the canoes that my students have built need to leave the nest as it were. It's a bit of a bitter-sweet occasion for me, as the students that I've gotten to know over the past few years are ready to take their boat and enjoy it and I won't be seeing much of them any more. Last night one of the canoes that has been a while in the nest (3 years!) left with her builders. They were taking her to their new camp by the lake where she should be right at home.
Right before the boats leave, however, we all get to enjoy their beauty at the school's annual exhibition. Here she is with her very happy builders:


After much hard work by the builders, the caned seats were also finished. This was a "last minute" project in some regards. The brass deck hardware went on the morning of the show and the seats and thwart were installed the day before!


My boat is finished in yellow polyurethane. I think it came out looking rather nice, actually. As the devil is in the details, we've got cherry for the floors, coming, hatch cover and hatch rim.


So, another year of boat-building at the school comes to a close. I'm really looking forward to seeing my students out on the water this summer!
Right before the boats leave, however, we all get to enjoy their beauty at the school's annual exhibition. Here she is with her very happy builders:

Note the rain gear on my students. It was coming down in buckets and we
were very, very happy to have the tent - leaks and all. You'll note
that the images are a bit dark because of the weather. As paddlers, we all know we've got to have a little rain, or there would be nothing to paddle on! Here's a shot of the feature strip:

A couple of obligatory details of the mesquite decks (hollowed underneath as they were incredibly heavy otherwise!) and the tapered end of the inwales.

After much hard work by the builders, the caned seats were also finished. This was a "last minute" project in some regards. The brass deck hardware went on the morning of the show and the seats and thwart were installed the day before!

The Wavy Gravy is pretty close to being done, actually - a bit of sanding on the inside, glassing and trimming out to do. Not bad, really. The feature strip was relatively simple to make, but is an attention grabber. It probably elicits the most questions about, "How did you do that?"

This boat needs some varnish and she's ready to go. The boat is a Wee Lassie called the Tesseract after Madeline L'Engle's book A Wrinkle In Time. This year, she told me the truth of how she arrived in my class - she had originally come to sign up for one of the other woodworking classes with the intent of building a table. The class was full, so she decided to sign up for the canoe-building class! This is her first woodworking project!

The canoe has a beautiful deck and coaming arrangement. The coaming and the deck is mahogany - like the rest of the trim - with a tiger maple stripe down the middle. What you can't see from this picture is that the deck has a crown to it. When varnished it should be gorgeous. I can't wait to see it.

The next boat belongs to the sister of the student above. She'd come to help her sister sand her canoe before glassing and decided that it would be a fun project to take on. It's a Wee Lassie II named Patience and has a similar feature strip to the boat above.

The deck arrangement on this canoe is much simpler than the others. It is a flat, one-piece deck. The inwale comes right up to the edge of the deck and a gentle curve is between them. The decks are made from some tiger maple with lots of figure, however and should be lovely to look at with a coat of varnish on them.

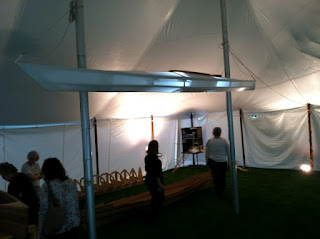
At the school, I'm getting ready for a little transition that I've discussed before on the blog. We're getting ready to offer a class in skin-on-frame boat building of the non-traditional style. By that I mean with marine plywood frames. To prepare for this, a friend who is a woodworking student at the school and I build two kayaks. As hers was finished with a clear poly, we decided it would be fun to try to light it up like a Japanese paper lantern at the show. The effect wasn't quite what I was looking for as the lights weren't bright enough. Still, people got a good idea of what the framing inside looked like.

My boat is finished in yellow polyurethane. I think it came out looking rather nice, actually. As the devil is in the details, we've got cherry for the floors, coming, hatch cover and hatch rim.

Just for giggles, I decided to make the coaming and hatch cover look like a Shaker oval box top.

So, another year of boat-building at the school comes to a close. I'm really looking forward to seeing my students out on the water this summer!
Thursday, June 7, 2012

Wednesday, June 6, 2012

Monday, June 4, 2012

Subscribe to:
Posts (Atom)


