Not so with a kayak.
Let's start with the fact that the boat cost me about $275 to build.
When I built the kayak, I added grab loops to the hull as part of a reinforcing strip at bow and stern that I was going to add anyway, so essentially, it was "free". These are simply stitched to the hull fabric. I think they came out looking nice and will let me attach a line at bow or stern for carrying the boat on the car or tying the boat to a dock or float if I wish.
I chose to add elastic deck rigging in front of my cockpit, so I added that as a convenience to hold my paddle, a compass, maps or a small deck bag. I needed to make some loops to attach the elastic rigging to the hull. To do this, I cut equal lengths of webbing and heat-sealed the ends. I then folded the fabric in half to create a loop. Using my grommet kit, I cut holes through the webbing and crimped the grommets in place which closed the loop. A #8 flat-head brass screw fit perfectly into the grommet hole and was what I planned to use to attach the loops to the frame. To do this, I had to make two holes - one in the fabric and one in the frame. To make the hole in the fabric, I heated a nail until cherry red with a torch and melted a small hole in the fabric where the screw would go to prevent the fabric from fraying. I then drilled a pilot hole in the frame for the screw. Once the hole was ready for the rigging, I applied some Dolfinite bedding compound to the screws and drove them into the pilot hole. This cost me a few bucks, but probably not more than $5.
As you could see in the picture above, there was something in the end of the boat. Actually both ends. Those are boyancy bags or float bags to keep the kayak above the surface of the water in the event of severe damage. They simply tuck into the ends of the kayak and were $42 for both. In my opinion, these are an indispensable safety item for this design.
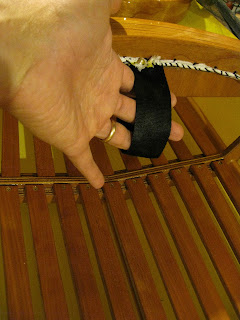
In the cockpit, I wanted to have a bilge pump at hand - another safety item. Fortunately, I already had the pump. (Typically around $20...) To hold the pump in place, I took some strips of two-sided Velcro, sewed a tab on one end of the strips (as a pull tab) and screwed the strips to the frame with a screw and finishing washer like so:
Cost? Less than $2 for both.
Here's a picture with the pump on place:
One of my personal mottoes is "Why Suffer?" Because I like to be comfortable, I bought a Seattle Sports inflatable seat/backrest combination. It has a self-inflating Therma-Rest style seat and a foam back panel with a small pouch on the back. To hold it in place in the kayak, I sewed a loop of webbing at the back of the cockpit and two other loops at the front with D-rings to clip the back-rest to.
The seat cost me $85 and the mounting points were maybe $4. Looks comfy, doesn't it?
To keep water and debris out of the hull when I'm transporting the boat, I purchased a Seals cockpit cover - another $35.
Paddling? A life jacket is a must. Cost? From $80-$200 for a good one. Don't leave home without one.
Finally, you've got to have a paddle. A good paddle can run you anywhere from about $100-$300 for a modern touring paddle or a nice Greenland "stick". Fortunately, yours truly makes his own paddle and has a nice Greenland style stick ready to go!
It truly amazed me to think that the cost to outfit the kayak was more than the cost of the boat itself, but I guess I shouldn't be surprised. This is one of the reasons that I make gear when I can rather than buying it. Guess I've got to learn to make more gear!


No comments:
Post a Comment