
Thursday, June 27, 2013
Wednesday, June 26, 2013
Happy National Canoe Day!

The Canadians have it right - on June 26th every year (or thereabouts...) - they celebrate National Canoe Day. This event was founded by the Canadian Canoe Museum to celebrate the canoe which was voted by Canadians to be one of the Seven Wonders of Canada.
Being good neighbors, we here in the US should celebrate with them!
Wednesday, June 19, 2013

Monday, June 17, 2013
A man's got to know his limitations.
...and one of our co-workers didn't remember that.
But I'm getting ahead of myself.
This fellow got his hands on a 17' long aluminum canoe that was in pretty nice shape for $200. Not a bad deal, really. A little cosmetic touch up and a few minor upgrades and he was ready to go paddling. It didn't quite look new, but was in great shape. So, he and another guy from work and the owner's most recent squeeze decided they'd like to take the canoe out - the question was, where? The owner knew a paddler who was a guide who thought she knew a good place to go.
To be fair, I think the owner actually had an idea of his limitations. He asked the guide to take them somewhere that was just a "nice paddle". The problem was that the woman that he asked was actually a whitewater paddling guide. She showed up with a plastic squirt boat and they put in on a well known local river that has timed releases for whitewater rafters and paddlers. Did I mention that this was after a large volume of rain?
They were heading downstream at a good clip and had been on the river maybe 15 minutes when they didn't manage to take the path that the guide wanted them to.
Oops.
Pretty soon the three occupants of the canoe found themselves swimming in very cold water, trying to breathe and trying to retrieve gear. (A cooler full of beer, if truth be told...)
Broach - it's an ugly word. Even uglier is what it means - when a boat broaches in whitewater, it's usually wrapped around a rock with the strong current keeping the boat pressed on the rock. It can be very dangerous for paddlers that are trapped in the boat as you can be pushed between the boat and the rock - and you may be underwater. The force of water on the surface area of a boat that has been broached is incredible - literally tons of force are applied to the boat.
Sometimes you can use a paddle and pry the boat loose - other times you need to rig a block and tackle from shore to the boat to be able to apply enough force to remove the boat or at least turn it in such a way that the water actually forces the boat off the rock. Ultimately, it is very important to get the boat removed so that it doesn't present a hazard to navigation to following paddlers or to leave behind a boat that will become trash in the river.
Fortunately for our hapless little group, some of the co-workers of the guide showed up with a paddling group and spent a half hour or so getting the canoe off the rock. Here are the remains - and the pictures just don't do it justice:

Note the dents and wrinkles below and behind the boat's name : Seif Raida. Yes, the name is sort of phonetic - "Safe Rider". Now realize that Seif Raida is a brand name for condoms in Papua New Guinea.

No, don't adjust the vertical hold on your monitor - that is the new shape of the canoe. There are popped rivets and torn aluminum. You can see two of the thwarts laying on the floor of the canoe. I might add that the boat was pried back into this "improved" shape from the shape that it was when wrapped around the rock.

One final parting shot of the destruction.
So, I have to commend themselves for doing the most important thing right - they were wearing their life jackets.
Tuesday, June 11, 2013
Tech Tip Tuesday

Well, maybe just one more... coat.
Finish of various types - stains, aniline dyes, paints, varnishes, urethanes and oils are key for protecting both the woodwork and epoxy of a cedar strip boat from the ravages of sun, water and ultimately, rot. They protect your investment of time and money and provide a nice looking boat or paddles.
Finishing - and varnishing in particular - appear to be a mystery to most folks that I teach. I generally hesitate to instruct others on how to finish because most people have some experience in painting and feel put off when I offer finishing suggestions - it's something they figure that they know how to do. Still, for many, it can be a frustrating process.
Mostly, it's about the preparation and the materials.
Let's start at the beginning.
You'll want to sand your project well to get rid of lumps, bumps and irregularities working from a coarser grit to a finer grit paper. How do you know when you're done? When the grit of paper you're using leaves no visible marks. Work with good light and protect yourself from the dust. If you're dealing with an epoxied surface or a hardwood surface, a cabinet scraper may also appropriate for surface prep.
When you think you're done with bare wood, take a sponge damp with warm water and wipe the surface. This will raise the grain. Sand off the fuzz with fine grit paper - say 220 to 320 grit. Then, clean away the dust with a tack rag.
Now that you've got the good clean smooth surface - stop. Read your can of finish - be it stain, dye, varnish or urethane - they come with good instructions. Follow them. This includes thinning the finish with the proper solvent and adding catalysts if necessary to get the finish to cure properly - Japan Drier being one of the catalysts for varnish and oil based paints.
If you want to color the bare wood, now is the time to stain it with the coloring agent of your choice. be it aniline dyes or oil based stains.
People will probably consider me a heathen, but I like foam brushes and rollers for finishing. It's not that good quality bristle brushes don't do a nice job - I have some good ones and like them - it's the cleaning. I prefer to start with a new clean foam brush. It works well for most of what I do - if I had a sprayer, I'd probably consider using that. For some finishes, I do use a bristle brush, but more than likely, I'll use a foam one.
Personally, I use Epifanes brand varnish - it's fairly reasonable in cost and I'm used to working with it. That's not to say that there aren't other great brands out there, because there are and I've used some of them including Interlux, Petit and others. The primary thing we're looking for here besides a good traditional varnish is the UV filters to protect the wood and epoxy from sunlight. Sun is one of the worst enemies of finish. The other is water.
Alternatively, I've used spar urethanes and wiping urethanes from Minwax and System 3 with good luck as well. Oil finishes I reserve for paddle shafts as I find varnish tends to give me blisters, but Watco Teak oil is a fine product for that purpose and can be applied by wiping with a lint free cloth in very thin layers.
Sometimes, you want to paint your surfaces - a good exterior enamel or topsides finish are the best for this application. I've worked with Rustoleum to expensive "yacht quality" paint and really don't see too much difference between the two for my applications, but your mileage may vary.
Actually, with all finishes, one of the major things to remember is thin layers - it's better to apply more layers than to try to rush the process by trying to build a thicker layer and getting runs in the finish that you then have to wait a long time until they are dry enough to sand out before applying another coat of finish. It's a real rookie mistake.
Another real rookie mistake is not applying finish in the right conditions. These include a clean work environment with a relatively low humidity and good lighting. Debris in the finish, milkiness due to humidity and runs or "holidays" (voids") in the finish because the lighting isn't good.
Further rookie mistakes include not prepping between coats - this includes sanding or roughing the surface between coats to get better adhesion, removing the dust with a tack rag and perhaps wiping down with a de-greasing solvent - such as denatured alcohol.
Finally, when you're done, clean up your workplace and clean your tools so they're ready for the next use.
Sunday, June 9, 2013
Exhibition 2013
Saturday dawned a much nicer, sunnier day and our collective disposition was much better. So, without further ado, here are some of the pictures:
Placed out front is the Genny - a 15' Solo Portage design from Rob Macks at Laughing Loon that was built by a former student with my help - it was kind of his master's level project in boatbuilding. The hull is 3/16" thick Northern White Cedar. Feature strip and trim are Walnut - both American and Peruvian.

Decks are crotched Walnut burl.

It's a stunning canoe and well made, to boot.
Hiding behind that is the modified Sea Tour 15 that I finished last year as an example of what is possible. I've been enjoying it and the speed and durability of the skin boat. It always seems to draw interest. It still doesn't have a name. I've been thinking of the Banana Boat and painting a huge blue Chiquita sticker on the deck.

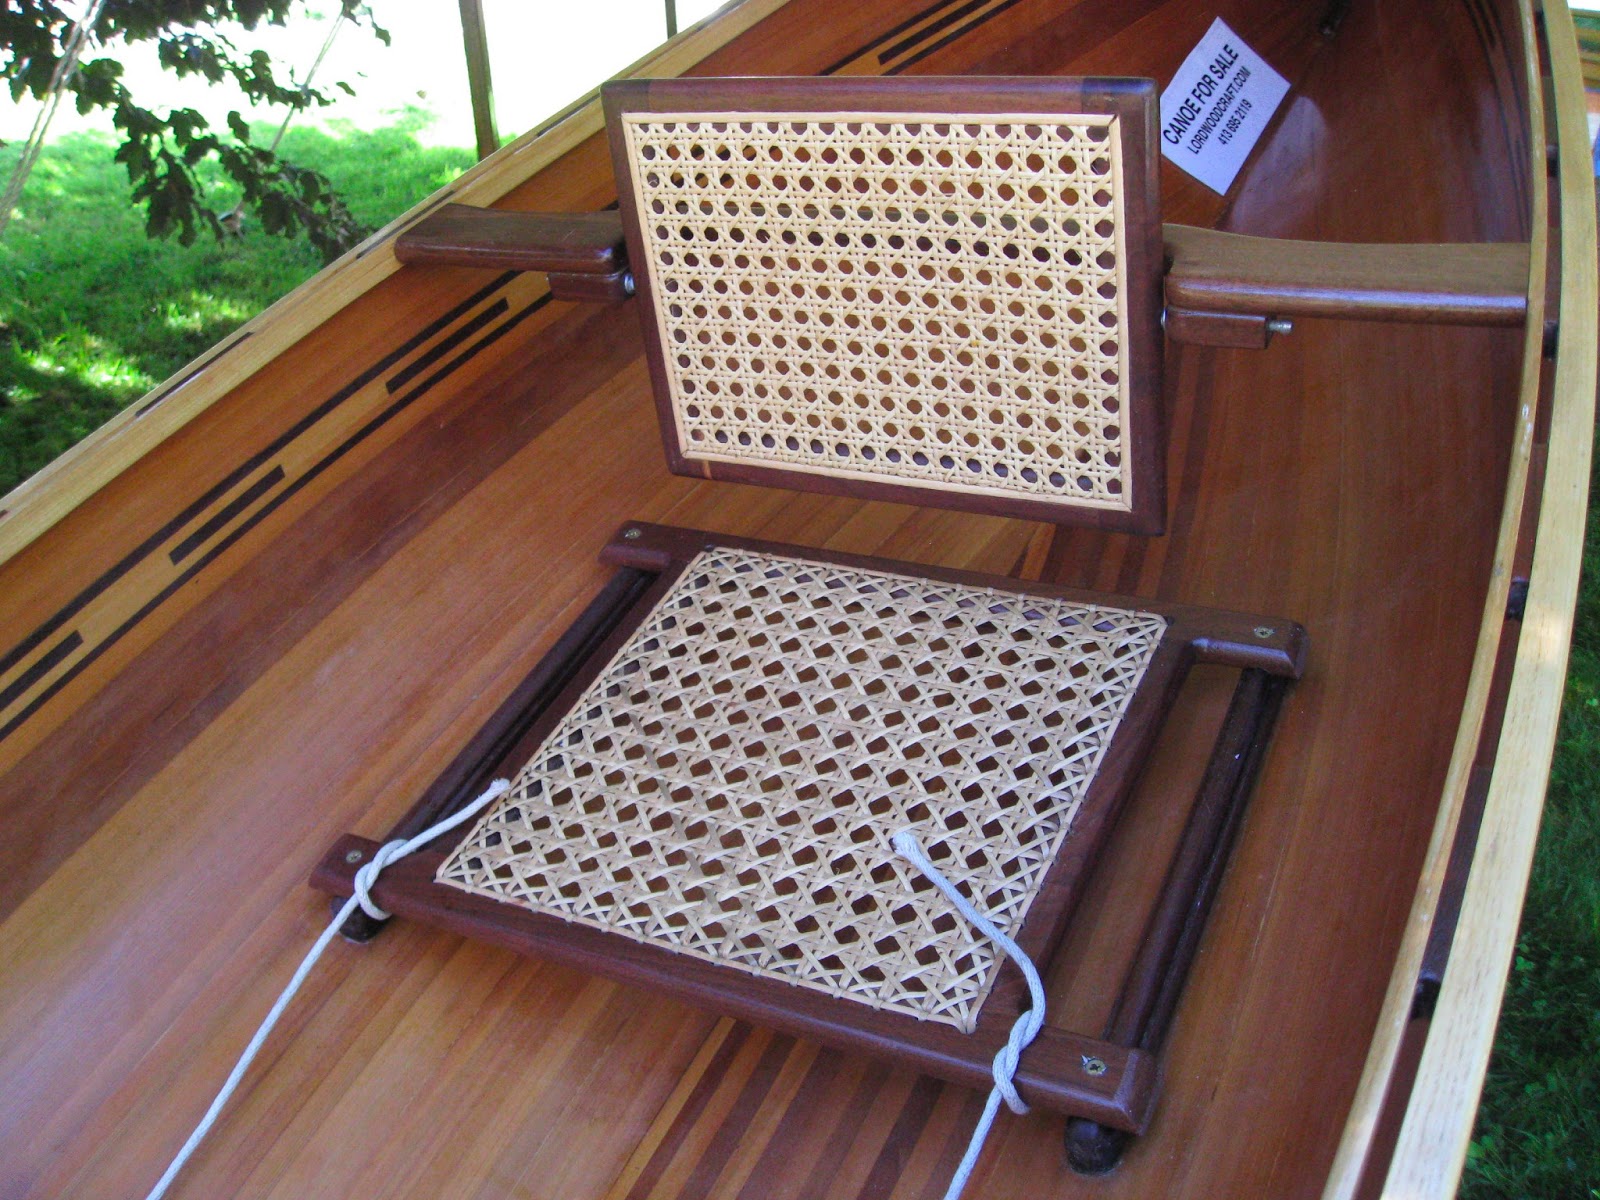
Hidden behind is the other stripper that was made by the student who built the Genny. This canoe, the Harpoon, was built in the class and is a Wee Lassie II designed by Mac McCarthy of Feather Canoes. Trim is Ash, Walnut, and Butternut and the hull is 1/4" thick Western Red Cedar. The ropes that you see are for a foot bar and allow for quick adjustment for different paddlers. Should you be looking for a canoe, it is for sale.

This is a detail of the seating area - a clever solution to remove the seat-back. There are barrel catches that are both the seat pivots and let the back be removable for transport.
At the beginning of the year, we offered three different designs to the students. They were the Stonefly canoe by S. Jeff Horton of Kudzucraft, and the Chuckanut 12 and Chuckanut 15 from Dave Gentry of Gentry Custom Boats. I figured we'd have a "little of this" and a "little of that" in the class, but we ended up with 7 of the Stonefly canoes and one of the Chuckanut 15's.
Here is one of the more interesting paint jobs that I've seen put on the canoes so far. The owner is a talented woodworker in his own right, and has done an outstanding job on the woodwork. I guess I shouldn't have been surprised about the creativity of the paintwork.

He was just applying the trim at exhibition. Today was another beautiful day, I hope he got a chance to paddle it.
This one is by a woman who started the class with somewhat more limited skills, but still has created a very beautiful boat. While we bond and screw or peg the stringers to the frames, she chose to add a more traditional touch by adding cosmetic lashings to all the joints as well as lashing the floorboards. (All of the students lash the floors to the frame...)

Scupper blocks, decks and rub rails will be from Walnut and the contrast with the Western Red Cedar frame are stunning. We hope to skin this boat this week.
This boat is being built by a fellow who has been developing his woodworking skills at the school and has done a splendid job of building his canoe. I'm really looking forward to seeing the decks in the sunlight - they're figured English Chestnut.

This boat was built by a student who was enthusiastic to build a light-weight canoe to use in the Adirondacks. He's made some unique choices during the build regarding his scupper blocks and has done a nice job with it. The brilliant red should be very visible on the water!

This is a unique canoe for us - it was done with White Pine stringers (like the yellow kayak) and is very pretty with the blonde wood.

Decks are Bird's Eye Maple and this boat has a sculpted backrest.


This is the lone Chuckanut 15. The gentleman who was building the kayak is 82 years young and is building the kayak to share with his grandchildren. The colors were selected to represent the college colors of some of the grandchildren.

Oh, yeah - he also built two paddles - one of which is in the picture.
Two canoes were MIA. One belongs to a student who gets around by bicycle - and plans to haul the canoe on a trailer behind the canoe, but had difficulty getting it back for exhibition because of this fact. The other belongs to a builder who had some serious changes in his life that occurred during the class and has moved to New York. He had come up to stay with myself and my family and work on his canoe. He'd applied finish to the frame and it wasn't dry enough to exhibit - a typical issue at boat shows - you can almost smell the varnish factory. Still, by the end of this weekend, the frame was varnished, decks and thwarts installed and the floors ready to lash in place. From there, just skin and trim. I hope to have pictures from the group launch party of these two boats.
During the course of the class, we discovered that the Stonefly design had a small issue because of some of the way we chose to finish the gunwales and decks. There was a slight "hourglass" shape that appeared in the aft end of the canoe. So, I decided that I'd like to change the design of the aft frame to get rid of this curvature. However before I turn this loose on the students, I figured I'd better build one. Here it is:

I went with Mahogany for floorboards and trim. I like the traditional shapes from wood and canvas canoes and took some cues from the class I took with Jerry Stelmok in tapering the gunwales and the shapes for the decks - curved with a hollow back - and the brass stem band and painter loop on bow and stern.

I have to admit that I had a bit of fun with the back rest. It is a curved pivoting back-rest with some stars carved into the top of the cross-member. I painted them gold before varnishing. I thought it came out rather nicely.

One of my concerns when I started this class was that the boats wouldn't have the same aesthetic appeal that the cedar strip canoes did. I had a set of clipboard out that visitors could leave contact information and be reminded of the sign-up for our next session in the fall - I have two full pages of folks who were interested in building a boat. I guess I didn't need to worry!
Subscribe to:
Posts (Atom)


