Showing posts with label Feature Strip. Show all posts

Sunday, June 9, 2013

Exhibition 2013

The school where I teach had their annual exhibition and my students and I had the opportunity to display our boats that we've been making over the past year.  Sadly, we had weather that reminded me of last year's event on Friday night.  It came down in buckets - we had at least 4" of rain.  Fortunately they have us display our boats on the front lawn under a large tent.  Still, I will save your delicate ears by not giving you my comments on the weather, but suffice it to say that I was a drowned rat when I returned home Friday after the show.

Saturday dawned a much nicer, sunnier day and our collective disposition was much better.  So, without further ado, here are some of the pictures:

Placed out front is the Genny - a 15' Solo Portage design from Rob Macks at Laughing Loon that was built by a former student with my help - it was kind of his master's level project in boatbuilding.  The hull is 3/16" thick Northern White Cedar.  Feature strip and trim are Walnut - both American and Peruvian.


 Decks are crotched Walnut burl.


It's a stunning canoe and well made, to boot.

Hiding behind that is the modified Sea Tour 15 that I finished last year as an example of what is possible.  I've been enjoying it and the speed and durability of the skin boat.  It always seems to draw interest.  It still doesn't have a name.  I've been thinking of the Banana Boat and painting a huge blue Chiquita sticker on the deck.


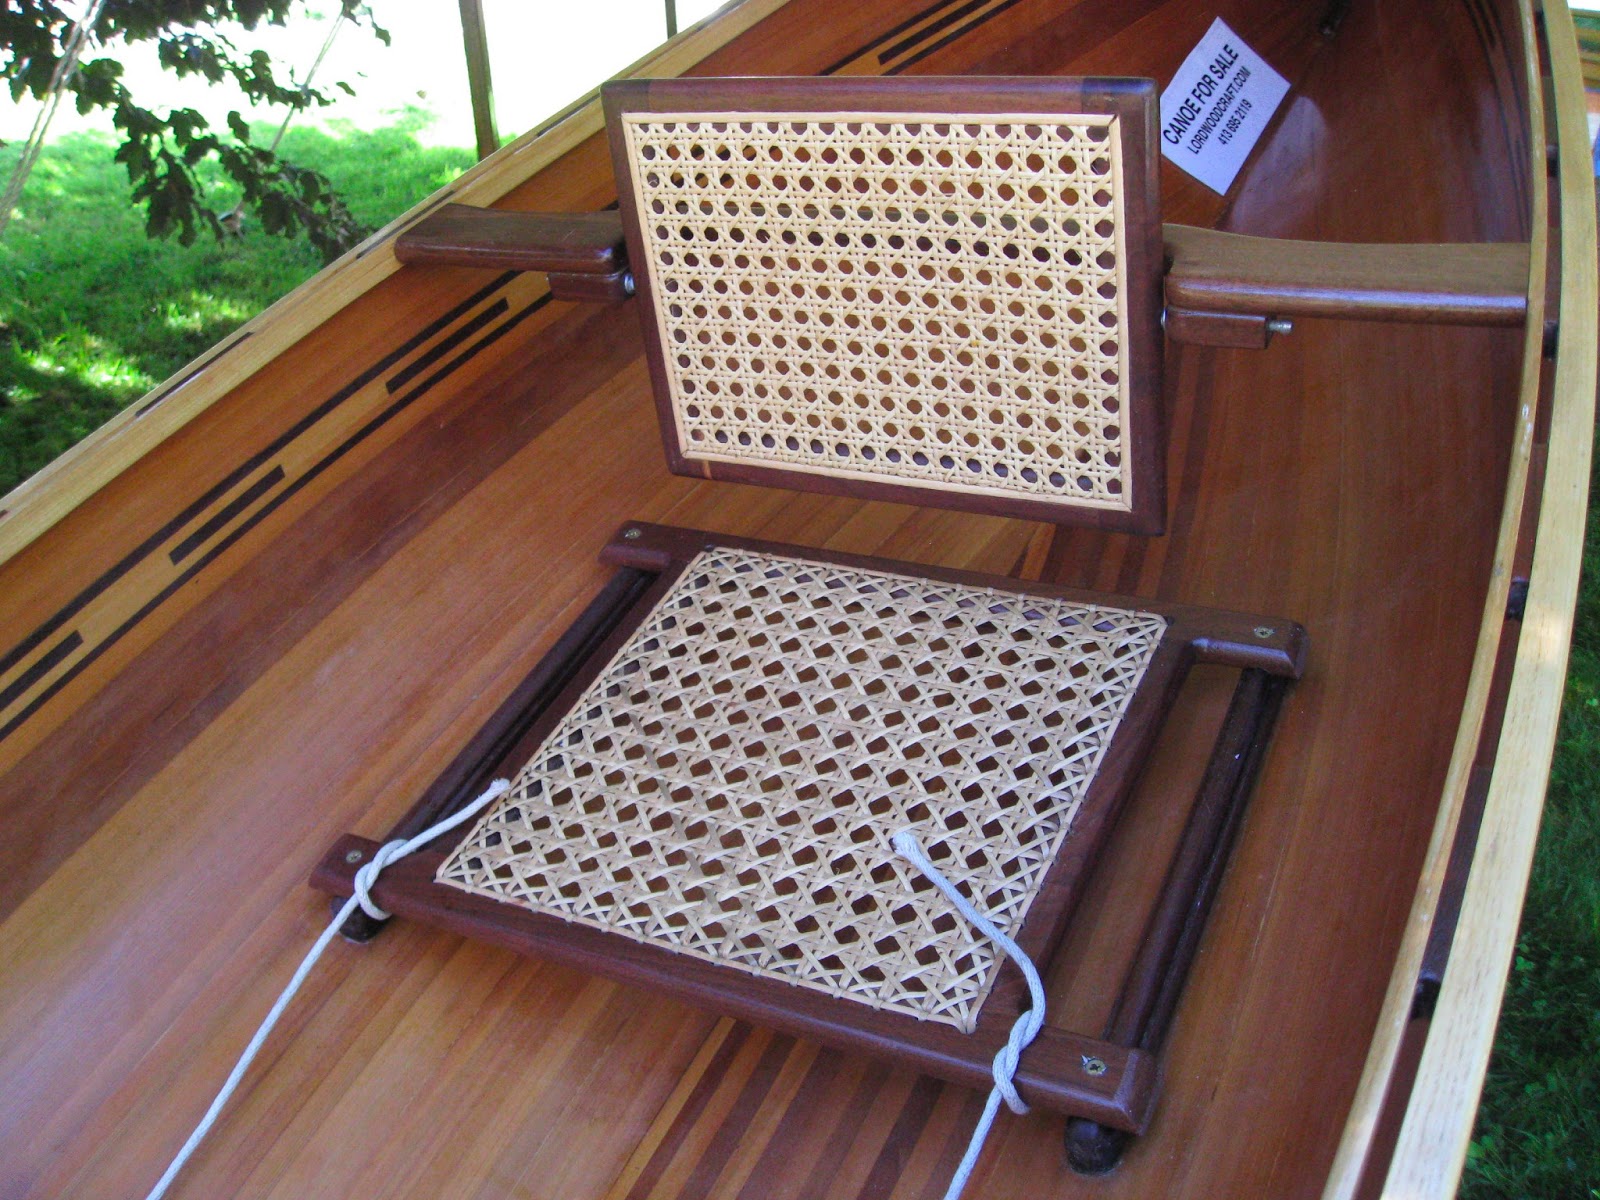
Hidden behind is the other stripper that was made by the student who built the Genny.  This canoe, the Harpoon, was built in the class and is a Wee Lassie II designed by Mac McCarthy of Feather Canoes.   Trim is Ash, Walnut, and Butternut and the hull is 1/4" thick Western Red Cedar.  The ropes that you see are for a foot bar and allow for quick adjustment for different paddlers.  Should you be looking for a canoe, it is for sale.


This is a detail of the seating area - a clever solution to remove the seat-back.  There are barrel catches that are both the seat pivots and let the back be removable for transport.

At the beginning of the year, we offered three different designs to the students.  They were the Stonefly canoe by S. Jeff Horton of Kudzucraft, and the Chuckanut 12 and Chuckanut 15 from Dave Gentry of Gentry Custom Boats.  I figured we'd have a "little of this" and a "little of that" in the class, but we ended up with 7 of the Stonefly canoes and one of the Chuckanut 15's.

Here is one of the more interesting paint jobs that I've seen put on the canoes so far.  The owner is a talented woodworker in his own right, and has done an outstanding job on the woodwork.  I guess I shouldn't have been surprised about the creativity of the paintwork.


He was just applying the trim at exhibition.  Today was another beautiful day, I hope he got a chance to paddle it.

This one is by a woman who started the class with somewhat more limited skills, but still has created a very beautiful boat.  While we bond and screw or peg the stringers to the frames, she chose to add a more traditional touch by adding cosmetic lashings to all the joints as well as lashing the floorboards.  (All of the students lash the floors to the frame...)


Scupper blocks, decks and rub rails will be from Walnut and the contrast with the Western Red Cedar frame are stunning.  We hope to skin this boat this week.

This boat is being built by a fellow who has been developing his woodworking skills at the school and has done a splendid job of building his canoe.  I'm really looking forward to seeing the decks in the sunlight - they're figured English Chestnut.


This boat was built by a student who was enthusiastic to build a light-weight canoe to use in the Adirondacks.  He's made some unique choices during the build regarding his scupper blocks and has done a nice job with it.  The brilliant red should be very visible on the water!


This is a unique canoe for us - it was done with White Pine stringers (like the yellow kayak) and is very pretty with the blonde wood.


Decks are Bird's Eye Maple and this boat has a sculpted backrest.


This is the lone Chuckanut 15.  The gentleman who was building the kayak is 82 years young and is building the kayak to share with his grandchildren.  The colors were selected to represent the college colors of some of the grandchildren.


Oh, yeah - he also built two paddles - one of which is in the picture.


Two canoes were MIA.  One belongs to a student who gets around by bicycle - and plans to haul the canoe on a trailer behind the canoe, but had difficulty getting it back for exhibition because of this fact.  The other belongs to a builder who had some serious changes in his life that occurred during the class and has moved to New York.  He had come up to stay with myself and my family and work on his canoe.   He'd applied finish to the frame and it wasn't dry enough to exhibit - a typical issue at boat shows - you can almost smell the varnish factory.   Still, by the end of this weekend, the frame was varnished, decks and thwarts installed and the floors ready to lash in place.  From there, just skin and trim.  I hope to have pictures from the group launch party of these two boats. 

During the course of the class, we discovered that the Stonefly design had a small issue because of some of the way we chose to finish the gunwales and decks.  There was a slight "hourglass" shape that appeared in the aft end of the canoe.  So, I decided that I'd like to change the design of the aft frame to get rid of this curvature.  However before I turn this loose on the students, I figured I'd better build one.  Here it is:


I went with Mahogany for floorboards and trim.  I like the traditional shapes from wood and canvas canoes and took some cues from the class I took with Jerry Stelmok in tapering the gunwales and the shapes for the decks - curved with a hollow back - and the brass stem band and painter loop on bow and stern.


I have to admit that I had a bit of fun with the back rest.  It is a curved pivoting back-rest with some stars carved into the top of the cross-member.  I painted them gold before varnishing.  I thought it came out rather nicely.


One of my concerns when I started this class was that the boats wouldn't have the same aesthetic appeal that the cedar strip canoes did.  I had a set of clipboard out that visitors could leave contact information and be reminded of the sign-up for our next session in the fall - I have two full pages of folks who were interested in building a boat.  I guess I didn't need to worry!


Tuesday, December 14, 2010

Tech Tip Tuesday

The old adage that good workmanship is it's own reward is very true. It takes time and patience to build a nice boat and as you're doing all of your preparation work, it may seem that you will never finish.

First, the students built the strongback and set up the forms. They then ripped strips and made stems.

A post from last fall shows the preparation and good workmanship that went into the building of the building of the feature strip on their canoe.

They stripped the hull and fitted the outer stems.

These students shaped stems, applied filler, faired the hull and long-boarding the hull.

This past Saturday, they finally applied the sealer coat of epoxy. The contrasting feature strip "popped" against the hull and proved that the work was worth it.

Here are the proud builders posing with their beautiful boat in a fresh coat of epoxy sealer:


Isn't that Walnut and Basswood feature strip a stunner?

Tuesday, October 20, 2009

Tech Tip Tuesday


Planning ahead to get a design where the parts all blend well is sometimes hard to do with my students. Most have not seen what is possible when building a strip canoe in terms of wood types and designs. I try to bring books into the first class to point them in the direction of resources that will show both interesting and unique designs.

Before they get started with building a boat, I encourage them to draw a sketch - even if it is a very rough sketch, showing what the feature strip might look like, what colors or wood types they would like. I also encourage them to pick good woods that blend or contrast nicely, woods with interesting figure or grain and woods of appropriate hardness for the part of the boat it will be used on. There is really a lot to consider even on a small boat with regard to the stems, gunnels, seat, thwart and decks.

While the books and on-line resources are great, there is sometimes no getting around looking at finished boats. That's why I encourage my students to go look at boats at places like the Maine Boatbuilder's Show, The WoodenbBoat Show and the John Gardner Small Craft Workshop. They are outstanding opportunities for a student to see what is possible and to dream a little bit about what they might like.

So sketch, plan and dream and have some pieces of scrap around so you can think about color and grain as you plan your next boat!

Tuesday, May 19, 2009

Tech Tip Tuesday


Feature strips - again.

I just thought that this would be an interesting post. One of my former students is building another canoe. We ripped stock at his shop about a month ago and had a good time doing it. The feature strip that he has planned for his canoe is unique. I don't think I've seen one quite like it elsewhere. It's basically a sine wave of white cedar sandwiched between two pieces of Peruvian Walnut.

Impressive, no?

Monday, October 27, 2008

Feature Strips : Another Way

Another way to make feature strips is to use strips of different widths and different contrasting woods that have already been molded with cove-and-bead features.

This method has one big drawback. You're only making one feature strip at a time, so you need to do it twice. This is time consuming. You also need to pay attention that the strips are the same (if that's what you want...)

Ted Moores uses this method in his book, Kayakcraft, and makes a pretty "Indian Blanket" sort of pattern using strips of similar widths.

For starters, 'tho, here is a very simple strip:

Two wide pieces of Spanish Cedar with a narrow strip of Basswood between them. Not difficult and not really time consuming.

Here is another slightly more complicated strip. It's made from two continuous narrow strips of Spanish Cedar and alternating pieces of Spanish Cedar and Basswood with 30° cuts on the ends. Here are the cut pieces ready to assemble:


And the finished product:


You can change the whole style just by changing the type of wood:


Spruce on the edges would be a completely different look - not my tastes, but it is intended to show what is possible.

You can mix up widths, cut directions, wood species, wood figure, etc. and get all sorts of neat effects. If you stack two rows of the same wood with cuts in different directions you can get arrowheads, diamonds and pretty much whatever you can dream up.

A couple of caveats about this method:
  • If you are making a row with multiple types of wood of a particular width - say 1/4" - mill all of this stock at one time. This way, you will not get any nasty gaps after trying to make two separate runs of 1/4" stock that are just slightly different widths.
  • Stagger joints. Butt joints or even a bunch of beveled joints that are stacked up will make an area where either the bend of the feature strip isn't fair or there is a weak area. Avoid this.
  • Don't make the feature strip too wide. It's fairly easy to build up a feature strip that doesn't want to follow the curve of the hull forms. If you want a complex strip with lots of detail, use narrower strips to achieve this goal.
  • Use a "type setting board". This is just a board a bit longer than your canoe and about 5" wide with a narrower strip screwed to it along the length of the long edge. This is then covered with packing tape or wax paper so you don't glue the strip to the board. Basically, you use it to organize the parts of your features strip and then clamp the pieces together when you're bonding the feature strip together. If your board is wide enough, you can stack the feature strips for the left and right side of the canoe on top of each other so that you can make sure they are the same. (Just DONT glue the left and right strips together!)

Monday, October 20, 2008

Sometimes the best feature strips...

Aren't.

Confused yet?

You don't have to have a feature strip to have a spectacular canoe.

As I mentioned in a previous post, I had a student who made a canoe with a gradient shading. I have a student who heard this and sorted her strips by color. She's got a feature strip, but she also has taken the darker strips for the "football" at the bottom of the canoe. She's got a gradient going from dark and getting just a bit lighter as it goes towards the keel area of the canoe. Here's a picture:


I think this is going to look pretty spectacular when she gets it glassed.

Some people also have a contrast between "topsides" and "hull" which is neat as well. There are many, many ways to have a distinctive boat with unique stripping methods. It's all up to your imagination!

Wednesday, October 15, 2008

Here's one I made earlier...

Ever watch one of those cooking shows where they get done with cooking the recipe and they put it in the oven only to draw out a perfectly prepared version?

Well, here is a feature strip that I made earlier. It was intended for a very small boat, but I wasn't happy about the way it was all tying together, so I took it off the forms. In the pictures, I wet the wood with some water to enhance the contrast. This feature strip was built up with the glue-up method that I discussed in last night's post.


There are only three types of wood here. The "eye" and the banding is made from Poplar. The darker wood is Spanish Cedar and the surrounding wood is Western Red Cedar. To give you an idea of the scale of this, the narrow white banding that makes the design "pop" is about 1/16" wide. Do note the variation in the Western Red Cear - it runs from whitish to brown, but is all cut from the same board.

The following images are from the Newfound Woodworks website. They are particularly good because they show the variation within a particular type of wood - in this case Northern White Cedar and Western Red Cedar. Keep in mind that it's sometimes possible to get contrasting color out of the same type of wood!


Tuesday, October 14, 2008

One way, two strips.

The method of creating a feature strip that I'm going to present is nice because it can be used for building a canoe with either cove-and-bead strips or beveled strips. This method also makes two strips from one assembly. The example that I'm going to show is a very simple strip, but you could do something more complex by making up the strips from short sections with square or beveled ends. You will want to try to stagger the joints in your strip to avoid making a weak spot. The images that I'll show are for the cove-and-bead version, but I'll explain the difference for beveled strips. For simplicity, this feature strip is being made for a boat that will be stripped with 1/4" thick strips.

Here's my build up of the feature strip "sandwich":


The image above shows three strips that have been glued together with carpenter's glue. The top and bottom strip are Spanish Cedar and the center strip is Basswood. My goal is to get two 3/8" tall strips of the Spanish Cedar and a 5/8 " tall strip of Basswood. All three strips are 7/8" wide and as long as I need for the boat I'm building. The bottom Cedar strip is 3/8 tall, but the top one is 1/2" wide. This is because I'm planning to cut a cove in the bottom and a bead on the top. When I cut the bead, I'll lose 1/8" of the face, so I have to make that strip a 1/8" taller. If I was making this for beveled construction, I'd make both Cedar strips 3/8" tall. That's the only difference.

At this point, I want a good surface to run against my table saw's fence. I'll plane or joint the face to the right so it is smooth and square with the bottom.

Now that I have a good edge, I'll set the table saw so that I'm cutting a 1/4" width between the blade and the fence. I'll have the teeth of the blade just protruding through the top of the strip. I'll also have featherboards to hold the sandwich in to the fence and down to the table. Below is a picture of that operation. Virtual featherboards and virtual guards have been virtually removed...


Now that I've cut my sandwich, I've got a strip that is 1/4" wide, 1-1/8" tall with square corners.


I'll repeat this operation so that I have two of the strips shown above. If I was making strips for a boat being built with beveled strips, I would be done at this point.

However, I'm making a cove-and-bead strip, so I'll need to use my router table to put the cove on the bottom and the bead on the top. Just a quick tip here: I'll use a scrap of wood that is the same width and thickness as my feature strip to set up the router table. I do this so that I don't ruin my carefully made feature strips.

You can see from the picture below that the Spanish Cedar strip at the top and bottom will be the same width on the exterior of the hull. At this point, I've got two feature strips that are ready to mount on the forms.


At this point, I've got two feature strips that are ready to mount on the forms.

Easy.

A bit later, I'll show how to make feature strips from strips that are already molded with cove-and-bead.

Monday, October 13, 2008

Feature Strips : Part 1

So you've decided to build a canoe and you want to "personalize" it.

Cool.

Anyone who decides to build a boat puts a lot of themselves into it. It's a pretty emotional and somewhat ego-driven process. You are building the boat. You will be paddling the boat. You want the boat to look good because of what it says about You and Your craftsmanship.

There are many ways to do this of course, but one of the more common ways is to add a feature strip to the canoe. Your canoe doesn't have to have a feature strip, but most people seem to want one. A feature strip is a section of your strips where you have chosen to have woods that create a pattern or design that makes it unique. It can be very simple - a single strip of wood that contrasts the rest of the hull. It can also be very complex with lots of detail, contours or artistic touches. You could easily spend more time making the feature strips than stripping the remainder of the hull.

It's really not that difficult to get spectacular results. There are some things you will need to consider before you start.

PLAN

You will need to have a plan - and it will need to extend beyond your feature strip to your vision of the whole canoe - seats, stems, thwarts, decks, gunnels and perhaps even to the paddle. (You've built the canoe - you ARE going to make the paddle, aren't you?!?) The choice of woods and the design should tie the whole boat together. It shouldn't just be a whole bunch of different woods that don't go well together making the canoe look like a badly made patchwork quilt. The elements of the canoe should go together. The best canoes that my students have made are those where they have a plan and a vision of what their finished canoe will look like. Usually they've made sketches and notes so that they know what the design and materials will be and are then able to follow the plan they've created.

KNOW YOUR LIMITS

If you're not an experienced woodworker, you probably don't want to go overboard designing a feature strip with Fleur-de-Lis for the length of the boat in exotic woods. To some degree, you may be limited by not only your own skills (and patience!), but by the tools, material and time available to you. Sometimes a simple strip is very elegant. One canoe that I thought was particularly nice had a single narrow stripe down the side that contrasted the rest of the hull.

Another limit is width. You don't want the feature strip to be so wide that you can't twist it to make contact with the hull forms. If it's much more than about 1-1/2" wide. If it's going to be wider, you probably want to break it up. I had a student build a strip that was about 2-1/2" wide. It didn't want to lay down on the forms and even snapped at one location and had to be repaired.

PICK YOUR MATERIALS


Pick softwoods. There is good reason for this. When your hull has been stripped and you are starting to fair it, the block plane and spokeshave will remove material fairly evenly. However, when you go to sand the hull, the hardwood will wear away more slowly than the softwood leaving grooves that make the hull looked rippled. Not the mark of a well-made canoe.

Pay attention to the color of the wood, the grain of the wood and the figure of the wood. You can use all of these to give you a beautiful result.

I usually recommend that students pick at least two species of wood that contrasts with the main hull material and with each other. For example, look at the two different woods in the picture below:


Both of these woods are suitable for making feature strips. The piece on top is Basswood and has a uniform, almost creamy color with very little distinguishable grain. The brown piece that it's sitting on is Spanish Cedar and it has a nice grain and color to it - it reminds me very much of mahogany. Both of these woods will contrast very well with a hull made from Western Red Cedar.

Generally, I recommend that my students build their hull from Western Red Cedar, Northern White Cedar, Atlantic White Cedar or Redwood. Other choices, although more difficult to find, would be Sassafrass, Cypress, or any other lightweight, rot-resistant softwood which isn't resinous (like White Pine with pitch pockets...)

Good accent strip materials include those listed for the hull as well as Poplar (be wary of green heartwood - unless that's what you want) and Basswood for lighter colors, Spanish Cedar, Peruvian Black Walnut (It's a "soft" hardwood. Go figure that one out...) are good for darker colors. For the more unusual, Alaskan Yellow Cedar or Spruce can be very yellow in color, Western White Cedar for another light color, or even Douglas Fir for the texture (although a bit hard and heavy) are options.

It is possible to add your own colors, but be careful. In the picture below are two pieces of the same Basswood board. The upper one is as it was cut from the board. The bottom picture shows a piece that has been dyed with aniline dye - in this case a water based aniline dye. You can use water based or alcohol based aniline dye and there are supporters for both. The reason these are used is that they don't have petroleum based solvents like oil based stain that you would use on furniture. If you use the oil based stain, it will contaminate the surface and you will have difficulty getting the epoxy to penetrate and bond to the wood. This isn't good. Also, be careful with the use of solvents generally - some are "recycled" and may be contaminated with petroleum based solvents. I've heard of bad experiences, but haven't had any myself.

I warmed both the dye and the wood and soaked it for a few minutes. The piece on the bottom has a cut made through the strip at a 45 degree angle so that you can see how far the dye penetrated the wood. To give you an idea of scale, these strips are about an inch wide and an eighth of an inch thick.


When the strip gets faired and sanded, most of the dyed surface will be removed. The dye would need to penetrate the strip much more deeply than this to be effective. This would take a very large container for a full length strip and a very long time. To be honest, I wouldn't want to try to dye selected strips ON the hull before glassing. I think it could be a disaster.

We've got a plan and we've got our materials. Tomorrow, we'll explore one method of building up a feature strip.