One of my students was preparing some Dookie Shmutz to fill small cracks and checks in his canoe. As I'm never sure of my student's level of experience with epoxy, I always make sure to let them know how to mix the epoxy. The epoxy in question was West System's 105/207 system and the ratio is 3:1 epoxy/hardener. The pumps that are sold by West System for the resin are metering pumps are sized to dispense the proper ratio with a single pump from each container.
I told the student to dispense one pump each of resin and hardener until he had enough volume, then to mix in the wood flour and silica until he had a mixture that was the consistency of creamy peanut butter. I was then called away to help another student. When I returned, he had what appeared to be the proper mixture and was applying it to his hull.
The next morning, we came in to put the canoes back in the barn. The filler on this canoe was not setting up - it was like soft putty. Sometimes it is a bit cool in the shop and the epoxy takes a little longer than usual to set. As last week was a vacation week, there would be no other classes in the shop, so we left it in the shop rather than take it to the much colder barn in the hope that it would cure.
Yesterday, we arrived to find the filler on this canoe stiffer, but not fully cured.
Bummer.
When the student came into class, I asked him how he mixed the filler. Turns out he'd read the can about the 3:1 ratio after I told him how to mix the epoxy and used three pumps of epoxy to one pump of hardener.
Uh oh.
Thotful spot time.
We ultimately resolved to scrape what uncured filler material that we could and to wipe the hull with denatured alcohol. Once this was done, we applied properly mixed filler.
This morning, the filler had set up hard. We appear to be in luck!
Sunday, February 27, 2011
Wednesday, February 23, 2011

Tuesday, February 22, 2011
Tech Tip Tuesday.
Last week, we put 'em in, this week we pull 'em out. I'm talking about the staples - oh, and the nails used to hold the strips in place as the glue sets. Below are the fasteners that I'm talking about.

On the left is a 9/16" long staple used at the forms. I've omitted the 1/4" long staples used between the hull forms. On the right is a ring-shank panel nail that we use for balky strips. I've tried 1" long 18 gauge wire nails, but find that sometimes they pull up out of the forms. The panel nails stay in place.
In the image below are two tools for removing staples. The one on the left is attached to a stapler and I don't find it all that useful - it tends to leave circular dents in the strips. The pocket knife on the right I find incredibly useful - it is an excellent tool for exhuming those staples that you've accidentally buried in a strip.

In reality, I use a wide variety of tools:

The strip on the left is to support the tools when prying against the hull - this might be for a hammer (not shown) to pull a difficult ring-shank nail or for one of the little pry-bars at top center. These little pry bars are some of the fastest tools I know for removing staples or nails. They also have the potential to do a fair amount of damage to the strips when pulling fasteners. I don't really care for the tack puller (2nd from right in the top row), but it can do a good job of removing staples that aren't buried. The Bostitch staple remover on the far right is intended for removing heavy duty box staples and does a great job of removing staples in a hurry without damaging the hull.
The variety of pliers in the bottom row are good, too. The locking pliers are nice to get a purchase on broken staple legs or nails that are otherwise impossible to pull.
 Also, when locked onto the nails, you can twist and pull the ring-shank nails without breaking out the surface of the strip.
I haven't discussed the use of nails to hold down strips before. There are some with great twist and bend that will not stay in place using staples alone, nails are required. When driving nails, you don't want to make a "rosebud" from hitting the hammer on the soft cedar hull. You also don't want to drive the head of the nail into the surface of the hull, either. To protect the hull, we use small pads made out of scrap strip with a hole drilled in them. It helps to hold the strip in place and protect it at the same time.
The other advantage comes when it is time to remove the nail. I use a hammer and the small pry bar to split the pads at the nail head like so:

When the pieces are removed, the nail is proud of the surface and you can grab the nail with locking pliers, twist and pull:

When finished, you will be fairing the hull - be sure to look over it carefully to make sure you didn't leave any fasteners in the hull to mar the edge of your plane irons!

All set and ready for fairing!
Saturday, February 19, 2011
Life, Wonder Bread, the Universe and Everything
I must admit at the beginning of this post that this is shamelessly copied (with minor alterations) from a co-worker's Facebook post. These are the actual events of a Thursday afternoon two weeks ago. Quite frankly, we probably wouldn't have believed her but for the fact that she was in the boss's car (this would probably happen to him while driving...) and the fact that there was evidence in the form of pictures and, um, other material. Now, I'll just let her pictures and words tell it like it was:
This is a story of intrigue...


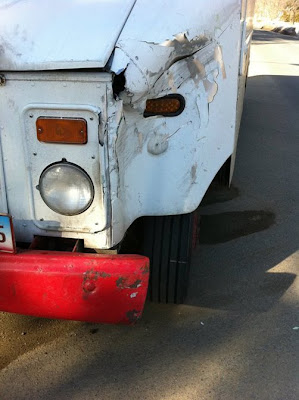
My boss's vehicle didn't look too bad


This is a story of intrigue...

It was a lovely Thursday afternoon. Life was good. So...

...I decided to accompany my boss on some errands. While enroute to the bank, and without the courtesy of a warning...

...a giant hawk (not THIS hawk, but a similar-looking hawk) carrying...

. . . a squirrel (not THIS squirrel, but a similar-looking squirrel) came careening towards our vehicle. The hawk was swiftly losing altitude and crashed into the windshield. It flapped and freaked as its wings pounded the glass. My boss and I screamed and the hawk flew way, but not before depositing bloody squirrel bits all over the hood. We'd no sooner screeched to a halt when (and I knew it was coming when the sun went away) we were clobbered from behind by none other than...

...the Wonder Bread truck, which was driven by...

...an extroverted Malboro-smoking man with three half-teeth and a leg that dragged behind him a bit (not THIS guy, but a similar-looking guy). And so, in the end...

...the Wonder Bread truck didn't look too bad.

My boss's vehicle didn't look too bad

...but the squirrel? Life wasn't looking so good for that little guy.

...and it did take two trips through the car wash to get all of the squirrel off of my boss's car ...
Tuesday, February 15, 2011
Tech Tip Tuesday
Today's post is on staplers. While it isn't necessary to use staplers to build a cedar-strip canoe, I find that for beginners, they are particularly helpful in getting good results on your first canoe. For subsequent canoes, if you want to go staple-less, fine, but learn what you are doing first as far as the building process goes. In particular, I think staplers are one of the more critical tools in the process and some subtle things can really help or hurt the cosmetics of the finished canoe. I'll show you why in this post.
Below are a few of my staplers. At the top left is a typical Arrow-brand hand stapler. (an older model) At the bottom left is an electrical stapler made by Stanley. The two on the right are different generations of the PowerShot staplers.

The traditional style stapler works OK , but the force that you apply is away from the point where the staple is being dispensed. This can cause issues with not driving the staple deeply enough - particularly at the stems. The electric stapler was OK, too, albeit a bit bulky - but the main problem was with the cord - it was always in the way and we always seemed to be moving it around. While I don't show an air stapler here, I find the same things to be true of the hose as I do for the cord. I have come to like the PowerShot style staplers for their reliability and ease of use. The do take a bit of getting used to - people try to use them backwards thinking the staple exits at the "heel" like a traditional stapler - but once you get used to them, I find that applying force over the staple exit makes lots of sense.
As you can see in the picture, the two PowerShot staplers look almost exactly alike except for the blue tape at the finger hole. The blue tape is for a very specific reason. I use both 1/4" and 9/16" leg length staples to build canoes and I need to know the difference. Why, you may ask? If you've ever been backing up 1/4" thick strips with your hand and accidentally drive a 9/16" staple through the strips and into your finger, you'd know why! OUCH! The tape tells me which size staples I've loaded in the stapler.
In theory, you drive the 9/16" long staples at the stations to hold the strip to the station as the glue is curing. You also use them to hold the strips to the stems as the glue there is curing. If they are in a neat row on the forms, the holes will draw the eye less then poorly aligned staples. The 9/16" long staples should be aligned with one another as best as you can and driven in the center of the strip so as not to pass through the cove or bead on the strip (if you're using cove and bead...) You do NOT want the 9/16" long staples to bridge across the strips (i.e. one leg in each strip) as this causes problems with strips staying on the forms. Because the back of the strip is supported by the forms, there should be no chipping on the back side of the strip.
The 1/4" long staples are intended for holding the strips together between the forms. Unlike the 9/16" long staples, they are intended to bridge between two strips to hold the joint closed as the glue sets. Anywhere there is no backing to drive a longer staple, you should use the shorter 1/4" staples. As noted above, this is a whole lot easier on the builder's fingers. Smaller gage staples are fine here - they will be less obvious when removed.
If you simply take a stapler and start building your canoe, you will get the following results -

This is the back of the strip - note that both the 1/4" and 9/16" staples have broken through and chipped out the back of the strip.

I should note here that the back of the 9/16" long staples is only breaking out the back of the strip because there isn't a form backing them up, and that the 1/4" staple should not break through, but has because it has been driven too deeply.
This is the front of the strip after the staples have been removed:

These dents will show up as "bruises" on the surface of the canoe even after you have faired and sanded them out of the surface of the canoe. This is from the tearing and deformation of the wood fibers. If you look carefully, you will also see a small circular dent from the staple remover.
Darn.
But I don't want my canoe to look like that with a line of bruises.
Is there a solution?
Yes.
Masking tape.
Masking tape?
This is the sole of one of the PowerShot staplers. I've applied a strip of tape to the sole to keep any glue out of the mechanism. I've also built up 7 layers of tape near the point where the staple exits. (Your mileage may vary - you might need more or less tape depending on how thick your tape is, how much force you apply, etc., etc...) This will raise up the sole of the stapler so that they will not be driven so deeply. The downside is that I need to pull this off when I need to refill the stapler, but it's worth it.

Here's the "mouth" one of my long-used Power Shot staplers where the staple exits without tape. If you'll look, you'll see that other than a bit of dust it is very clean.

This is very important. When you are applying staples to the canoe, you want the stapler to function well. If it is all gunked up with glue, the stapler can jam and will not work smoothly. It's frustrating when you're trying to apply strips only to find that the stapler isn't working well and you have to clean it up as your glue is setting on the strips...
So, here are some staples that have been applied with tape applied as shown above.

You can see visually, that they aren't driven below the surface of the strip. This has several major advantages. First, we won't get the dent noted above. Second, as seen below, the tips of the 1/4" staple don't break through the strip. (The 9/16" staple still does as it wasn't "backed-up" by the forms.)

Third, you can get a staple remover under the staple to lift it more easily and as I said, there's no dents!

There are still staple holes, but these can be swelled shut with a steam iron and a damp cloth when the hull is complete and the staples removed. They will still be a dark dot because the tearing of the wood fibers made by the staple going through the strip, but this cannot be avoided when stapling strips.
I should point out that you can apply tape to the sole of the stapler and still get the dents from the staple's crown. You need to keep the sole of the stapler on the hull like this:

NOT like this (note raised heel of stapler):

If you drive staples like in the last picture you'll still have dents - tape or no tape.
Methods and technique solve this issue.
Below are a few of my staplers. At the top left is a typical Arrow-brand hand stapler. (an older model) At the bottom left is an electrical stapler made by Stanley. The two on the right are different generations of the PowerShot staplers.

The traditional style stapler works OK , but the force that you apply is away from the point where the staple is being dispensed. This can cause issues with not driving the staple deeply enough - particularly at the stems. The electric stapler was OK, too, albeit a bit bulky - but the main problem was with the cord - it was always in the way and we always seemed to be moving it around. While I don't show an air stapler here, I find the same things to be true of the hose as I do for the cord. I have come to like the PowerShot style staplers for their reliability and ease of use. The do take a bit of getting used to - people try to use them backwards thinking the staple exits at the "heel" like a traditional stapler - but once you get used to them, I find that applying force over the staple exit makes lots of sense.
As you can see in the picture, the two PowerShot staplers look almost exactly alike except for the blue tape at the finger hole. The blue tape is for a very specific reason. I use both 1/4" and 9/16" leg length staples to build canoes and I need to know the difference. Why, you may ask? If you've ever been backing up 1/4" thick strips with your hand and accidentally drive a 9/16" staple through the strips and into your finger, you'd know why! OUCH! The tape tells me which size staples I've loaded in the stapler.
In theory, you drive the 9/16" long staples at the stations to hold the strip to the station as the glue is curing. You also use them to hold the strips to the stems as the glue there is curing. If they are in a neat row on the forms, the holes will draw the eye less then poorly aligned staples. The 9/16" long staples should be aligned with one another as best as you can and driven in the center of the strip so as not to pass through the cove or bead on the strip (if you're using cove and bead...) You do NOT want the 9/16" long staples to bridge across the strips (i.e. one leg in each strip) as this causes problems with strips staying on the forms. Because the back of the strip is supported by the forms, there should be no chipping on the back side of the strip.
The 1/4" long staples are intended for holding the strips together between the forms. Unlike the 9/16" long staples, they are intended to bridge between two strips to hold the joint closed as the glue sets. Anywhere there is no backing to drive a longer staple, you should use the shorter 1/4" staples. As noted above, this is a whole lot easier on the builder's fingers. Smaller gage staples are fine here - they will be less obvious when removed.
If you simply take a stapler and start building your canoe, you will get the following results -
Note that the staples have been driven below the surface of the strip:

This is the back of the strip - note that both the 1/4" and 9/16" staples have broken through and chipped out the back of the strip.

I should note here that the back of the 9/16" long staples is only breaking out the back of the strip because there isn't a form backing them up, and that the 1/4" staple should not break through, but has because it has been driven too deeply.
This is the front of the strip after the staples have been removed:

These dents will show up as "bruises" on the surface of the canoe even after you have faired and sanded them out of the surface of the canoe. This is from the tearing and deformation of the wood fibers. If you look carefully, you will also see a small circular dent from the staple remover.
Darn.
But I don't want my canoe to look like that with a line of bruises.
Is there a solution?
Yes.
Masking tape.
Masking tape?
This is the sole of one of the PowerShot staplers. I've applied a strip of tape to the sole to keep any glue out of the mechanism. I've also built up 7 layers of tape near the point where the staple exits. (Your mileage may vary - you might need more or less tape depending on how thick your tape is, how much force you apply, etc., etc...) This will raise up the sole of the stapler so that they will not be driven so deeply. The downside is that I need to pull this off when I need to refill the stapler, but it's worth it.

Here's the "mouth" one of my long-used Power Shot staplers where the staple exits without tape. If you'll look, you'll see that other than a bit of dust it is very clean.

This is very important. When you are applying staples to the canoe, you want the stapler to function well. If it is all gunked up with glue, the stapler can jam and will not work smoothly. It's frustrating when you're trying to apply strips only to find that the stapler isn't working well and you have to clean it up as your glue is setting on the strips...
So, here are some staples that have been applied with tape applied as shown above.

You can see visually, that they aren't driven below the surface of the strip. This has several major advantages. First, we won't get the dent noted above. Second, as seen below, the tips of the 1/4" staple don't break through the strip. (The 9/16" staple still does as it wasn't "backed-up" by the forms.)

Third, you can get a staple remover under the staple to lift it more easily and as I said, there's no dents!

There are still staple holes, but these can be swelled shut with a steam iron and a damp cloth when the hull is complete and the staples removed. They will still be a dark dot because the tearing of the wood fibers made by the staple going through the strip, but this cannot be avoided when stapling strips.
I should point out that you can apply tape to the sole of the stapler and still get the dents from the staple's crown. You need to keep the sole of the stapler on the hull like this:

NOT like this (note raised heel of stapler):

If you drive staples like in the last picture you'll still have dents - tape or no tape.
Methods and technique solve this issue.
Monday, February 14, 2011

Sunday, February 13, 2011
I love a full shop...

Four in the shop and one up in the hall. (There are four there - can you find them all?!) Next week it will be 5 in the shop and one in the hall.
That's what I love to see.
Friday, February 11, 2011
Finnish Determination

From the AP news:
Finns to revive beer from 19th century shipwreck
February 9, 2011, 12:46am
HELSINKI (AP) – Finnish scientists say they hope to re-brew an old ale after studying ancient beer found in a 19th century shipwreck at the bottom of the Baltic Sea.
The VTT Technical Research Center of Finland says it aims to determine the recipe used in the brewing of what is "one of the world's oldest preserved beers."
Divers in July found five bottles of dark, foamy beer while salvaging champagne from the wreck near Finland's Aland Islands. The shipwreck is believed to be from the early 19th century.
VTT spokeswoman Annika Wilhelmson said Tuesday that researchers want to find out what kind of yeast was used because "the role of yeast in beer brewing was not yet fully understood in the early 1800s."
(A bottle of beer that was retrieved from a shipwreck in the Åland archipelago in the summer of 2010, is displayed at the VTT Technical Research Centre of Finland in Espoo, Finland, Tuesday Feb. 8, 2011. (AP Photo))
I suppose what is truly amazing is that the stuff survived!
Wednesday, February 9, 2011

Monday, February 7, 2011
I Love My Job... I Love My Job... I Love My Job...

While I don't know if anyone has ever seen the movie above (Sunshine Cleaning) - I can tell you that it is a funny, quirky film about a family that gets involved in the 'cleaning' business - after crime, suicide and unattended death. (Odd, in my opinion, but definitely worth a viewing) While it is a rather disturbing subject to think about, it is definitely a very necessary service. As I was driving along yesterday, I saw a white van with the words "Aftermath, Inc." on the side.
Curious at this rather unusual company name I did a quick bit of research. Turns out they are a real world "Sunshine Cleaning" business.
From their website:
Aftermath Inc provides professional services for blood clean up, death clean up, homicide clean up, suicide clean up, unattended death clean up, accident & injury clean up, industrial accident clean up, vehicle/automobile clean up, hoarding & filth clean up and tear gas remediation.
Ewwww...
Definitely not a job for me, but I'm thankful there is somebody out there who will do this. A book has even been written about their business:

At work today, I was particularly appreciative of my job - I had an "ohnosecond". I'd made a particularly bad mistake about the orientation of a part. Fortunately, two of my employers were able to provide a quick and simple remedy to my situation. Besides - after thinking about Aftermath, Inc., my job is a breeze...
Wednesday, February 2, 2011


Subscribe to:
Posts (Atom)


