Monday, May 31, 2010

Getting Close!

My classes have ended until next Fall, so I've been able to enjoy a little bit of time to myself of late. Not tons of time, mind you, but a bit.

My student who has been building the Newfound Woodworks Osprey has taken the boat back to his shop for some finishing details. The kayak is, for the most part, complete. The hull and deck have been made, the coaming is formed and two bulkheads have been fitted.

This Saturday, he asked me to come over and help bond the deck down the the hull. We've got a sheer clamp at the top edge of the hull that we installed as the kayak was being built so that we could bond the deck to the hull with thickened epoxy. Here's the kayak bonded together and trussed up like the Thanksgiving turkey with inner-tubes:


Once this has cured a piece of 'glass tape will be epoxied over the outside of the hull/deck joint for strength and waterproofing. A cosmetic Butternut coaming cap will go on and the seat and footbraces installed. At this point, only a bit of minor epoxy work on the deck and varnishing stand in the way of the first paddle.

Eventually, he plans to cut hatches in the fore and aft decks, and add some deck rigging, but he's been waiting so long that he will wait to cut the hatches until after he's paddled it a bit!

Monday, May 24, 2010

2010 John Gardener Small Craft Weekend


If you're a big small-boat person like I am (please pardon the oxymoron...) , you probably know about John Gardner. Mr. Gardner was a curator at Mystic Seaport and an author of several books about traditional small craft including boats for paddle, sail, oars and combinations thereof. He kept the traditions of small craft building alive at the museum in classes that were taught there.

In his honor, Mystic Seaport hosts the John Gardner Small Craft Weekend, which will be June 5th and 6th 2010. If you have an interest in small craft, you really owe it to yourself to go!

If you can't make it, be sure to treat yourself to a look at his books on the subject at your local library or available from many online book sellers including Mystic Seaport's Museum Store, and The WoodenBoat Store.

Thursday, May 20, 2010

Thought for the Day

If you think you're too small
to have an impact,
try going to bed
with a mosquito in the room.

Wednesday, May 19, 2010

Sunday, May 16, 2010

A Good Weekend and a Good Day


This weekend, the class made some great strides on their boats. The kayak's interior was sealed for glassing, the trim on the Wee Lassie is well underway, three seat frames were prepped, bottom panels were scraped and sanded for installation, and a set of strips were ripped for a new boat.

Also, this weekend was also my birthday. Somebody let the cat out of the bag because my students had a cake, ice cream and balloon to surprise me - the cake even had a canoe on it! As we were eating cake I learned that one of my student's had her birthday Friday, another Saturday and mine which was actually Sunday - I wonder what the odds were of that!

Saturday evening we invited my father to join us for a birthday dinner with ribs, chicken, grilled asparagus and sliced Yukon gold potato and sweet onion with garlic, chicken stock and olive oil with a bit of parsley, salt, pepper and garlic. (Have I mentioned before that I'm a foodie? Who else could talk about potatoes that way?) The big surprise were that there were two more birthday cakes! After dinner we sat down and watched The Princess Bride. DS provided vehement opposition to watching the movie, but after he watched it decided that it wasn't that bad and would like to watch it again.

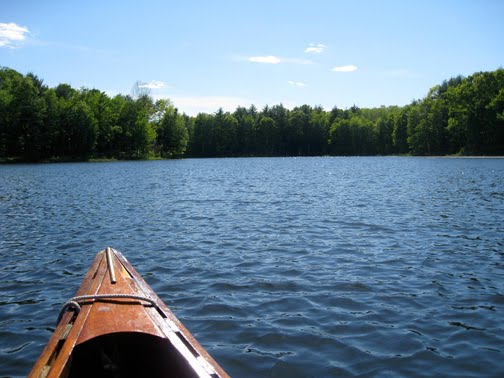
This morning I woke up and took DS swimming at our local YMCA and did the food shopping. This afternoon, I got to do something that I really wanted to - I went for a canoe paddle with my dad.

Out came an old paddle. This was my brother's paddle - when I was much younger, my entire Scout Troop made a paddle for a canoe trip that we took to Lake George, New York. Ahh, the memories.

I'm in this picture, but I won't help you find me in it!


The canoe that we chose to take has lots of memories as well - for both my father and I. It was a canoe that my father found for sale at a local lake that is overcrowded with summer camps. When he found it, it was in very, very poor shape. It had been left outside on the ground - for years and years apparently. He bought it anyway - I thought it was an irrational decision as the canoe was a wreck when he got it, but we started working on it. What was left of the rotten deck had a Chestnut Canoe logo on it:

What made his reasoning much more clear to me was when he was inspecting what was left of the canvas. He said, "I thought so." There was a bit of a color known as Chinese Red. Apparently, this canoe had been one my father had paddled as a boy on the pond where the canoe was found. I'm not sure but what the canoe had some age to it already when he paddled it as a boy.

We replaced stems, planking, decks, spliced in tips of inwales, re-caned the seats, re-canvased the canoe and replaced the stem bands. The result is below:


We're not sure what model it is, but it is a 15' canoe and is about 33" in the beam. She's not a beauty queen - the planking isn't really fair and has gaps. One of the ribs is broken and will need to be replaced the next time we re-canvas. (We've canvassed her twice since we got her...) It needs a coat of varnish and a new stem-band:


She's still one of our favorite canoes - it's light and is a nice canoe to paddle on your own or to paddle with others. I should probably take the lines from her.

The place we went to paddle was about a half mile from where I grew up. It is a 40 acre man-made pond but is called a "lake". It was originally built with the intention of putting up a development with houses around the lake. Fortunately, this never happened and the property
was ultimately purchased and protected as conservation land. The protected area is now about 625 acres in total. I referred to this place last year in this post. Like the river I posted about here, this is a mini-wilderness within reach of many people.

The walk in had some pretty wildflowers (and poison ivy!) along the path:


There was also a nice passage through a shady grove of pines:


What is truly amazing about this place is that it is a wilderness that has been made handicap accessible. There are board walks with small bridges that let those who are in wheelchairs get to the trails and get to the water's edge.


It was a beautiful, albeit breezy day.


This particular area has lots of wildlife - for an area that is so close to populated areas, and gets so much use, it is amazing how much wildlife sticks around. There are bears, deer, otter, muskrat, raccoons, skunks and other smaller animals around. There are also beavers. The beavers themselves were not in evidence, but several lodges that were either in-use, abandoned or being build surrounded the shore. The lodge below is an active one.


The "lake" isn't that deep in many spots. If you weren't drawn in by the boot-sucking mud at the bottom of the pond, there are some spots where you could probably walk from shore-to-shore. The lake is pretty well choked in spots with pickerel weed and lily pads. Algae is abundant as are the fish - mostly bass, pickerel and sunfish from what I could tell. Cat-tails and wild iris line most of the shore and in spring, the red-winged blackbirds are hanging out on last year's cat-tails chirruping to their heart's content.


We saw one huge snapping turtle in the water that I couldn't get a picture of - it looked for all the world like a large rock - it had a shell that was about 14-16" across if it was an inch. Painted turtles were sunning themselves in the shallows and on rocks and trees in the water.


We saw signs of spring everywhere - like these geese and downy goslings. They were very cute.


I think the family of geese were too close to another nest as the red-winged blackbird to the left of the next picture was harassing the parents by landing on them!


We also caught glimpse of a mallard and a string of downy ducklings following through the grass at the edge of the water, but they were too far away for a good picture. I don't know how many broods there were, but it seemed like there were 8 or 10 of the ducklings at the least.

We saw two other boats - one was a fellow my father knew who had just returned from a paddle in a new plastic kayak. He'd had a nice paddle but was looking forward to going home and taking in a basketball game. We also saw one other canoe on the water - fishing.


Our return trip back to the put-in was made a bit difficult by a freshening breeze. We had to work fairly hard to keep on a straight track into the wind to get under the lee shore. No whitecaps - just a stiff breeze that was turning over the leaves of the pickerel week that lay on the top of the water - it looked like we were being waved at by many, many hands. As we approached the dock at the put-in, we saw two young ladies in an inflatable plastic raft with stubby paddles who were headed out onto the water. I do hope they knew what they were getting themselves into with the wind.

The boat needed a quick was on the return home to get rid of the new "waterline".


We also seem to have disobeyed the paddler's mantra that my father taught me many years ago:

"A canoe's bottom only touches two things
- one is air and the other is water."


I think from the scratches that we found a little hard water...

Friday, May 14, 2010

Thursday, May 13, 2010

No good deed goes...

My next-door neighbors lost a small tree to some heavy ice late in the winter. It wasn't a big tree and it had been where it had fallen blocking part of their sprinkler system for about two months. A few weeks ago when my neighbor and I were putting together a new basketball hoop, I mentioned that I have a chain saw and would help him clean up his tree if he wanted. He said that he didn't have a saw and that he'd think about it.

Last week my neighbor said that he'd like to take me up on my offer to help cut the tree up sometime over the weekend. The neighbors were away visiting parents for Mother's Day last weekend. DS and I had some spare time, so rather than waiting for my neighbor, I sharpened up the saw, filled up the gas and bar oil and cut the tree up and dragged it away to the brush pile. It was a "Git-er done", kinda job, so rather than wait, we figured we'd make it happen. It was a relatively small tree - maybe 4 or 5 inches in diameter at the trunk and I probably spent more time sharpening the saw than cutting and moving the wood.

Imagine my surprise when I was grilling some dinner on Tuesday evening when my neighbor comes striding across the back yard with these in his hands:


Oops... One seemed to get emptied before I got to take the picture. ;-)

Thanks, neighbor!

Wednesday, May 12, 2010

Tuesday, May 11, 2010

Tech Tip Tuesday

One of the more traditional woodworking projects that we do when building the canoe is the fabrication of the seat frame. Because commercially made seat frames are available so cheaply, many people skip this part of the process and just spend the $40-$50 that a seat costs and call it a day.

For many of my students this isn't always a good option as they want to use a specific kind of wood that isn't commonly available as a seat frame. The other problem that I have with commercially made seat frames is that they are often made from machine woven cane that is pressed into the frame with splines. I have found that it tends to pull out more than hand-woven cane that we install. This process does take a fair amount of time, but it is important to remember that my students are building the boats - not just assembling kits.

This joinery would be familiar to anyone who has done any furniture or cabinet work. Basically, the seat is an "H"-shaped frame made from hardwood and held together using a mortise-and-tenon joint. For those not familiar with a mortise-and-tenon joint, it is clearly shown in one of the photos of last Saturday's class:


In the long rail sitting on the saw table is a rectangular hole - this is the mortise. On the end of the stretcher that is pointing straight up we see the tenon - a relieved "tongue" that fits into the mortise. Once glued together, this creates a very, very strong joint. For our Wee Lassie and Wee Lassie II, we make the same seat frame. It has an 11" square opening and is 28" wide before we cut it to fit the boat.


To get started on the seat, we first "dress" the rough-cut stock from the lumberyard. This is done to achieve flat stock with smooth parallel faces on the top and bottom and a smooth perpendicular edge so that we can then cut the wood on a table-saw without difficulty.

To do this, we flatten the board (if necessary - if the board is warped, twisted or cupped) on at least one face using a jointer and then plane the stock on both faces using a thickness planer to get flat, parallel surfaces. The flattening process on the jointer can be very important because if we just tried to plane the stock down, the planer can apply enough force to press the stock flat while it is being cut, but let it reflex after it leaves the planer resulting in parallel, but warped, twisted or cupped stock.

After the wood has been planed to the appropriate thickness - between 3/4" and 7/8" thick depending on the type of wood and the paddler's, um, gravitational attraction. We then use the jointer to mill one edge of the board so it is straight along the length of the board and the edge is both smooth and square to the faces of the board. We are very fortunate to have a 12" wide jointer and a 24" wide planer in the wood shop which help to make this job easy.

After the wood has been "dressed", it should look like this:


We now have to cut the board to the proper width and length for the rails and stretchers for our seat. Using the table saw, we rip stock to just over 1-1/2" wide, and at least 30" long. We'll need three pieces per seat. These cut pieces are then cleaned up using the planer to get rid of the saw marks and we use a cabinet scraper to assure perfectly smooth surfaces on the four sides of these three pieces. It is easier to do this before we assemble the frame.


Nothing like a nice pile of shavings from scraping...


We then use the "chop saw" - a dual bevel miter saw - to square one end of each piece. We then cut two of the pieces down to 28" long for the rails. To get pieces that are exactly the same length, we cut both pieces at the same time. We cut the third piece in half and then the two remaining pieces are cut to be 14" long to become the stretchers - again making the cut at the same time.

The general location of the mortise is then marked on the rails. As I mentioned before, the distance between the stretchers will be 11". I make marks on the rail to indicate the inside and outside edge of the stretchers. The inside edge of the stretchers are 11" apart, centered on the rail. When considering the amount of material to be remove for the mortise, I want to leave a minimum of 3/16" of material all around. I mark the size of the mortise opening and put an "x" through the area to remove.


While this next step can be done with a mallet and chisel, we use a mortising machine. This machine is basically a drill press with a hollow, square chisel that surrounds the drill, allowing us to cut square holes. We use a 3/8" square mortising chisel and set the mortiser up so that the depth is 1/4" less than the width of the rail. The width of the mortises is just a smidgen (That's the technical term for it...) wider than it needs to be - about 1/32" - 1/16" on both sides of the four mortises. This will still be hidden by the shoulder on the stretchers. We then flip the rails and repeat the mortising cut. This is to assure that the mortise slots are centered in the rails.


At this point, we have two rails with four mortise slots in them.

The tenons are then marked out on both ends of both of the 14" long stretchers. The tenons will be 1-1/2" long, yielding an 11" space between the rails on the finished seat. What I do is simply to make a cut that goes all the way around the rails 1-1/2" from the ends using a utility knife. When the tenon is finally cut, this keeps the surface from tearing out beyond the cut.


The table saw is then set up with a dado blade. A dado blade is usually a stack of several blades. End blades which look like typical saw blades and "chipper" blades which go between the two outer blades. Dado blades let you cut rabbets (rebates), dados (slots) and tenons. We're using it to cut tenons. In our case, I raise the height of the blade to be the same as the thickness of material between the mortise and the outer face of the rail. This will remove the right amount of material all around the stretchers to form the tenons.

I then attach a block to the fence of the table saw. It is imperative that the block stops before the point where the saw blade protrudes from the table. This is to prevent jamming the stock and causing a dangerous kick-back. This block will be used as a stop to set the tenon depth. The surface of the block closest to the saw is set 1-1/2" from the opposite side of the blade. (Use the scribe mark for the tenon on a stretcher as a guide. Here's the set-up shown with a standard table saw blade and a finished tenon for clarity:

Using the miter gauge for the table saw, cross-cut the stretcher starting at the shoulder and then pulling back from the block and making more passes to remove all the material. Rotate the stretcher and repeat to remove material from all four surfaces. The completed tenon should look like this:


Once all the parts have been milled, we dry fit the whole thing together and check if any tune-ups to the tenon are needed. When the fit is perfect, we apply glue to the mortise and the tenon and glue the frame together making sure that everything is square. The seat needs to sit and let the glue cure before further work happens.

Once the frame is assembled and the glue is cured, we use a palm router with a 1/4" or 3/8" radius round-over bit with a follower to break the sharp edges on the seat frame. This will make the frame more comfortable to sit on when complete. It will also avoid thin spots in the finish on sharp outside edges.


We then drill the holes for the cane. For the common cane (a specific size of rattan cane) that we use to weave the seats, a 5/16" diameter hole on 7/8" center-to-center spacing is required. These holes are drilled 7/8" away from the inner edge of the frame. When drilling, be sure not to break out the back surface of the frame. We do this by using a brad-point bit and setting the depth on a drill press to let just the center point come through . We then flip the seat over and use these marks as a guide to complete the hole from the opposite side. We then use a counter-sinking bit in the drill press to make a 3/32" chamfer on the holes on both sides of the frame. This relieves the edge so that the cane doesn't get cut on the sharp edge of the drilled hole.

Once this is complete, your seat frame is ready for sanding, varnish and weaving of the cane.


A little bit of work, but worth it!

Sunday, May 9, 2010

Boat Builders?

The weather this weekend was less than co-operative for class this weekend. While we've been spoiled by the nice warm, clear days that we had for the past few weekends, we were deluged with rain this Saturday. Still, I'd like to think that we had a very good class just the same. Even though it isn't the case, it seems like we were doing everything but building canoes as there were only two actual boats in the shop.

The strong-back assembly finally came out of the kayak hull this weekend. I had been delaying it for several reasons. First, we wanted to complete the deck up to the point where both sides were 'glassed and the coaming was installed. Second, I wanted to leave the frame in place until the last minute to prevent the hull from "relaxing" prior to the installation of fiberglass on the inside of the hull.


When we built this boat, we did some things which varied from the original plans a bit. We put notches in the corners of the patterns to allow us to install sheer clamps as we built the kayak. On a friend's previous kayak build, we put the sheer clamps in after the hull was complete and it was a pain. The other issue is that we needed to get the hull edge and sheer clamp to be beveled to match the deck shape. This would have been made very difficult if the patterns weren't in place to use as a guide.

With the notches for the sheer clamps, the student was concerned that we wouldn't be able to get the forms out of the hull as the patterns were undercut. I knew that the hull would still flex enough to get the forms out. Fortunately I wasn't proven wrong. I should add here that we were hoping not to cut the strong-back to get it out of the hull. Here it is - free at last! :


The student who had completed the woodwork on his Wee Lassie II, the Double Espresso, wanted to build a pair of paddles for the canoe. He made great process and with a bit more sanding and varnish, he will be finished with them quite quickly - they are nice looking paddles that are patterned from a design in Graham Warren and David Gidmark's book, Canoe Paddles : A Complete Guide to Making Your Own. He still has some caning to do on his seats and varnish, but his boat and paddles should be ready to enjoy this summer.


Another student had 'glassed the inside of her Wee Lassie last weekend. This weekend, we cut the sheer, cut back the inner stems and did a rough fit of the decks. We should be well on our way to completing the trim before the end of the year. It's looking good.


Rather than move the other boats (without fiberglass...) in the rain, we opted to work on their canoe seats. There were three seats made - one cherry one for a Wee Lassie that is in progress and two Peruvian Walnut seats for the Prospector Ranger. I'll be posting more about that process for Tech Tip Tuesday. It made for lighter lifting than usual!

Thursday, May 6, 2010

This is why you wear safety equipment.

Last night, I was getting ready to sand some plywood in the garage for a little renovation project. So, I got out my power sander, some sanding discs and my safety equipment (minus my glasses...) seen here:


Now, keep in mind that the last time I used this equipment was while cleaning up the shop at the school where I teach last weekend. I was using the dust mask and hearing protection as I ran the shop vacuum to get into corners and crevices. When I picked up my mask, I thought, "Ewww...".

Here is a close-up of the mask's filter - it should be bright white:


Time for a new clean one. Boy - am I glad that wasn't in my nose and lungs!

Protect yourself!

Wednesday, May 5, 2010

Wordless Wednesday...

I can't leave you folks hanging about today's Wordless Wednesday picture.

This is a picture of RawFaith in Portland Maine on the waterfront adjacent to Portland Yacht Services. RawFaith is an 88 foot long, three-masted, 300 ton galleon modeled after the English galleons of the 16th century. It is the brainchild of George McKay, a former engineer who felt "called" to design and build the ship. This gentleman and his now ex-wife have a daughter who has medical issues and is wheelchair bound. Inspired by the wish to be able to take his daughter and other wheelchair bound kids and their families sailing, Mr. McKay, created this ship and a foundation intended to accomplish that mission.

I have no wish to judge or ridicule Mr. McKay, but there appear to be some issues with the execution of his idea. Those who have seen the ship describe it as primitive, workman-like and crude. Observations have been made that the ship doesn't even seem to be well suited to the task of taking wheelchair-bound people and their families sailing. As you can tell from the picture, the boat lacks finish. I also gather that it lacks an engine.

There have been issues at sea with the maneuverability (or lack thereof) and strength of masts and rigging. The ship has been dis-masted at least once that I know of, had a rudder fail, and has been towed back to port by the Coast Guard on several occasions.

The local Coast Guard Commander had gone so far as to state that the boat will never carry passengers for hire and had restricted the ship to Rockland harbor until it could be shown to be able to maneuver safely under it's own power. I would assume that this restriction was lifted in some form as the Raw Faith was in Portland with the intent of putting an engine into her - perhaps it was towed there?

A quick web search for Captain George McKay or RawFaith will yield many links - this has been a very controversial vessel.

I will let you draw your own conclusions.

Wordless Wednesday

Tuesday, May 4, 2010

Turbulent Tuesday : Wild Weather Day

Today started out as a beautiful, if a bit breezy day. I had lunch outside at a picnic table at work and if it had been a bit less windy, I would have been awfully tempted to go grab a boat, paddle and life jacket and go play "hooky". We even had the doors open at work to let the breeze flow through it was nice.

Until about 4 o'clock.

One of my co-workers was looking out the back door and said, "We're gonna get whacked."

Huh?

I got up from my desk and went to see what was making him say that. There was a band of dark black clouds in the direction that the weather normally comes from. It was the kind of cloud that is the harbinger of a squall. Another co-worker was standing at the front door and said, "Wow. Look at that." Dark clouds of brown dirt from off local farm fields were airborne along with bits of leaves and other light debris. At this point the wind speed probably doubled and the rain began. The temperature also probably dropped about twenty degrees in the mount of time that it takes to read this paragraph. The lights flickered and went out and thunder could be heard. Co-workers were also commenting about the rather ominous rotation that was plainly visible in the clouds to the south.

We waited for the lights to come back on and they flickered hopefully and went out again. About 10 minutes before the end of the day, the power came on for a few minutes - enough for me to almost reboot my computer before the power went off again and I decided to call it a day.

The ride home wasn't uneventful - power was out in a very large area and stoplights weren't working leading to snarled traffic. Several very large trees, including one about 2' in diameter were fallen, as were many large limbs. Large clumps of leaves were tangled up in the insulators of power lines that were far, far away from any trees. If it wasn't a tornado, I'd be amazed.

Here's a picture of the "back" of this front about an hour after the events at work started:


As you can see, as quickly as the front arrived, it was gone. When I got home, it was a beautiful and sunny, but cool evening.

Another take with more pictures from Da Goof.

Sunday, May 2, 2010

Full Weekend.

It has been a very busy weekend. We were fortunate to have another class with wonderful weather that allowed us to work outdoors, which is something I really enjoy. When the weather is good like this we spend a little less time moving boats into the shop and more time building.

The students had some fantastic accomplishments this weekend. One student and her sister just recently finished the prep work on the inside of her Wee Lassie canoe. Many people feel keeps going on and on and on and on.... This work starts with scraping out any residual glue and smoothing the inside of the canoe, which is made more difficult by the concave interior surfaces. Any checks or voids get filled with dookie shmutz and this gets sanded again. We generally apply a sealer coat of epoxy over the whole interior. We finish up by putting a layer of fiberglass and epoxy on the interior. We do this fairly carefully by saturating the cloth and then going back over it with a squeegee to remove excess epoxy and get a nice matte finish that leaves the texture of the cloth. We want the texture in the interior surface of the boat so that it isn't as slippery when it is being used. It is a real milestone in the building process because all that's left is trim work.


The couple who are building the Prospector Ranger fitted the two bottom panels on their canoe. We fit them as panels as opposed to fitting each bottom strip individually - it is quicker from a building standpoint and I find that it is easier for novice woodworkers to get good results. This is another milestone in that all of the hull woodwork is complete. For large boats, the last plank put on the hull is known as the "whiskey plank". It is cause for celebration - traditionally in the form of an alcoholic libation. The cut and fit are complete and next week we will glue the hull panels in place using inner-tubes to clamp them into position.


Another of my students has just completed his Wee Lassie II. This boat is known as the Double Espresso as this gentleman owns a business selling coffee and has been kind enough to bring in a coffee machine and supplies for the class's 10 O'clock "union break". The canoe has a Western Red Cedar hull with Poplar and Spanish Cedar for a feature strip. The thwart, seat gunnels and coamings are all Mahogany and the decks are Tiger Maple surrounding a Mahogany center stripe. The desk have both an elegant arc and taper to them. The boat still needs the seat to be caned and some varnish, but essentially it was ready to paddle.


After we got the boats put away, I went home for a quick lunch and then headed out to take the family to a circus which was in the area this weekend. Lions, tigers and (no) bears - oh my... I think they had a good time although DS was disappointed not to come home with one of the lighted novelties that they had for sale at the circus. DD simply thought that all the animals were, "Sooo cute!"

We had a nice family dinner out afterward. Low key - which was nice.

Today, my fellow instructors and I had a mission at the school - clean. We arrived at the shop just before 9 AM and proceeded to take the place apart. As my DW pointed out to me this afternoon, nobody has done this level of cleaning in the shop in about 10 years or more - and the place needed it. We cleared out odds and ends of hardware, wood, cardboard, sawdust, chips, cobwebs and myriad other items that were, to be kind, "past use". We brushed down the walls, ceilings, floors and tools. We cleaned out all the dust collection equipment. We spent nearly 7 hours cleaning the shop - and it really shows. We still have more that we'd like to do to clean up and organize, but that will have to wait for another day.