Showing posts with label tools. Show all posts

Tuesday, January 31, 2012

Tech Tip Tuesday

I've said it before, and I'll say it again:


It's not the clothes that make the man, it's the tools. 

                                                                        -Canoez


In this case, we're talking about planes.  There is a great variety out there, the good, the bad, and the just plain ugly.  For the type of small boat building that I do, I find a pretty large variety of planes to be pretty useful.  For most novice boat-builders, it can be challenging to learn the skills you need, and this is even worse when you've got bad tools.  Selecting good tools can be hit-or-miss, even if you are careful.  The best way to select a good tool is to try one out.  This can sometimes be done at woodworking trade shows.  If that's not possible, see if you can find someone who has the tool that you're interested in so that you can try it out.  Usually, this helps weed out the really bad ones.

Let me mention at the outset that you can go and buy some great planes right off the shelf from makers like Lie-Nielsen Toolworks and Lee Valley Tools.   For slightly less money, I've also been hearing some good things about the re-worked Stanley Sweetheart line of planes, too. Then again, you can get into some seriously rarified air with infill planes from the likes of Karl Hotley.   Beautiful, but certainly out of the reach of most of us.

These are some of the planes that I use and I'll point out some of the good and bad.

My first go-to plane tends to be a block plane.  I do prefer a low-angle plane for working soft cedar.  These planes are used for shaping stems, fairing the hull and smoothing the sheer.  Handy as all get-out.  From the bottom up we have a Stanley #102, a Stanley 12-247, two Stanley 60 1/2 low-angle, and a Borg brand plane.


The first plane I ever bought was the 12-247 at the top of the image below.  It's really a carpenter's tool and lacks some sophistication.  It and the #102 (at the bottom of the image below - purchased last year.) are very similar in that they don't have adjustable throats (you can't limit the chip you're taking off), the blade is set at a high angle, which is fine for many operations, but to adjust them is very difficult for a beginner as there is no skew adjustment lever on the blade and no threaded adjustment.  I usually stack the plane's sole on a piece of paper to get the proper cut depth.  Simple trick, but makes these planes relatively easy to adjust. 


The second plane I bought was one of the 60 1/2's in the early '90's.  It's a workhorse and has been made for some time.   It was a world of difference from the 12-247 for what I do - and it was reasonable.  It did need a bit of tweaking out of the box, but it wasn't long before it became a trusted and reliable tool.  It has a skew adjustment for the blade, the throat opening can be adjusted and the blade adjustment can be done with a knob that moves a fine screw thread.  I needed another one about five years later and figured I'd buy the exact same model.  It was not the same.  The differences are subtle, but represent manufacturing changes made to lower the cost.

First is the locking lever for the cap.  On the left in the image below is the older unit and on the right is the newer one.  The old locking lever and cam was cast - a robust and effective thing.  The new locking lever is stamped steel and doesn't stay locked.  It's horrible.


While not a disaster, you can see the difference in the quality of the knobs on these planes - can you guess which is which?


If you guessed that the plane on the left with the nice crisp looking knob is the older one, you'd be right.  There are other subtle and not-so subtle differences.  The opening for the throat plate was not well machined and required a file to clean it up before it moved smoothly.  Then, the cam that is underneath the knob in the picture above, doesn't appear to have been either properly designed or cut as it wouldn't let the throat open and close the way it should.  (i.e. the opening was limited and too small.)  The quality of the grinding of the castings was also not as good on the newer unit.  Quite frankly, I have retired it - it's not fit for use.

I then got a Borg brand low angle block plane from our friends up at the WoodenBoat Store.  Sadly, they no longer carry this plane.  It is very similar to some older Stanley designs, is almost exactly like one of the Lie Neilsen planes and is very nice for the price.  It is very comfortable to hold and use, has an adjustable throat, a nice threaded blade adjustment and a secure locking wheel to hold the blade in position.  Oh, and the fit and finish were excellent and the tool was ready to go out of the box.  

One big difference between the Borg and the Stanley 60 1/2 planes is the blade thickness (and probably the material (Borg on the left, Stanley on the right - note the shear mark on the Stanley's edge versus the nicely ground Borg) :


That's a significant difference in thickness.  Thicker blades tend to chatter less and cut better.  You can upgrade tools by purchasing new blades (irons) from Ron Hock at Hock Tools or one of his distributors.  They offer drop-in replacements for common planes that are thicker than the originals and made from high quality tool steels that are properly heat-treated.  A better quality iron can make a big difference in the performance of the tool.  That's worth repeating.  A better quality iron can make a big difference in the performance of the tool.

This is another plane purchased from the WoodenBoat Store and is unfortunately a bit of a disappointment.  It is an Anant brand rabbet (or rebate) plane that is a copy of a - you guessed it - Stanley product.  The tool's fit and finish is questionable as is the perpendicularity of the side of the casting to the sole.  No matter what I do, I can't seem to get the blade to hold an edge - I should probably spend some time tuning this up and getting a replacement blade, but I can't seem to get myself to do it.  Rabbet planes are very helpful in establishing a rolling bevel on a cedar strip canoe that doesn't use cove-and-bead strips because the blade runs the full width of the tool.


 The next planes that I use a lot are spokeshaves.  Very useful in shaping stems or fairing the hull.  I find the flat-soled spokeshave best for stems and the round-soled spokeshave good for getting into some of the hollow shapes on the outside of canoe hulls during fairing.  The two blue-handled planes are Record A151's in both round and flat soles.  (Model 151 is a Stanley number - surprised?)  The 151's are easy to use and adjust and have a nice set of double adjusters at the top to allow depth and skew of the iron to be adjusted.  The green handled spokeshave with the axial curve is a Groz brand plane.  I'm planning to use it on paddle shafts after going from rectangle to octagon cross-section.   It just has the single screw to adjust the blade.  It is definitely not ready for use yet and will need sharpening and clean up of the sole before I can use it.  Adjustment of the blade looks to be difficult.  Groz also makes a 151 model today with similar adjustments to the Record in both flat and round soles and looks to be a better quality tool than the one I'm showing.


The Record spokeshaves need some Hock blades, methinks.

The planes below are from Lee Valley - I tend to have one or the other in my shop apron for tasks that I just can't do with a larger block plane.  They are tiny.  The top plane is a reproduction of the famous Leonard Bailey #51 plane.  My father has an original that I've tuned up and sharpened up for him, but he would never part with it so I had to get my own.  The bottom plane is a copy of a Stanley #100 Squirrel-tail plane.  Both are fantastic tools for lots of odd jobs - the quality was outstanding and they were producing shavings right out of the box.  The soles and blades are lapped (a sharpening method that produces excellent finish and flat parts.)


These planes see less use, but are still handy.  One is a Sargent smooth plane (on the left) and the other is a Stanley 5-1/2 bench plane.  I use them both for truing up edges on boards before I put them on the jointer. (power, jointer, that is, not jointer plane)  Usually this involves taking off a high spot.  I also find these useful for trimming the centerline of the hull's "football".  Both of these planes were given to me by a co-worker in return for a table top.  When the arrived, they were both covered in rust and looked horrid.  A little careful cleaning, flattening and sharpening has returned them to good working order.  I'd love to know what the steel is in the Sargent's iron, as it is very, very hard and holds an incredible edge.
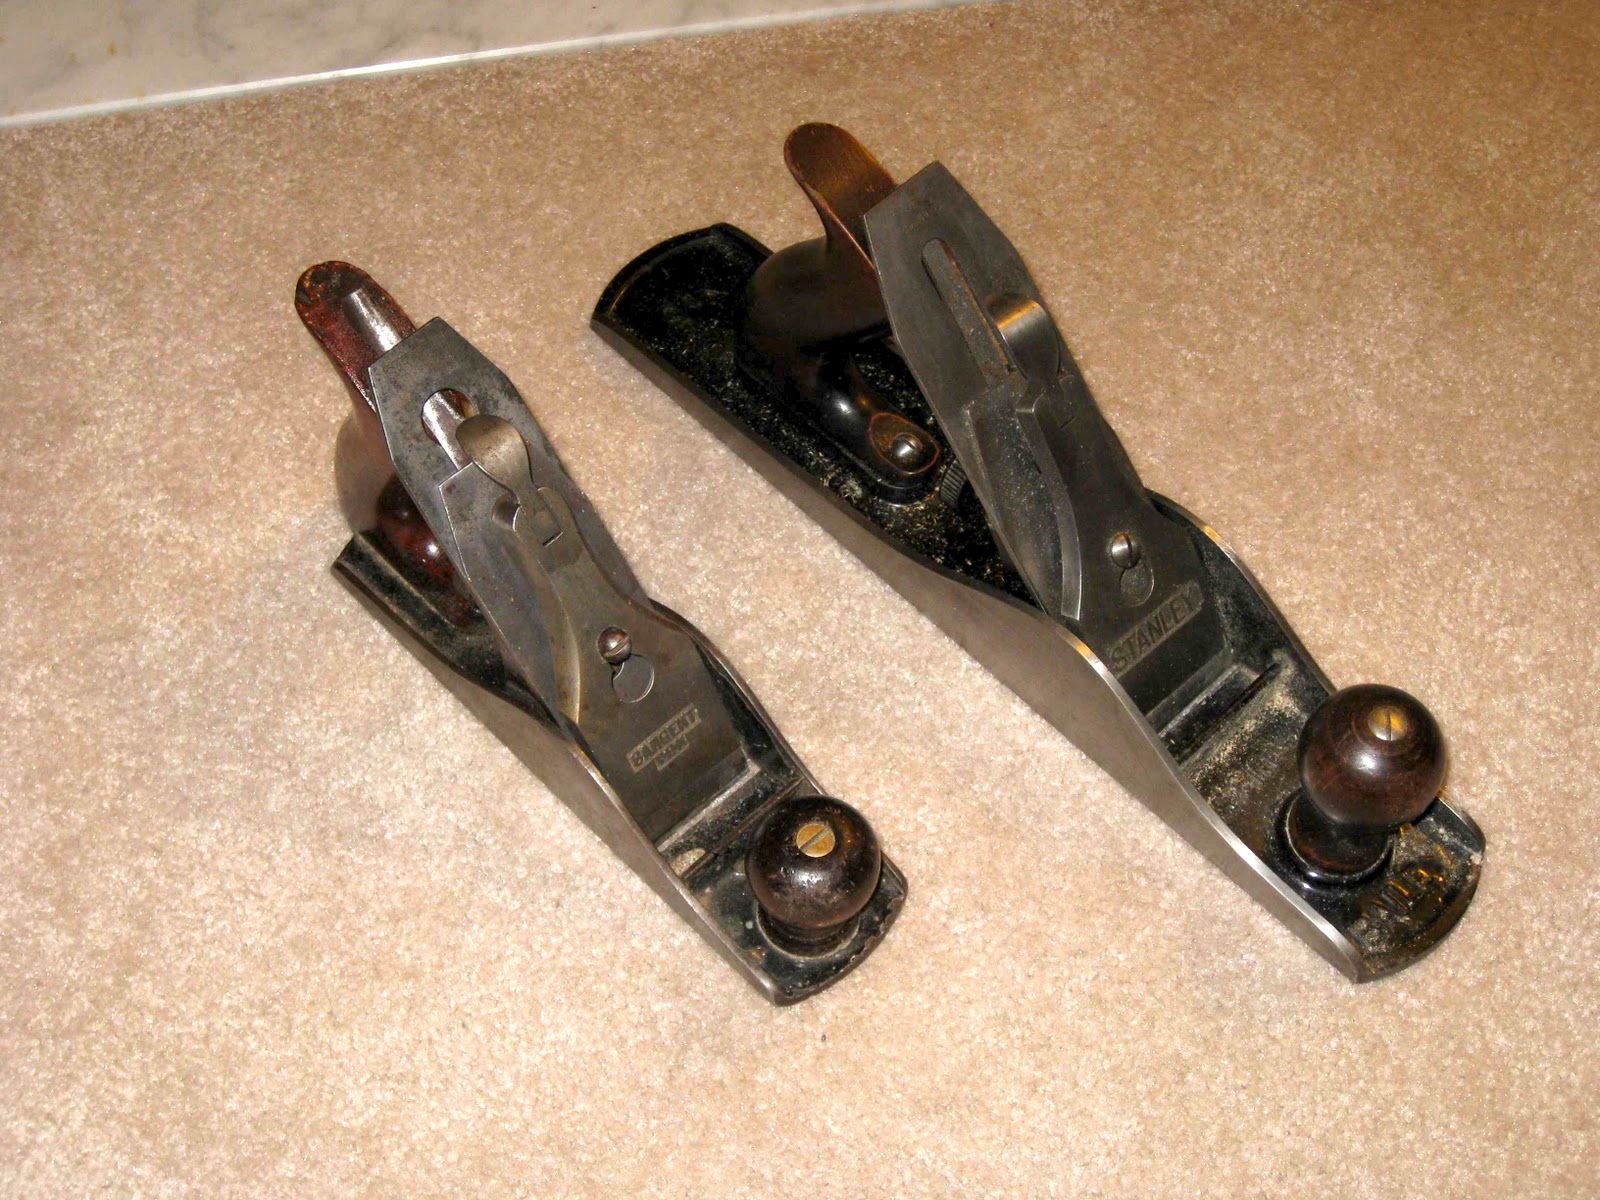

These planes - and ones like them at the school where I teach will be instrumental in the shaping of paddle blades for the canoe paddles.

Older tools are often available from used tool vendors, at flea markets, tag sales, on eBay, or Craigslist.  Very often, older tools can be had for a good price.  You should, however do your homework to make sure that it is a good tool and is in good physical shape (i.e. is the casting cracked?  are all the parts there?  is it damaged in some way?)  Also, not all older tools were good or successful - which is why they are available.  A quick trip to Patrick's Blood and Gore (yes, that's the name!)  pages will provide some good information on Stanley tools, and there are many others with information on Record, Sargent and others.  Learn about the tools you're planning to buy and what a fair price might be - sometimes they can be had quite cheaply!

One other thought is to learn to make your own wood-bodied planes - there are several books and web pages on the subject.  I'd try it myself, but I'm worried that it would become rather addictive.

All of this is useless, however, if you don't know how to sharpen, adjust, and maintain these tools.  A dull plane is useless - even a $4000 Hotley!

Monday, August 15, 2011

It's not...

It's not the clothes that make the man, it's the tools. 
                                                                        -Canoez

Well, I'm a firm believer in this as you can tell from my quote above.  I'm sort of a renaissance man in some ways  or Jack of all trades, master of none, take your pick.  Let's think about this for a minute.  I'm a homeowner and I like to be relatively self-sufficient in terms of maintaining my home and my yard.  There are certain things I don't work on - for example gas fittings, the furnace and hot water heater, but otherwise, I'm happy to work on most other things that are part of the home and the yard.  So, we've got the yard tools and machinery to cut grass and move snow.  Plus, you have to have the tools to maintain them.  I like to cook, so we've got a fairly well equipped kitchen.  I like to build furniture, so I've got hand and power tools that are geared towards that.  As a boat-builder, I've got some tools that are specific for doing that.  Because I have been trying other boat-building methods, I find that I need to either buy or build tools that are specific to the build type including 'glassing tools, lap clamps and hot knives for skin-on-frame building.

BUT.

The "but" is that I've had a problem.  Many of my tools and some of my tool storage are hand-me-downs or "finds".  I have a rugged wooden tool chest that belonged to my Grandfather and a very tired Gerstener-style tool chest that I've used for quite some time.  I also have a bunch of plastic totes that I store some of my "homeowner" tools that are specific to a job, like plumbing, sheet-rock and plaster work, electrical work, etc.   Because I carry tools back and forth to the school where I teach and take classes, I have some Nantucket Diddy Bagg(s) which I like a lot.  I've got a canvas one and a poly one, both of which I highly recommend.   I tried a gate-mouth bag, which I didn't care much for and a bucket-boss which was OK.  I also use a plastic crate and a wooden crate to store and transport some of my tools.

However, I've been trying to organize my shop and have better tool storage than the multiple bags, buckets and crates for the lion's share of my tools.  For a long time, I've wanted a "roll-away" style tool chest to store all my tools in.  This weekend, I finally took the plunge.

I've looked at a variety of tool chests and in particular liked some stainless-steel tool chests at the Big Orange Box for some time.   As you can see below, it is now in use.  It consists of a top chest and a bottom cabinet.  Amazingly (I guess...)  It is already full.    It is not a top-of-the line tool chest, but it is of decent construction including full extension drawers with ball-bearing slides, a lock, gas-shock lifts on the lid, a power strip (really) and locking casters.  I'm a bit suspicious of the "stainless steel" part - I don't know if you can see it in the picture, but there are two relatively large magnets (one for fixturing, the other a magnetic bowl for small parts.) stuck to the side.  N.B. - 300 series stainless steel shouldn't be magnetic, 400 series (which will oxidize...) is.


The two parts of this chest were heavy. DW and DD helped me get the two halves into the basement - Empty, they each weighed about 150 pounds.  We had all we could do to manage to put the awkward top on the base.


It is getting better in the shop space, but I still feel that I've got a long way to go.  It is a start, however.  Perhaps a second roll away is in order?

Tuesday, February 22, 2011

Tech Tip Tuesday.

Last week, we put 'em in, this week we pull 'em out. I'm talking about the staples - oh, and the nails used to hold the strips in place as the glue sets. Below are the fasteners that I'm talking about.


On the left is a 9/16" long staple used at the forms. I've omitted the 1/4" long staples used between the hull forms. On the right is a ring-shank panel nail that we use for balky strips. I've tried 1" long 18 gauge wire nails, but find that sometimes they pull up out of the forms. The panel nails stay in place.

In the image below are two tools for removing staples. The one on the left is attached to a stapler and I don't find it all that useful - it tends to leave circular dents in the strips. The pocket knife on the right I find incredibly useful - it is an excellent tool for exhuming those staples that you've accidentally buried in a strip.


In reality, I use a wide variety of tools:


The strip on the left is to support the tools when prying against the hull - this might be for a hammer (not shown) to pull a difficult ring-shank nail or for one of the little pry-bars at top center. These little pry bars are some of the fastest tools I know for removing staples or nails. They also have the potential to do a fair amount of damage to the strips when pulling fasteners. I don't really care for the tack puller (2nd from right in the top row), but it can do a good job of removing staples that aren't buried. The Bostitch staple remover on the far right is intended for removing heavy duty box staples and does a great job of removing staples in a hurry without damaging the hull.

The variety of pliers in the bottom row are good, too. The locking pliers are nice to get a purchase on broken staple legs or nails that are otherwise impossible to pull.

Also, when locked onto the nails, you can twist and pull the ring-shank nails without breaking out the surface of the strip.

I haven't discussed the use of nails to hold down strips before. There are some with great twist and bend that will not stay in place using staples alone, nails are required. When driving nails, you don't want to make a "rosebud" from hitting the hammer on the soft cedar hull. You also don't want to drive the head of the nail into the surface of the hull, either. To protect the hull, we use small pads made out of scrap strip with a hole drilled in them. It helps to hold the strip in place and protect it at the same time.

The other advantage comes when it is time to remove the nail. I use a hammer and the small pry bar to split the pads at the nail head like so:


When the pieces are removed, the nail is proud of the surface and you can grab the nail with locking pliers, twist and pull:


When finished, you will be fairing the hull - be sure to look over it carefully to make sure you didn't leave any fasteners in the hull to mar the edge of your plane irons!


All set and ready for fairing!

Tuesday, February 15, 2011

Tech Tip Tuesday

Today's post is on staplers. While it isn't necessary to use staplers to build a cedar-strip canoe, I find that for beginners, they are particularly helpful in getting good results on your first canoe. For subsequent canoes, if you want to go staple-less, fine, but learn what you are doing first as far as the building process goes. In particular, I think staplers are one of the more critical tools in the process and some subtle things can really help or hurt the cosmetics of the finished canoe. I'll show you why in this post.

Below are a few of my staplers. At the top left is a typical Arrow-brand hand stapler. (an older model) At the bottom left is an electrical stapler made by Stanley. The two on the right are different generations of the PowerShot staplers.


The traditional style stapler works OK , but the force that you apply is away from the point where the staple is being dispensed. This can cause issues with not driving the staple deeply enough - particularly at the stems. The electric stapler was OK, too, albeit a bit bulky - but the main problem was with the cord - it was always in the way and we always seemed to be moving it around. While I don't show an air stapler here, I find the same things to be true of the hose as I do for the cord. I have come to like the PowerShot style staplers for their reliability and ease of use. The do take a bit of getting used to - people try to use them backwards thinking the staple exits at the "heel" like a traditional stapler - but once you get used to them, I find that applying force over the staple exit makes lots of sense.

As you can see in the picture, the two PowerShot staplers look almost exactly alike except for the blue tape at the finger hole. The blue tape is for a very specific reason. I use both 1/4" and 9/16" leg length staples to build canoes and I need to know the difference. Why, you may ask? If you've ever been backing up 1/4" thick strips with your hand and accidentally drive a 9/16" staple through the strips and into your finger, you'd know why! OUCH! The tape tells me which size staples I've loaded in the stapler.

In theory, you drive the 9/16" long staples at the stations to hold the strip to the station as the glue is curing. You also use them to hold the strips to the stems as the glue there is curing. If they are in a neat row on the forms, the holes will draw the eye less then poorly aligned staples. The 9/16" long staples should be aligned with one another as best as you can and driven in the center of the strip so as not to pass through the cove or bead on the strip (if you're using cove and bead...) You do NOT want the 9/16" long staples to bridge across the strips (i.e. one leg in each strip) as this causes problems with strips staying on the forms. Because the back of the strip is supported by the forms, there should be no chipping on the back side of the strip.

The 1/4" long staples are intended for holding the strips together between the forms. Unlike the 9/16" long staples, they are intended to bridge between two strips to hold the joint closed as the glue sets. Anywhere there is no backing to drive a longer staple, you should use the shorter 1/4" staples. As noted above, this is a whole lot easier on the builder's fingers. Smaller gage staples are fine here - they will be less obvious when removed.

If you simply take a stapler and start building your canoe, you will get the following results -
Note that the staples have been driven below the surface of the strip:


This is the back of the strip - note that both the 1/4" and 9/16" staples have broken through and chipped out the back of the strip.


I should note here that the back of the 9/16" long staples is only breaking out the back of the strip because there isn't a form backing them up, and that the 1/4" staple should not break through, but has because it has been driven too deeply.

This is the front of the strip after the staples have been removed:


These dents will show up as "bruises" on the surface of the canoe even after you have faired and sanded them out of the surface of the canoe. This is from the tearing and deformation of the wood fibers. If you look carefully, you will also see a small circular dent from the staple remover.

Darn.

But I don't want my canoe to look like that with a line of bruises.

Is there a solution?

Yes.

Masking tape.

Masking tape?

This is the sole of one of the PowerShot staplers. I've applied a strip of tape to the sole to keep any glue out of the mechanism. I've also built up 7 layers of tape near the point where the staple exits. (Your mileage may vary - you might need more or less tape depending on how thick your tape is, how much force you apply, etc., etc...) This will raise up the sole of the stapler so that they will not be driven so deeply. The downside is that I need to pull this off when I need to refill the stapler, but it's worth it.


Here's the "mouth" one of my long-used Power Shot staplers where the staple exits without tape. If you'll look, you'll see that other than a bit of dust it is very clean.


This is very important. When you are applying staples to the canoe, you want the stapler to function well. If it is all gunked up with glue, the stapler can jam and will not work smoothly. It's frustrating when you're trying to apply strips only to find that the stapler isn't working well and you have to clean it up as your glue is setting on the strips...

So, here are some staples that have been applied with tape applied as shown above.


You can see visually, that they aren't driven below the surface of the strip. This has several major advantages. First, we won't get the dent noted above. Second, as seen below, the tips of the 1/4" staple don't break through the strip. (The 9/16" staple still does as it wasn't "backed-up" by the forms.)


Third, you can get a staple remover under the staple to lift it more easily and as I said, there's no dents!


There are still staple holes, but these can be swelled shut with a steam iron and a damp cloth when the hull is complete and the staples removed. They will still be a dark dot because the tearing of the wood fibers made by the staple going through the strip, but this cannot be avoided when stapling strips.

I should point out that you can apply tape to the sole of the stapler and still get the dents from the staple's crown. You need to keep the sole of the stapler on the hull like this:


NOT like this (note raised heel of stapler):


If you drive staples like in the last picture you'll still have dents - tape or no tape.

Methods and technique solve this issue.

Sunday, January 9, 2011

Faith-Based Navigation


For most of my driving life, I've found my way around using gas-station maps (a thing of the past) and the old faithful from Rand McNally. (current version pictured above) I've even done without. I took a short vacation when I was single and living in Vermont that I referred to as my "turn left" vaction - when in doubt, I'd simply turn left. It was an interesting way to see the area and I'm sure that I saw some things that I never would have found otherwise. It wasn't always an effective way to find my way around, but it was fun and I really didn't care where I was.

Since we've gotten married, DW and I have tended to go on vacation in the UK to go visit family and to see some of the tourist sites. Because we're on a relatively tight schedule, we need good maps to be able to get to the places we want to go to. More importantly, we need to be able to get to the places "on time" so that we can make the best use of our limited time. For the last few visits, we've used either borrowed UK road atlases or used our Ordinance Survey Maps. For finding specific attractions, we've downloaded directions from online mapping services like Google or Mapquest - a big change from the past.


On our visit to the UK this summer, we seemed to have more difficulty than usual navigating by map. Two things seemed to contribute to this - one was probably the age of the maps, the other was the resolution of the maps - it wasn't good enough for us to actually navigate in the city of Bath. Ironically, before we left my BIL's house, he had offered us the use of his GPS. We had turned down the offer based on our previous (successful) experience navigating with our maps. Instead, we carried on the family tradition of disagreeing on how to get there and the navigator's competence.

When we got to my MIL and FIL's house, we navigated based on DW's knowledge of the immediate area. One day we were planning to head to North Wales and my FIL offered us the use of his GPS. We accepted his kind offer and used it to good effect. It got us out of a few missed turns and in difficult streets around Caernarfon. The only issue that we seemed to have with the GPS was on our trip back to my MIL and FIL's house - there was a long stretch of stone wall on the left and the GPS kept insisting, "TURN LEFT. TURN LEFT NOW."

I think not.

We were planning to visit family in Southeastern, Pennsylvania at a new house. I know from a visit we took to the area that navigating there was fairly difficult. Roads are narrow and bend up, down and sideways. There also isn't much of a view to let you see where you're going, where you've been or to get landmarks. This fact along with an outstanding sale at a local electronics retailer led me to purchase a TomTom XL350T GPS.


The GPS is pretty neat - it will allow you to find gas stations, restaurants and the like along your way and has traffic updates to help you avoid back-ups. It does way more than I really need it to and will let me load UK maps for future travel.

We left early in the morning with a plan to visit a friend of DW and her family in New Jersey on our way to Pennsylvania for a lunchtime stop. Along the way, we studiously ignored the directions provided by the GPS because "she" wanted to take us though New York City on Route 95 - where we didn't want to go. When we finally left DW's friend's house, it was about 3 PM. We figured it would be another 2 hours to our final destination.

The New Jersey Turnpike had other ideas.

There was a significant traffic back-up on the Turnpike that delayed us for about 45 minutes or more. For whatever reason (probably pay-back for ignoring "her" earlier), we didn't get a warning about the back-up or didn't know how to interpret what we were seeing on the GPS display at the time. For us, the problem was that it was going to get dark before we reached our destination. We finally got out of the back-up and on to the Pennsylvania Turnpike and it was looking like things were going to be fine. When we were nearly at the exit we wanted, the GPS warned us that there was a delay on the planned route and suggested an alternate. We took it.

This was the beginning of the faith-based navigation. It was dark and we were on unfamiliar roads - we followed "her" instructions as they came. It felt like we were careening through the dark on some strange GPS driven roller-coaster as the roads we were on had few signs and fewer indications that we were on the correct path. The GPS told us that there was only 3 miles to our destination, but until we actually made the turn into my family's development, we had no clue that we were anywhere close.

Ain't technology wonderful?

Friday, November 19, 2010

A diversion from boatbuilding...

DS and a couple of his buddies were interested in being Cub Scouts and I managed to get myself roped in to being a Den Leader. I guess it must be fate.

As part of one of their requirements for the Bear badge, they had to build something useful out of wood. We discussed a few options for things that they could make out of wood. These included the usual suspects of a shelf, birdhouses and the like. From the list of presented options they decided that they would like to build some journeyman style toolboxes.

Fortunately, I have a friend who is a tree farmer and a sawyer who had sold me some nice Eastern White Pine which I had in the cellar. The pine had been in the basement for a number of years waiting for an appropriate use and I figured that the time had come. Based on a design that I'd seen, I sat down at my work computer at lunch-time and designed a tool box in the CAD system. I then made a prototype from the drawing which was nice. I bought some screws and a few oak dowels and cut enough parts for the 6 boys in the Den to make their own toolboxes. Quite frankly it was a labor of love as there were lots of parts.

Last Wednesday night we had our Den meeting where the boys and their parents worked as a team to put together these toolboxes. They got to clamp together the assemblies, drill the holes for the screws that went into the boxes and screw them together. I brought along a small compressor and pneumatic stapler which they used to assemble the drawers with a little help. I think they had a good time building the tool boxes and that Santa Claus may hear some requests for pneumatic staple guns over the next month or so....

Here are the results of DS's work:


It's not clothes that make the man - it's the tools!

Wednesday, October 27, 2010

Wordless Wednesday


Okay, okay... I can't resist. "You can never be too rich, too good-looking or have too many clamps."

Tuesday, September 14, 2010

Tech Tip Tuesday

Well, yesterday's post was indeed apropos.

As part of the kayak build, it is necessary to bend some wood for coamings, hatch covers and rims. I've spoken about bending wood before - and canoe ribs specifically - but I'll recap quickly here. You can cut pieces of wood so that they are curved after cutting - often done with crooks or knees so that the grain direction follows the intended curve to yield a strong part. You can laminate thin layers of wood around a curved form like we do with our stems, or you can heat the wood by boiling it or steaming it to soften it for bending.

In my case, I'm bending long strips about an inch wide at their widest and about 8 feet long. The stock cannot tolerate the tight bend that I'm contemplating for any of the parts. I tried one method that I've seen used successfully - taking a damp T-shirt and steam iron to heat the strips (because they are s thin) and bending them around the forms. This didn't work too badly, but my scrap rate was a bit high for comfort. (The rims are going to be cherry!) I decided that I'd better bite the bullet and just steam them.

Alas - no good way to create steam. Time to make one.

I like the brute force behind a propane fired steam generator (think large kettle on big propane burner with 100 gallon propane tank and regulator), but don't want the expense or safety issues associated with a set-up like they have at WoodenBoat. I decided that an electric steam generator would work best for me. I'd seen some that I liked. Here's my first cut:


First, before thinking of undertaking this type of project, be sure to know and understand what you're doing - it can be dangerous if you are not careful. Live steam, electricity, flammables and other hot parts can hurt your badly or even kill you if not treated with respect. Details are important - like choosing the correct wire gage for the cable, proper grounding, avoiding electric shock and not creating a sealed area where dangerous amounts of pressure can build up. Think before doing.

I've shown part of the steam generator before, but let me describe it a bit. What we have is a frame to support the apparatus and on the left is a bucket which gets filled with water. (both for feeding water and counter-balance - note that the feed on the pipe is higher than the bucket's bottom) on the bottom of the bucket is nipple which lets the water feed into the high-temperature black heater hose, through a ball valve, and into the "T" on the pipe assembly to the right. Located in the pipe at the bottom is a 1500 watt electric hot water heater element. I was very careful to ground the pipe with the cable and to cover the connections with a silicone cover to isolate them from water and to prevent electrocuting the operator. I also located the element at the bottom to avoid boiling it dry - I've seen similar steam generators with elements in the "T" and fed from the bottom. The water is boiled in the tube and expands as steam exiting at the top brass fitting and into another piece of heater hose which is held in the steam box with a rag.

Because of the length, this presented some issues. I picked up some ABS pipe to use as both a soak tank (wet wood steams better...) and another piece for the steam box.

It's all R&D.

Lessons learned? Yup. Bigger diameter pipe would have been better. First, it would have created a larger surface area making more steam. Second, the expanding steam wouldn't push the hot water up the relatively narrow column; I'd started with some shorter pipe, but the expanding steam pushed hot water up and out of the top of the device - like Old Faithful! That's one of the reasons that this is such a tall device - this one is about 3-1/2" tall. I'd also make a more robust custom cap for the bottom to protect the electrical elements.

"If they don't find you handsome, they should at least find you handy."

- Red Green

Tuesday, April 27, 2010

Tech Tip Tuesday

Or

Sometimes There's No Tool Like an Old Tool

I have a student who is a professional woodworker - a cabinetmaker by trade. He is, ummm, well experienced and I've known him in one way or another for many years. He'd been thinking of building a kayak for many years and had already purchased plans for a Newfound Woodworks Osprey. I knew this and had been talking with him about it for quite some time. After a fair amount of teasing, he finally signed up for my class.

This student is a talented woodworker, but is comfortable using his tools. Most of these tools happen to come with a "tail" that ends like this:

I'm not a Luddite - I use power tools where I think they make sense. For example, I'm not going to rip the 1/4 mile of strips that go into a Wee Lassie by hand. Nor, will I do my final sanding on a whole hull by hand. Still, I will do my initial fairing with a sharp hand plane and my initial sanding with a long-board to achieve a good, fair hull.

A few weeks ago, this student was working on his coaming - it is made up from 3/8" thick cove-and-bead cut Port Orford Cedar. His final strip was in the front of the coaming and was made from a piece of Butternut (also known as White Walnut) to match the feature strip running down the center of his deck. He had measured the gap where this final strip went and made this last piece up in his shop during the week using a router table to shape the coves.

He arrived at class to find it 1/8" too wide.

What to do?

He started looking around for tools - power tools - to solve this fit issue. We suggested the use of a piece of coarse sandpaper wrapped around a dowel of an appropriate diameter. Here is the suggestion being implemented: (note the power tools on the bench...)


Did it work?

Yup.

Was it quick?

Yup. It took less time than setting up the router would have.

Sometimes the best tool isn't a power tool.

Once the pieces were glued in place, the bottom of the coaming needed to be cut flush to the bottom of the deck. First tool that came out? A sabre saw. It wasn't a bad idea, but we were concerned about breaking loose the edge glued strips until such time as they were reinforced with fiberglass and epoxy. We suggested the use of a Japanese style pull saw for trimming the edge. He looked at it suspiciously and I'm surprised that he didn't ask where it plugged in. After a little practice he got all but the most difficult transitions cut flush. Here he is making quick work of the trimming:


Still, he couldn't resist getting out the power tool to finish up the details:


While he often teases me in class with his suggestion that, "I'll get out the belt sander to do that." I think he's developed a new-found respect for some of the hand tools when they are the right tool for the job.

Thursday, December 3, 2009

Fantastic Historical Short Film

While I certainly cannot take credit for finding this film - a gentleman by the name of Bert Langley over at the WoodenBoat Forum found it. The film is about 15 minutes long and records the building of a traditional piroque (pirogue) by Cajun craftsman Abdon Allemon using traditional hand tools only. The film was made in 1949 by Arnold Eagle who was working with Robert Flaherty.

It is a true gem and shows the process from the harvest of the log to the launching of the boat.

Don't miss this one!

Tuesday, August 25, 2009

Tech Tip Tuesday

It isn't often that I have a specific tool that I rave about. Today, I'll make an exception about a tool that I've found to be very, very handy. It's called a Shinto Rasp. I purchased it from Japan Woodworker, but it may be available from other sources that I'm not aware of.


To be perfectly honest, I don't often find a use for a rasp in my woodworking, but in fairing stems, cleaning up epoxy and rough shaping of unusual contours, I've found this to be very useful. It's basically saw blades that have been joined together and put in a handle.

Because of the open design, it doesn't clog and need clearing in the same way that a rasp often does. This was particularly useful in clearing out hardened epoxy from places that it wasn't desired on the kayak frame. It has two different sides - an 11 TPI side and a 25 TPI side.


Coarse 11 TPI side


Fine 25 TPI side

Amazingly, it was able to be used on the edge grain of the marine plywood we're using, hardwood and softwood without tearing or chipping when using the "fine" side. The more I use it, the more that I like it.

"It's not clothes that make the man, it's tools."

-Canoez

Tuesday, August 11, 2009

Tech Tip Tuesday


In my opinion, the humble cabinet scraper gets a bad rap. To appropriate a "Bushism", they are highly misunderestimated. Basically, they are a piece of hardened steel that you turn a burr on the edge of. The burr is the cutting edge and can almost eliminate the use of all but the finest sandpaper in finishing. The cabinet scraper also excels at cutting wild grain where the direction of the grain reverses such as in a burl. They are best on hardwood, but some softwoods can be cut with a scraper so long as you use light pressure.

The scrapers above are a decent selection including some with curves for finishing moldings and different thicknesses. The thicker scrapers are for heavier stock removal and the thinner ones remove a bit less - the closer you get to the final finish, the thinner the scraper I use.

The thing that most people have a problem with is getting a good burr. It's fairly simple, so long as you follow a simple but consistant method I'll show you below. The items below are what I use to maintain my scrapers. On the top is a mill bastard file. This file is used to roughly square the edge. At the bottom is a sharpening stone and some lubricant for dressing the filed edge. The stone is used because the file leaves microscopic cuts which will give you a fragile, slightly serrated edge if you skip the stone before burnishing. The center tool is a polished burnishing tool - basically a very hard piece of steel. Some people use old drill bit shanks for burnishers.


Another thing that I find necessary when using a cabinet scraper is gloves. When using a scraper, you generate heat from friction. It can burn your thumbs and if you haven't built up good callouses, you'll regret not protecting your thumbs!


Here is a sample of typical stock that I use a scraper on. It's a narrow cherry strip for use in the kayak. It's fairly smooth, but you can see the saw marks from resawing this wood.


I pulled out my scraper and started to work. I was raising fine dust. This tells me that the scraper is dull.


So, I first remove the old burrs with the file, keeping the scraper square to the file. Some people use a small block to keep them square.


After the burr was gone, I polished the edge on the sharpening stone until it was perfectly smooth across the whole edge. Again, you want the scraper to be perpendicular to the stone so that you get nice square edges.


Lightly wiping the edge with oil, I then turn the burr in one direction applying firm pressure with the burnishing tool. Note the angle of the burnisher.


I then take the burr that I've created and turn it back at about 10° to create the hooked burr that will do the cutting.


The shavings at the bottom are made with the sharpened scraper. They are fine, lacy shavings that are rolling up in front of the scraper as it is used. As it is used, the scraper is flexed slightly to present a good cutting edge to the wood.


In no time at all, we have a nice smooth surface. This picture was taken at the same point on the strip that the first picture above showing the saw marks. This took less than a minute and maybe 8 passes along the strip. Note the "shine" in the wood and the lack of tool marks. A little bit more finishing; either with a thinner scraper or a fine sandpaper will finish things up and remove the slight fuzz seen on the edge.


If you haven't used a cabinet scraper, you owe it to yourself to try. It takes a bit of practice to get things to work well, but if you persist, I think you will be amazed at how much time and money you'll save.