Showing posts with label materials. Show all posts

Tuesday, June 19, 2012

Tech Tip Tuesday


I was having a discussion with someone the other day regarding the use of plywood in the skin-on-frame kayaks and canoes that I'm building this person took exception to the fact that plywood could be a "traditional material" while my build method I consider to be "non-traditional".   While the building method is non-traditional in that I don't use steam-bent ribs to provide hoop strength in the hull of the boat, I really do consider plywood to be a traditional building material.

How so you say?  Plywood has been around as a building material since the ancient Egyptians. Check this out:


    The oldest piece of plywood was found in a third dynasty coffin, made of six layers of wood each 4 mm thick and held together by wooden pegs. [11] Like modern plywood the grain of its layers was arranged crosswise to give it added strength. [12] From 1750 BCE onwards this plywood technique became widespread. The thickness of the layers was reduced to less than three millimetres and they were stuck together with a glue made from bone, sinew and cartilage applied hot. [13
(http://www.reshafim.org.il/ad/egypt/timelines/topics/wood.htm)

So, why is plywood such a great material?  Well, for one thing, it usually starts out flat and rectangular in common sizes.  The use of unequal numbers of layers (or plies) of wood helps to keep the plywood from warping.   It's made from layers of wood with the grain of the plies at 90° to one-another and bonded together.  This makes it relatively dimensionally stable with changes in moisture content.  It can be formed to make shapes.  It doesn't split all the way through if you nail or screw it together without pre-drilling.   The strength is consistent in both directions.  It generally takes finish well.  It doesn't tend to check through and through.  It can have decorative veneers on the faces to be pretty.  The adhesives used to bond the sheets together can be made from water resistant resins.  The use of some modern marine plywoods have made some great boat designs affordable and achievable by those without extensive woodworking or boat building skills.

All of those things being said, not all plywood is created equally - there are softwood, hardwood, marine, aircraft and decorative plywoods to name just a few.  Some plywoods have voids or patches in the middle or outer laminations.  Some have no flaws allowed on the exterior, but voids or patches allowed on the interior.  Whatever your application, be sure to select the best plywood for your application and remember the long history of this venerable material.  Above all, don't forget to do your homework!

Wednesday, May 23, 2012

More than a little over the top...

Plywood is nice - but seriously - a love letter to plywood?

 Oi!


Love Letter to Plywood. By Tom Sachs

Tuesday, May 22, 2012

Tech Tip Tuesday


 One thing most people wonder about is where to find good wood for their boat-building project.  Let me tell you it isn't always easy.  Very often people wander into a "big box store" and wonder why they can't find what they are looking for.  Simple.  The big box is targeted at folks who are building homes, decks and sheds - not boat builders.  This means you're going to need to look a bit harder. 

Ok, so you head over to your "local" lumberyard that you found in the yellow pages.  Chances are they've got some of the wood that you might be looking for.  Perhaps a bit of Western Red Cedar or maybe some Douglas Fir, Cypress, Redwood and the like.  Plywood will be in abundant supply, but not likely BS1088 marine grade plywood.  Some brass hardware might be in evidence, a bit of stainless steel.

So now you delve a little bit deeper into the yellow pages.  You find a hardwood or specialty lumber supplier and you can now get a wide variety of domestic and foreign hardwoods - perhaps even some marine grade plywood, too.  Selection is usually decent, but the prices are somewhat high.

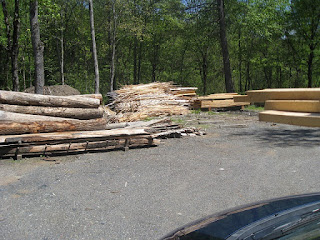
The next step is a difficult one for many woodworkers and boat builders, but usually a good one.  Sometimes it's an advertisement, sometimes it is somewhere you see when you are out driving, sometimes it's word-of-mouth, but however you find out, you go to the source - the sawyer and the sawmill.  Some sawmills are pretty permanent and organized operations like the one below.  Some are a bit more "fly-by-night" - a portable bandsaw mill located at a timbering site.   These are the connections that you want.  The closer you can get to the growing tree, the cheaper the lumber usually is, and the better selection you will get.

In my case I was looking for Northern White Cedar which does not grow locally to me.  However, I knew by word-of-mouth that this particular sawmill sold it - which surprised me.  I called ahead to see if they had what I was looking for and drove up to the mill.  The image below shows what I saw on arrival - logs, offcuts and stacks of lumber.  All a good sign.  The sawyer pointed me to a small stack of lumber about 10' from the saw.  It was a jumbled-up mix of short, generally narrow stock that looked pretty nice.  He also pointed to the pile to the right of the offcuts and said that I could look through both for what I needed - which was very kind of him.  (Note the hood of the car in the lower right)


Immediately to the right of the car, was the planing mill and the pile was between the stack of lumber you see next to the car.   I went through the pile and re-stacked it up on ties sorting it by width and length when I was done.  I then went to the pile in the back and looked through that - re-stacking the lumber when I was done.


Considering the quality (and small quantity) of the stock that I bought, I was pretty pleased with the price - $3 a board foot.  He was kind enough to lower the price from $3.50 to $3.00 for the longer stock I picked from the back pile because he was pleased that I had neatly re-stocked the lumber.  He also commented that I was welcome to come up and pick through stock anytime I wished.  I also took the time to speak with him about what he generally had to offer, how he seasoned his stock and how long the wood that I'd purchased had been milled and drying - all of this is nice information that you won't find in a lumberyard or big-box store.  He also quoted me prices for other lumber he had - all at attractive prices and good quality. 

The pile I selected from was to the right in this image behind the board.  Can't get too much closer to the tree than 20' from the bandsaw mill!  I later found out why they carried the stock I was looking for - they own mills in the northern part of the state where it grows and ship "local" stock from those mills south and vice-versa.  It does pay to go to where the stock is cut and talk to the sawyer!


Saturday, May 5, 2012

The likes of which are hard to find...


I'm pretty lucky - I have access to some great stock.  I have a friend who I've known for many years.  He was a co-worker of my father's and an assistant scoutmaster of our scout troop when I was young.  He's taught me much about the forest, wood and forestry management.  He continues to do so today.  One of the things that he taught me is that managing the forest is something you do for your children or grandchildren, as it takes so many years to get results.

This man and his father have both tended the stands of White Pine, Oak and Soft Maple on their property, pruning the trees when young and managing the forest itself for many many years.  On this property there are some White Pines that are absolute giants - pruned for clear stock 17' from the ground and over 36" in diameter.   Some of the stock that he cuts is in excess of 18" wide and as much as 24" wide. He has a portable bandsaw mill and selectively cuts logs from the property when they're mature.  Occasionally, he has some stock that he knows I'll be interested in and will give me a call - for example, a cherry log that became some of the furniture in my house, and some large cherry burls.  Alternatively, when custom stock is needed, he'll cut that too.

The boards that are in the picture above are White Pine - they'll be used for stringers on the skin-on-frame boats you've been seeing and will see more of here in future - with no scarfing required.  The two top boards are 16' long, 13" wide and four-quarters (rough) thick.  It is straight grained and flawless.  Underneath are two 14' long 10" wide boards, also four-quarters thick - one with a small knot 2" from the end.  You definitely don't see stock like that every day and I know that I'm fortunate to have it available to me.  It's almost a shame to cut it into narrow strips like we do, but I console myself that it's not the widest or cleanest stock that he has.

There are still people like this gentleman who are farmers, tree farmers or small businessmen who manage the land and cut stock.  You can be fortunate like me too.  All you have to do is ask around and look around.  If you find woodworkers, they usually know someone like my friend who can help you.  You'll also see notices in the paper or posted on message boards.  Keep your eyes open!

Tuesday, February 7, 2012

Tech Tip Tuesday

Probably one of the hardest things to get across is how to select good stock.  Students making canoe paddles in my class are looking for one thing, students making oars and Greenland Style paddles are looking for something else and those making double-bladed paddles are looking for both!  Those who are going to make one-piece canoe paddles are looking for flat or plainsawn wood.   That is clear.  That has no grain run-out.  Harder still is trying to explain the grain of the boards and why it is the way it is.

With words.

Yeah.  Doesn't work so well.

So, we're going to take another approach.

To wit, pictures.

Pictures are worth at least a thousand words. 

For example, let's start with this diagram looking at a cross-section of a tree:

This gives you a basic idea of the structure of a tree - simple.  You have to know how the growth rings run in a tree to understand why the next bit of information is important.  Now, let's look how a sawyer will slice that tree into boards:


On the left,  you can see how the boards are sliced from a tree for plainsawn stock.  This leaves the growth rings running side to side on the ends of the boards, with the exception of the slices through the middle which are actually quartersawn. Ideally, for paddle blades and single board paddles, we want them to be from about 3/4 of the way out from the center of the tree so the curve of the grain as viewed from the end of the board is gentle.  The plainsawn piece has flat grain on the wide face - like this:


Why are we so picky?  It has to do with strength and dimensional stability and flexibility.  If we were to thin out a vertical grain board, it is weak along the growth rings and is liable to split from the end.  Dimensionally, once seasoned, it should be relatively stable.  The shaft will exhibit some flexibility in the direction we're going to be pulling the paddle - which is good, as a paddle that is too stiff can be tiring to use.  Blades should be made from plainsawn stock, so a single board paddle should be as well.  A wide variety of materials can be used as you can put a protective tip on the paddle.  Some paddle-making woods are found below:

·       Basswood
·       Yellow Cedar
·       Douglas Fir
·       Spruce
·       Cherry
·       Birch
·       Maple (Soft or Hard, but Soft is a bit less dense, so lighter)
·       Ash
·       Mahogany
·       Walnut  (Peruvian is lighter than American if you can find it)
·       Sassafrass
·       Butternut
·       Cypress

For oars and Greenland style paddles, I want just the opposite - I want rift or quarter-sawn stock with vertical grain running on the face of the boards for a bit more rigidity.  Oars and double-bladed paddles are long and will flex a bit just because they are long and slender, so I'll use the board that has the grain running in the other direction for stiffness.  These boards should look like this:


I recommend good vertical grain dimensional lumber for oars and Greenland style paddles if you can find it - a 2x6 or 2x8 of spruce, cedar, redwood or douglas fir.  light, but strong.  For a Greenland style paddle, these materials work and a 2x4 provides just the right amount of stock.

For the traditional double-bladed kayak paddles, I usually recommend getting the shaft out of the same materials that are used for oars or Greenland style paddles - with a vertical grain in the direction you're pulling the shaft (i.e. looking at the vertical grain as you use the paddle) to avoid making a "whippy" paddle.  For blades - either flat or laminated curved blades, I want the same plainsawn stock that I'd use for a one-piece canoe paddle.  

If I were making a multi-piece canoe paddle, I would tend to use different woods to take advantage of their best properties - light weight, stiffness, hardness, rot resistance, etc.  Light, flexible material for the shaft and plain sawn hardwoods for the grain.

Don't forget that you can be selecting pieces of wood for aesthetic purposes, too - contrasting grains and colors.

Above all, you're looking for the straightest, clear grain stock without knots, checks or wild grain.  You also don't want the grain lines to run diagonally across the board (side-to-side or front-to-back) as it will create a weak area in the paddle - particularly the shaft.

It can take a while to find good wood.  Hopefully, your local lumberyards are like mine and will let you sort through the stock rack.  If they're kind enough to let you do that, be sure to neatly re-stack the stock and don't handle it roughly as you're sorting it or they won't be happy to let you (or others) sort through stock in the future.  Often, if you tell the folks who are in the yard what you're looking for and why, they can be fantastic resources to find those odds and ends that are either not out yet, or squirreled away that are perfect for the paddle you're going to make.

Friday, October 28, 2011

Baby Steps


I'm making progress on my prototype skin-on-frame canoe.  The canoe in question is 1/2 scale.  Why 1/2 scale?  Well, marine plywood isn't cheap and this model is as much to establish building methods as the feasibility of the design itself.   When I start a design, I usually take the offsets or whatever design I'm working on at the time and create a CAD model.  I'm fortunate that I have a copy of the CAD software that I use at work on a machine at home.  (The user license allows for this...)  Once my design has been created and checked visually on the computer for smooth curves and regular transitions, I usually create a Adobe Acrobat file of the drawing.  These files can be taken to your local print shop on a thumb drive - in my case, a local office supplies store - and printed in full scale on their large format printers.  It's not that expensive, really.  The other thing is that if you're getting multiple patterns from the same drawing, you may want extra copies - they can do that with either by printing more copies or large scale photocopies.

Once the prints have been made, I usually turn them into templates by bonding them to cardboard sheets (NOT corrugated cardboard...) with some spray adhesive.  In this case, I had a choice.  I could have adhered them directly to the plywood that I'd be cutting out, but opted not to in case I wanted to make changes or notes on the templates.

As you may note from my templates, I've only positively identified the location of the keel and sheer stringers on the canoe and will by seeing where the best location is for additional stringers around the turn of the bilge and on the bottom of the hull frame.  Mostly I'm concerned about how the stringers will bend and twist into place at this point.  Also missing are the concave cuts between stringer notches in the sections to provide clearance for the covering fabric once water pressure is exerted on the covering.


Tonight I managed to get the plywood sections cut out and ready to put on the strongback.  Earlier today, I made a trip to my conveniently located lumberyard and picked up a 2x4 for the strongback and a few pieces of poplar to be stringers, mounting blocks and floor-boards.  On the real boat, this will probably be pine or cedar for rot resistance, but for now, that's not an issue on the model After I got the lumber strapped to the car's roof rack, one wag at work commented on how fast and straight the trees grew on my car roof. 
More to come...

Tuesday, May 3, 2011

Tech Tip Tuesday

(Photo by Inventables)

DW sent me an email message with a link that seemed to be eerily prescient. On Thursday this week, I'm going to be working with a friend steam bending her kayak coaming so that we can finish up the skin-on-frame boats we're building. However, it appears that there are some other options.

Cold bending - a process that uses heat and compression to alter the structure of wood can provide a piece of wood that can be bent easily without requiring heat or chemicals to alter the wood. To use the product, the high moisture content treated wood is removed from its packaging and bent around a form to the shape that is desired. The material is then allowed to dry and will hold its shape. It was developed by a company called Compwood and seems to be offered by different vendors under different names. WoodenBoat Magazine had a review of the material in issue 213.

(Photo by Inventables)

While it looks like an interesting material, it appears to have a few shortcomings. The material is fairly expensive - a sample package of 5 - 1/2 board feet is $90.00 (US) - that's $16/board foot! The material is only available up to 100" long, can only be worked in limited ways and if it gets wet again, it may move again. The manufacturer claims that coatings will help prevent this, but if you're building a boat, it's likely that some of the coatings may come off from use or weathering.

Still, for certain applications, I'd love to try a few pieces!

Sunday, April 10, 2011

Maine Boatbuilders Show : Part 2


My favorite boat at the show was the shallop that was built by some at-risk students at for the Maine's First Ship project named the Jane Stevens. "Maine Boats Homes and Harbors" magazine seems to have agreed - they named the Jane Stevens their boat of the year.

A shallop isn't a commonly known boat design today. From the Maine's First Boat website:

What is a Shallop?

In the 1600’s, the word “shallop” referred to an open wooden workboat such as a barge, dory or rowboat. Shallops were small enough to row but also had one or two sails. The shallop is a European-style boat of approximately 18 feet in length that can be outfitted to row or sail.

This was a traditionally built boat of cedar on oak that was fastened with copper roves and treated with "boat soup" and pine tar. (I must admit loving the smell of the boat.) This boat will serve as the tender for the reproduction of the Pinnace Virginia which was the first ship built by colonists at Maine's Popham Colony.

I like the boat for several reasons:
  • It is traditional in construction, materials and techniques.
  • It serves to educate students and the public in general at all levels.
  • It aids at-risk students
This boat was built by the 9th and 10th grade students at the Morse High School in Bath Maine. Quite frankly, they did a wonderful job, don't you think?

Monday, March 14, 2011

Mumble... Grumble... Grump...

Being a boatbuilder who lives where I live can be very frustrating.

Very frustrating.

Most of the lumber that I want to work with is available, but not readily. You've got to look around. I've got a few projects that I've been thinking of and they require specific types of stock. They include the following:


Atlantic White Cedar


Atlantic White Cedar


Western Red Cedar

Atlantic White Cedar, a relatively local wood, requires a drive to the lumberyards nearer to the coast than I am located. For Northern White Cedar, again, a relatively local wood, I have to head further North. Western Red Cedar, which actually grows nowhere near here, is available at almost every local lumberyard.

Go figure... The irony here is that I'm really looking for the local woods in decent quality with some, but relatively few knots. It will take me a bit of work to get as I'll have to track down a sawyer who deals in it.

Then again, there is some plywood I'm looking to find as well. It's marine plywood. Marine plywood is pretty specific stuff. It is stamped (as in the image below) BS 1088 which refers to a very specific British Standard specification. The reason for the specification is to get a product with a uniform thickness, no flaws or voids, resistance (obviously) to moisture and attack by fungus, hot, cold and uniform dimensions and plies.


BS1088 plywood is tested and certified by Lloyd's Register Group. (note the stamp below)


There are a variety of manufacturers. Just because they meet British Specification 1088 doesn't mean they have to be manufactured in Britian, Shelman S.A. which makes Shelmarine is in Greece and Joubert Group is located in France with manufacturing operations in France and Gabon.


To get this marine plywood, I'd have to drive at least two hours each way to a supplier, and get it back in one piece without losing it off the roof-rack or borrow a truck to stick it in the back. Time is money and so is gas and tolls. So, I've tried my local lumberyards. Local lumberyards don't carry the stuff and I'd have to special order it. One yard wanted more than three times the going rate for a sheet of plywood to get it here - $165/sheet for 4mm Okoume (Actual per sheet cost? $49!) Another yard couldn't even get the stuff from their suppliers. I could get it shipped by Boulter Plywood of Somerville, MA. However, shipping would be $40 for packaging and another $90 for the shipping fee via common carrier - if it is delivered to a commercial address.

Dang.

This stuff can be hard to find. Still, the end results are worth the time and effort to get the stock.

Tuesday, September 8, 2009

Tech-Tip Tuesday


As I've mentioned before, there has been great interest in from future students to build tandem canoes. For the most part, we've built solo boats because they are smaller, lighter and use less material and therefore are less expensive. One of the unique challenges that my class has is that we have no "fixed" workshop to leave our boats in as they are built. We need to carry the boats in from a storage barn and back out again every week. To be able to do this without altering the shape of the canoes as they are built, the strongback and forms must be very rigid and strong enough to take the abuse of moving them around.

While the 15 foot long canoe would only about 1-1/2' longer than the Wee Lassie II, it is about 7" wider. Also, the 15-footer is probably at least a third heavier in both forms and boat. Not insignificant weight. For this reason, I have shied away from offering a tandem canoe design.

This year, I'm finally relenting and trying a 15' canoe. I'm doing everything that I can think of to put both the forms and strongback on a diet. First, is the strongback. I'm thinking of using a box-beam design. It is a lighter-weight approach, but I need it to be rigid for moving the boats. Box-beams are just that - a beam with a box-shaped cross section and are usually hollow. Because of this configuration, they are not always rigid in torsion (read: twisting). I'm trying to avoid this twisting by using rigid foam for the beam's core.

The picture at the top shows the materials that I'm using. At the top is 5.5mm thick Luan plywood sheet. In the middle is a 2" thick foam insulation board. At the bottom is a piece of 2x4 framing lumber. Some 1/2" plywood (not shown) will be the top for mounting the patterns.

First, I squared up the foam's edge (it had a tongue-and-groove feature) and then cut pieces 3-1/2" wide that were 8' long. There were 6 pieces. I then took two of the full length pieces and cut 2' from the end. The goal here is to stagger the joints when I laminate the foam together. In the picture below, I've pulled the joints open to emphasize their location and show the spacing. There are three 2" wide laminations showing here.


The next step was to cut some blocks from the 2x4 for the bottom of the beam - about 5-3/4" long blocks - these are to keep the beam from spreading and to give something rugged to clamp to and screw to when in use. I'm envisioning this beam sitting on workbenches or sawhorses as the canoes are being built. The picture below shows the pieces sitting on the foam. At this point, the beam is upside-down.


The next step was to rip the Luan sheet. I made the sides 5-1/2" wide to allow for the 2x4, the foam and the 1/2" plywood deck. There are 4 pieces. As the butt joint between is in the middle of the beam, I made up some 5" wide 2 foot long butt blocks to glue to the sides. I made it 5" wide so that I had room to put a square up against the sides of the beam for setting up patterns. The bottom edge of the butt block will be at the bottom edge of the beam. (Where the 2x4 is...)


This picture shows the dry-fit of the beam in its proper orientation- foam core, Luan sides, plywood deck and 2x4 bottom blocks. Tomorrow, I'll assemble the pieces using the foam adhesive in the tube below. The sides will be screwed to the deck and the blocks to keep things together while the adhesive sets.


Stay tuned!

Monday, July 13, 2009

Fantastic Plastic?


DD, my father and I took a paddle at a local state park this weekend - another three generation paddle. We took the same canoe that we did the weekend before - the 16' Wabnaki. We paddled a complete circuit of the pond and we saw many, many boats - easily 3 dozen boats. There was an inflatable, a few other canoes, but by far, most of the boats were small plastic rotomolded kayaks. We were the only wooden boat on the water.

Plastic boats certainly have their purpose. They're durable and take an incredible amount of abuse. They're also inexpensive. Because they are inexpensive, more people can afford to buy them and provide an easily accessable way to start paddling. Their shortness, "cute"-ness, bright crayon-like colors and low cost seem to be instrumental in making them popular.

There are some downsides, too. They are not always easily repairable. Some of them have bottoms which oil-can (Flopping up and down.) which effects paddling efficiency. Scratched up, they can look pretty horrid. They tend to be wide for their length and sometimes track poorly as they are short. Because of the roto-molded construction, they tend to be heavy - often 40-45 pounds for a 11' long kayak.

At the take-out, my father helped two women with these little plastic kayaks put them on their car. He was stunned to find that the little 12' long kayak weighed nearly as much as the 16' cedar-strip and 'glass canoe that we'd been paddling.

I really prefer wooden boats, but I can't disparage the plastic boats. (at least not too badly...) They introduce a lot of people to boating who otherwise might not get the chance. Getting out on the water is important. You have to start somewhere. Also, because of their limitations, they often lead people to better fiberglass, Kevlar, or wooden boats. I'm often surprised at how many of my students in my canoe-building class have started in little plastic kayaks or canoes.

However you do it, get out and paddle.

Friday, April 24, 2009

A New Method?


One of my fellow woodworking students in the furniture making class that I take is also a paddler. She made a pair of Greenland paddles for both herself and her husband and would like to make a wooden boat, but is sensitive to the cedar we use to build canoes. We've been working to figure out a way for her to build a boat, but not use cedar.

Another thing I've been looking at is how I can offer other classes. One concern that I have is that it takes a long period of time and a some skill to build a cedar-strip canoe. I've been looking for a project that will be a bit less intensive and a bit less costly. I'm still looking to have the students build a light-weight, easy to handle boat, and skin-on-frame kayaks look like a decent option. Still, these types of kayaks can be relatively complex to build.

What I've found is Thomas Yost's website. Most of the boats that he builds are based on Greenland style and Aleut style kayaks. He covers folding aluminum and plastic frame kayaks, wood-framed non-folding kayaks and inflatable kayaks. In particular, I'm interested in his simplified non-folding wood framed boats. Here are a few pictures of his work - I particularly like the clear PVC skin because it shows the framing technique very nicely.


I'm not enthusiastic about three things which are part of his method:
  • Use of relatively expensive cedar (Which my friend is sensitive to...)
  • Use of PVC skinning materials and solvent cements
  • Lack of paddler "customization"
I've been reading a few other books on skin-on-frame boats by Starr, Cunningham and Morris. What I like about what I've seen in these books is the use of white pine for the major stringers. It's strong, light and low cost and most people aren't sensitive to it. It isn't very rot resistant, but these boats aren't left exposed to water for long periods of time and the wood of the frame can be coated with waterproof finishes.

These books also suggest the use of ballistic nylon (or dacron materials) very much like George Dyson does with his kayaks. I think that this looks like a better method than the PVC as it should be lighter, look more like a traditional skin and has fewer seams - one down the center of the deck. I also like the idea that I can use water-based polyurethane finishes to cover the nylon as opposed to noxious solvent based PVC adhesives. They also seem to be tighter skins than the PVC.

Last but not least is the customization for the paddler. Scale and balance in small canoes and kayaks is critical to the paddler. It is important that the boat 'fits' the user. While Thomas Yost offers some interesting designs, they're generic and may or may not fit the user. My hope is to incorporate the framing style and use of plywood cross-sections, but to offer a way to customize the size of the cross sections to the user.

Ultimately I'd like to be building and teaching more traditional skin-on-frame kayaks like the one shown below from Robert Morris' Brewery Creek Small Boat Shop. For now, I'm going to be satisfied with getting my friend on the water in a boat of her own manufacture.


I'm planning to start the process with a small model (1/3 scale) of one of Yost's 15' boats - the Sea Tour 15R - to get a good start on the build process. I'll be adding more posts on the subject as I progress.

Tuesday, March 31, 2009

Tech Tip Tuesday

If you're going to take the time to build your own boat, you should always use the best material that is available to you. You're going to spend many, many hours working on the boat and you want to have something you can be proud of. I figure that if you're building a canoe for the first time, you'll probably spend a great deal of your time looking for suitable materials for your boat. Don't skimp on the time you spend looking for good materials.

It only makes your life difficult to use the wrong parts or poor quality stock. I had one student show up at class with some Mahogany for trim and seat frames. He was trying to save money and use stock he already had. The wood was badly weathered and checked stock that had holes though it where fasteners had once been installed. I tried to convince him that it wasn't exactly what he wanted for his trim. I was concerned that it wouldn't clean up well and was not going to be strong enough. The only way that I could finally get my point across was to actually mill up some of the stock. At this point, seeing the milled stock the student was convinced things would be just fine. (Uh oh...) I then set up the two pieces of wood that were milled to be stretchers for the seat frame like they would be in the finished canoe. I had him sit on the stretchers with the expected result. CRACK! Thankfully, he only dropped the 3" to the bench.

Good material tends to yield good results. Enjoy the beautiful pictures!

Raw hull stock (clear vertical grain Western Red Cedar):


The trim (Teak):


Hardware (Brass, Bronze or Stainless) :
Rigging (quality bronze, clear, straight grained stock and hand spliced line):

Finish and coatings (No bugs around for THAT varnish job...) :


Necessary equipment :