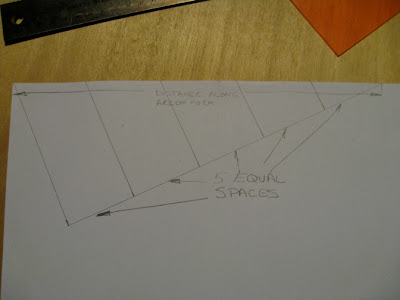
Well, that's certainly one way, but I'd be worried about errors. I like to avoid them if I can, so I like to be "simple". From my old-school drafting (Yes, I've worked on an actual drafting board with a T-Square and triangles...) I dredged up a simple trick.
Here's the premise - a lapstrake boat is being built and I'm working to assemble the form. I've got a strongback with patterns set in place. The plans tell me where a garboard stringer goes and where a sheer stringer goes. It also tells me I need to have 6 stringers equally spaced on both sides. You can see the garboard and sheer stringer in the photo below:

I then took a piece of paper and held it to the bottom edge of the garboard stringer and carefully wrapping around the form, marked the bottom edge of the sheer stringer. While I used paper, if you're going to make patterns or special measuring sheets that you'll use later, you might want to use drafting mylar as it doesn't change size with a change in humidity...

At this point, I've got a piece of paper with the length of the arc that I will be dividing. In this case, into 5 equal portions.

I then take a scale and a triangle and set them up on the paper. In this case, I'm using a 10" length on the scale as I can divide it easily into five two inch lengths. Note that the short leg of the triangle intersects the corner of the paper and the 10" mark on the ruler is at the mark we made on the paper when we were over at the form.

Now, I draw a line on the edge of my scale (in case it accidentally moves...) and make tick marks every two inches along my scale.

I bring my triangle over and sliding it up the scale, draw a line at every tick mark over to the edge of the paper.

At this point, I have divisions along the edge of the paper which represent the spacing that I want on the form.

I then take the paper over to the form, wrap it along the edge and transfer the marks from the paper to the form.

The end result? Equally spaced stringers to make equally spaced planking.

A remarkably simple method, really. I was able to lay out all 7 forms in less than twenty minutes using this method. Quick, easy and not prone to measuring and math mistakes!


No comments:
Post a Comment