Sunday, November 29, 2009
The Silly Season
The cartoon above really isn't an exaggeration, which is kind of sad. When I was growing up, my mom would decorate for all of the holidays, but the decorations would go up about two weeks before the holiday. We always have a fresh Christmas tree for the holiday, so the tree would go up two weeks before Christmas and come down around New Years, unless we had a live (potted) tree in the house which we sometimes did.
Lately, I've been having trouble with the way that the stores market goods. You know, it's the middle of the summer and you're looking for another pair of shorts or a short-sleeved shirt and all that is on the rack is flannel shirts and corduroys. In February and March, all you can find are shorts. :-/ Back to school stuff was in the stores in July and was hard to find in August when you're actually looking for it. Halloween decorations, toys and costumes were in stores as early as the end of August. I didn't actually SEE anything for Thanksgiving in stores this year at all - with the exception of marked-down decorations that I saw when out shopping yesterday. Christmas decorations were out in stores before Halloween.
Its nutty.
What I found really frustrating was that I was looking for some chocolate Thanksgiving turkeys to put out on the table for Thanksgiving dinner. I had begun looking in early November - you'd think that was early enough, wouldn't you? - and found nothing. The seasonal aisle in our local grocery store where they put decorations and candy skipped right from Halloween to Christmas and skipped Thanksgiving entirely.
I was really pleased to see this posting on Facebook from a friend of mine. I think that there should be a bit of a separation between the holidays. I have a great deal of respect for the folks from Nordstrom's for not bowing to peer pressure and decorating for Christmas before Thanksgiving. We'll be putting up Christmas lights and decorations outside today, but will probably wait until at least the first weekend in December to turn them on!
Saturday, November 28, 2009
Friday, November 27, 2009
Ambition
One of my students is building a Wee Lassie II this year and is working on a very ambitious feature design. Most of my students build a "feature strip" which is just that - a linear strip down the side of the boat made from contrasting wood to make beautiful patterns or stripes.
I really like the idea that he has which is to put a rather large bold design on both sides of the bow of the canoe. When I say "large" you have to realize that it consists of 12 courses of 3/4" strips! We will be assembling it as we strip the hull and I wanted him to pre-build the design so that he was sure that it was going to work. He marked out the design on a white board with marker and then cut all the pieces to fit like a puzzle. The design that he has chosen will have Poplar and Peruvian Black Walnut in what I will refer to as an "Indian blanket" design while the rest of the hull will be made from Western Red Cedar. There will be two strips of the very blond Poplar that will be interrupted by the design shown below about 12-18" back from the bow:
The contrast of the three different types of wood should be rather stunning - particularly at the scale that he is working at. When wet out with epoxy the Peruvian Black Walnut ranges from a dark chocolate brown to nearly jet black. Normally we try to use all softwood for the hull, but the Peruvian Black Walnut is obviously considered a hardwood. I use the term "hard" here in a relative term. The Peruvian Walnut actually is fairly soft and should both fair and sand well next to the much softer Red Cedar and Poplar.
You may notice a slight mis-match between the longer center pieces. The photo was taken before the student finished his trimming and the inside corners meet perfectly. I'm looking forward to posting more pictures of this boat as the design progresses.
I find the idea to be intriguing and it is really evocative of the large logos that outfitters and camps would put on the sides of their canoes. The old canoe camps would have large decals on the bow of the boat and usually a number for the boat so that they could control inventory and that their boats were easily identified from a distance. One that really sticks in my mind is that from the Darrow Camp at the Birches on West Grand Lake Stream, Maine.
Back when I was very young, my father was taking a local group on wilderness canoe trips as a summer vacation. He would take these folks up to paddle the Grand Lake Stream area and rented canoes and other gear from George Darrow who owned the camp. On his return, he would come home with little child-sized birch-bark canoe toys with the Darrow logo on them as a gift for us. - it was a capital "D" with an arrow through it, just like on their livery canoes.
When looking, for information on the Darrow Camps tonight, I was amazed to see that Darrow is still in business running canoe-camping trips. I'd heard that George had passed away a number of years ago and had wondered if they were still doing business. I was even more pleased to see that they are still running these trips with traditional cedar and canvas canoes!
Thursday, November 26, 2009
Wednesday, November 25, 2009
Tuesday, November 24, 2009
The Canoe Gods and Penance.
In some previous posts, I've alluded to two B.N. Morris canoes that I've done restoration work on. There's a bit more story to tell about the first one.
The first Morris that I dealt with was a canoe that belonged to my Scoutmaster when I was a teenager. While I don't know what particular model it was, it looked like the one in the picture above and had belonged to someone in his wife's family. (The one in the picture is a reproduction from the Northwoods Canoe Company) The canoe had Mahogany trim all over. This boat was in pretty nice shape with the exception of the rot that seems to be typical on the ends of the stems at the bow and stern and the canvas was shot. I should point out that the B.N. Morris canoes had closed gunnels like in the picture below:
This allowed the water trapped in the canoe when it was stored upside-down to travel down to the tips of the stems and cause rot in this area. I should note that most people are more familiar with open gunwale canoes like the Old Town in the picture below. Water can come out through the scuppers created by the spacing that the ribs create between the inwale and the outwale. A little bit more to follow on this detail later.
My father offered to help him restore this canoe for a trip that we were planning in the summer. We started off by removing the rotten wood and scarfing in new sections of Cedar ribs, stem, inwale and planking. Some new pieces of Mahogany were scarfed to the ends of the trim pieces that covered the top of the gunwales and made up the outwale. We also had to scarf in some sections of new deck. Once the woodwork was done, we stripped the old varnish and re-varnished the interior. Seat cane was replaced and new floorboards (AKA "duckboards") were fabricated.
Now comes the sin.
I should note that canoes with closed gunwales like the Morris are very "early" designs. Bert N. Morris started building canoes in his home in Veazie Maine around 1882 and finally opened a successful factory there. It was one of the largest canoe companies with a widely known name until a fire destroyed the factory in 1920. After the fire, some canoes were still built under the Morris name for a short time, but as I understand it, ultimately Morris went to work for the Old Town canoe company. The canoe we were working on was both very old and sought after. Other than the small amount of rot at the tips, it was really in pretty pristine shape.
Right until we fiber-glassed it.
Fiberglass should really never be put on a traditional rib and plank canoe. It's just not right. For the most part, I have to say, "Forgive us, because we really didn't know any better." -the owner and my father didn't really know this at the time and figured that they were saving the canoe. I know my father had expressed some interest in re-canvasing the canoe, but the owner figured that the fiberglass was a final solution. (It is, but not for the best...) Worse still, we used forest green tinted Polyester resin. I can still smell the Styrene. Overall, we did a pretty good job with the Polyester and the canoe looked and paddled OK, but it was still the wrong thing to do.
I figure that due to this event in my past, I am doing my penance to the Canoe Gods by researching, building, and writing about traditional and semi-traditional wooden canoes. One of the reasons that I took a Cedar and Canvas Canoe building class at WoodenBoat School was to do a good job of restoring the second Morris Canoe that I've gotten my hands on - a boat I found by the side of the road with some rot at the tips and pink Polyester resin on the outside!
Sunday, November 22, 2009
U.F.O.
I didn't post a picture with today's post. I did this deliberately and you will thank me for it as you read onwards.
As part of the preparations for Thanksgiving next week I decided that it was time that the fridge got a real cleaning from top to bottom. I took out shelves and bins and actually scrubbed the inside of the fridge. Admit it. How often do you do that? When doing food shopping, unfortunately, we have a relatively small fridge (for here in the US, might I add) and when the new food arrives, the things that were already here have a tendency to migrate to the back of the fridge.
As part of the cleaning process I discovered several U.F.O.'s. These are Unidentified Food Objects. We're talking about the kind of things that your kid's biology teacher asks students to bring into class when they do the segment on fungi. We're usually relatively frugal here with the notable exception of food. Still, we do try to avoid buying too much food and having more leftovers than we can eat. DD did a segment at Nature's Classroom where they even applied the proper name to this food. Ort.
They would even go to the effort of weighing the ort at the end of a meal to show the kids how much food they had wasted. This would be conveyed at the end-of-meal "ort report".
While we try to avoid ort, the process of pushing things to the back of the fridge provides for the occasional surprise. Over the past few weeks, DW and I seem to have been spread fairly thin, so we were probably due for what we found during today's fridge clean out. I must say there were some interesting things. I'll let your imagination run wild with the colors, textures and aromas. They included:
Still, I can say with total honesty that my high-school biology teacher would have been overjoyed to prepare slides from my fridge to look at under the microscope! She would have particularly enjoyed the vibrant colors of the Mozzerella!
As part of the preparations for Thanksgiving next week I decided that it was time that the fridge got a real cleaning from top to bottom. I took out shelves and bins and actually scrubbed the inside of the fridge. Admit it. How often do you do that? When doing food shopping, unfortunately, we have a relatively small fridge (for here in the US, might I add) and when the new food arrives, the things that were already here have a tendency to migrate to the back of the fridge.
As part of the cleaning process I discovered several U.F.O.'s. These are Unidentified Food Objects. We're talking about the kind of things that your kid's biology teacher asks students to bring into class when they do the segment on fungi. We're usually relatively frugal here with the notable exception of food. Still, we do try to avoid buying too much food and having more leftovers than we can eat. DD did a segment at Nature's Classroom where they even applied the proper name to this food. Ort.
Ort : (n) a scrap or morsel of food left at a meal.
They would even go to the effort of weighing the ort at the end of a meal to show the kids how much food they had wasted. This would be conveyed at the end-of-meal "ort report".
While we try to avoid ort, the process of pushing things to the back of the fridge provides for the occasional surprise. Over the past few weeks, DW and I seem to have been spread fairly thin, so we were probably due for what we found during today's fridge clean out. I must say there were some interesting things. I'll let your imagination run wild with the colors, textures and aromas. They included:
- Psychedelic Technicolor (once) fresh Mozzerella
- Fuzzy Peach Jam
- Liquid cucumber (fortunately an "English" cucumber still in the plastic wrapper)
- Grey pickled Jalapeno peppers. (No, not fuzzy, just grey.)
- A whole wheat flatbread wrap that was more like a Saltine cracker than bread.
- A jar with a solid cake of Sesame Tahini at the bottom that required a knife to remove.
- One shriveled and totally dessicated strawberry.
- A small pool of something very sticky on the bottom shelf. (No sign of actual food or a container of any sort.)
- A small container of grapes that were more like wine-in-a-grape skin
Still, I can say with total honesty that my high-school biology teacher would have been overjoyed to prepare slides from my fridge to look at under the microscope! She would have particularly enjoyed the vibrant colors of the Mozzerella!
Saturday, November 21, 2009
A little literary diversion.
Last week one of my students passed on a copy of a book that she'd read for me to look though. I've been pretty busy this week and hadn't even been able to look past the notes on the dust jacket. Today was no exception. After taking DD and a friend out to lunch after my canoe building class this morning, I returned home to scrape the scary (and mostly fluid) pumpkins up with a snow shovel and carry them to the compost bin and do a bit of garage cleaning and organizing.
This evening I got a few moments to sit down with the book. It's The Year of the Boat by Lawrence Cheek and have discovered that it is about his personal journey to build his own wooden boat. It's one of those books with a really incongruous start - the author and would-be boatbuilder is a native of El Paso, Texas - not a real hub of boat building. The chapter titles such as Impatience, Glop, Grit and The Zen of Screwing Up portend some interesting reading.
Thursday, November 19, 2009
Ok, that was a new one for me...
Wednesday, November 18, 2009
Tuesday, November 17, 2009
Grim Reaper?
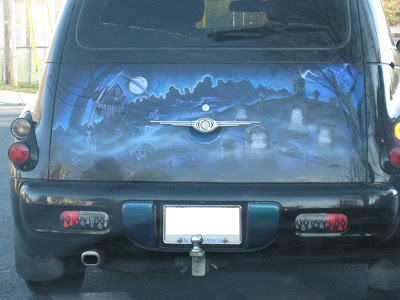
Probably one of my least favorite cars from a stylistic point-of-view is Chrysler's PT Cruiser. While they were sorta cool when they came out in a very retro way, I quickly became jaded about the styling. More often than not, I can be heard referring to them as a "Sport Utility Hearse".
Today, on my way to work, I saw the following in front of me at a traffic light which only reinforced my opinions.
Note the Grim Reaper on the left. It had flames down the sides and probably over the top of the hood as well as those you see on the bumper.
A bit of detail of the right side of the vehicle is shown below:
It is a bit difficult to read, but the tombstones say things like R.I.P. 1991 Subaru and R.I.P. 1965 Ford Falcon Sedan Delivery.
Sunday, November 15, 2009
Ultralight!
The picture above is of the new "lightweight" box-beam strongback and the "light" patterns. For those of you who may not have been following this blog, this design is a Prospector Ranger 15 from Bear Mountain Boats. At 15' long and 35" wide, it is easily the largest canoe that we've ever built at the school where I teach.
We had several concerns with building a boat this large. It was going to be a) big and b) heavy. First, as the boat itself is 35" wide and the main engtry door we go in and out is 36", but the swing of the door prevents us from getting a full width opening. To solve that issue, we move this boat out through the door on it's side as it is only 28" from the bottom of the box beam to the keel of the patterns. Even doing this required shortening the station forms by about 4" and notching the stem and stern forms to lower the whole set of forms.
After you get the canoe through the door, you need to make a 90° turn to go through some (thankfully!) larger doors and down a flight of stairs to get to the basement shop. Once down the stairs, you need to turn again to get the boat in place to work on it. The shop is well equipped, but a bit tight for building 6 canoes at a time. I tell my students that it is a bit like ballet - everybody needs to be in the right place at the right time and know what all the other people are doing!
The station forms are also hollowed out. As I mentioned in an earlier post, this was to reduce weight. The weight loss from the station forms alone was 14.5#. I really need to weigh the whole assembly, but when we brought out a Wee Lassie strongback with station forms on it this morning, we put it down and then immediately lifted the "lightened" strongback and station forms of the Ranger. We found them to be comparable weight-wise.
While the bits of material that we've left look deceptively thin, they're at least 3" wide along the edges and 4" wide at the center. I was concerned about warping of these station forms and that has not reared its ugly head, so I'm pleased with that. Overall, a real "thumbs-up" for our new space-age design.
Friday, November 13, 2009
Scary Pumpkins
I think Jack O'Lanterns at Halloween aren't at their scariest. They're too fresh and new looking. The more I think about it I should probably carve them at least a week ahead of time as it usually takes a week or more for them to become truly scary. You need to wait for them to become slightly moldy and wizened shadows of their former selves, oozing and wrinkling in the early November weather.
I wanted to take these pictures last weekend, but the pumpkins were not truly scary yet. The weather has been a bit cool over the last two weeks and hasn't been ideal for making this year's pumpkins as scary as last year's pumpkins were in DW's post found here. On clearing away last year's crop of orange mutants, there were some that were more liquid than solid as they were taken to the compost bin.
Here's the slowly collapsing "boo" pumpkin...
The "B" has wrinkled into nothingness and one "O" has fallen out while the lid has actually collapsed into the center.
The Harry Potter pumpkin is somewhat more menacing with a slowly spreading goatee of black mold developing from the inside out. From a purely dental standpoint, he's beginning to look a little less toothy and a lot more gummy...
I figured that the vampire pumpkin would be as moldy as Harry was as they were both from the same place and equally soft when I cut them, but this was not to be. With the softening of the edges on this one, it looks decidedly more smiley than menacing.
The pumpkin in the left foreground does look more menacing than it did, but isn't anywhere near as scary as it could be. The haka pumpkin in the background with the (now) string of a tongue now just looks ridiculous.
The most frightening pumpkin in the whole crop is the one in the right foreground of the photo above. It was given to DS by a friend of mine who lives nearby. This pumpkin arrived looking as it does in the picture - the white marks were not carved by us. They were made by bear claws as the gourd was growing!
Wednesday, November 11, 2009
Tuesday, November 10, 2009
Tech Tip Tuesday
I really hate to sound hypocritical, but at the risk of sounding that way, my Tech Tip Tuesday advice is the following:
Do what you're doing while you are doing it.
Ok. That sounds pretty simple, but it really isn't.
It came from a lesson that we taught to Engineering Freshmen in a study skills class. What it really means is to focus on your work, not what music is playing, or the other things drawing your attention. In boat building, it is a bit different. When working in the shop or on your project are you really focused on what you're doing? Are you thinking about the bills, the kids making noises in the background or the next step of your project. It's hard to work while your attention is divided and not only will the quality of your work suffer, being distracted can make you miss a safety issue.
Now, why do I seem to be a hypocrite? Well, I'll let you judge for yourself. Here are a series of pictures from the class I taught this past weekend.
By the way - I had been concerned about the strength of this beam - 13' long and supported at the ends, it only deflected about 1/2" with my full weight applied to the middle of the beam! I'm very pleased with the result.
While I say above that it sounds hypocritical, even with all of these different things happening in my class, I'm still "doing what I'm doing while I'm doing it" - I'm there to teach people to do build canoes!
It came from a lesson that we taught to Engineering Freshmen in a study skills class. What it really means is to focus on your work, not what music is playing, or the other things drawing your attention. In boat building, it is a bit different. When working in the shop or on your project are you really focused on what you're doing? Are you thinking about the bills, the kids making noises in the background or the next step of your project. It's hard to work while your attention is divided and not only will the quality of your work suffer, being distracted can make you miss a safety issue.
Now, why do I seem to be a hypocrite? Well, I'll let you judge for yourself. Here are a series of pictures from the class I taught this past weekend.
The interior of a Wee Lassie II getting sanded in preparation for a coating of fiberglass.
A Wee Lassie getting some epoxy.
An Osprey kayak getting deck strips.
Peruvian Walnut being ripped for stems and patterns being installed in the background.
A new pattern being made to replace a flawed one.
The new "lightweight" box beam being assembled for the Ranger canoe.
By the way - I had been concerned about the strength of this beam - 13' long and supported at the ends, it only deflected about 1/2" with my full weight applied to the middle of the beam! I'm very pleased with the result.
While I say above that it sounds hypocritical, even with all of these different things happening in my class, I'm still "doing what I'm doing while I'm doing it" - I'm there to teach people to do build canoes!
Monday, November 9, 2009
BWWAA-HAA-HAAAA!!!
I must say that although the learning curve is a bit steep at work, I'm enjoying my new job immensely. One of the things that makes me enjoy the job is the fact that both my new employers and co-workers understand that you need good tools to do a good job. They even take the time to make sure that you have the right tools and equipment to do the job.
As a mechanical engineer, one of the more important tools that I have at my disposal is the 3D CAD software that I use to design product. In this case, the software is Dassault Systems' SolidWorks. It's very much like ProEngineer "light" or Solid Edge CAD software. Basically, you can model the parts in the way you would manufacture them, assemble the models of the parts, evaluate and animate the assemblies and create part and assembly drawings. It's generally very user friendly software. Because SolidWorks is a very large piece of software that is highly graphics intensive, it is very resource hungry. The faster the processor, the better the graphics cards and the more RAM, the better.
At my last job, we'd been running the same computers and the same version of the software for the past 2-1/2 years. They really weren't up to the task and had some "issues" with crashing and waiting for the computer to actually do it's job. It didn't make for productive or happy people in the engineering department.
My co-worker at my new job was pushing for a capable computer before I was hired to replace an older machine that had been around for a bit - a 3.6 GHz single core 32-bit machine. Still, we didn't expect the machine that arrived last Friday.
It's a Dell Precision T7500 with dual quad-core processors (yep - that's 8 processors!) and is a 64-bit computer. This is good because the next upgrade to the CAD software looks to be optimized for the 64-bit machines from what I've read. It also came with 4 GB of RAM - a bit on the light side, but certainly upgradable. What was really nice, however, was the dual video cards and dual 19" displays. They're even thinking of upgrading one of the monitors on the two computers that we use this software on to an even larger display. Still, having two monitors is fantastic as I don't have to keep switching back and forth from my CAD software to other windows with calculations or technical information as I design. This should really be great for productivity. Physically, the computer is a monster of a thing and barely fits under my desk - it actually sticks out from underneath it by a few inches. Can you say "Behemoth"? Take a look:
It's nice to work with and for people who understand the importance of good tools. So now, I can be the evil genius in my cubicle working away without waiting for my computer!
Sunday, November 8, 2009
Regrets
I've got a few regrets in my boating life. Some are simple - I didn't get to go paddling with friends up in Maine this summer or the summer before. Some are a bit more complex.
When I was 15 years old, I had the canoe blues in a big way. My Boy Scout troop was planning a wilderness canoe trip to the Grand Lake Stream area in Maine and we'd been training and paddling in preparation for the trip. We'd even done a troop activity where each one of us made our own wooden canoe paddle for the trip. It was a really neat project. Building the paddle only fueled my desire to have a canoe of my own. I really wanted on in the worst way. My dad had gotten a canoe from my mom as a Christmas present and we'd been working on our assistant Scoutmaster's BN Morris canoe to get it ready for the trip. I really, really wanted my own canoe.
This summer, my brother had been working at our local Scout camp for the summer. Before our trip to Maine, I went up one evening with my parents to drop him at the camp after a day off. While there, I went into the camp's trading post to get something to drink. Above the door to the trading post was a 16' long Old Town canoe. The camp had switched from wooden canoes to aluminum canoes in the years before and this was one of the last of the canoes. This canoe was the last of the wooden canoe livery. What I found out was that this canoe was basically being offered to the highest bidder. All you needed to do was to write your name, number and bid on a slip of paper and throw it up into the boat.
I got a chair that I could stand on to see into the canoe. The forest green canvas looked great. The shape of the canoe was great. The woodwork was in nearly immaculate shape with the exception of one cracked rib. In my eyes it was gorgeous. I wrote my name and number and bid on a slip of paper and threw it up in the boat.
We got back from out canoe trip and I had seen a red fiberg!@$$ canoe with beautiful ash woodwork. The store wanted $550 for the canoe. It was glossy beautiful and new. I went up to the camp and withdrew my bid as I was going to buy the red canoe. The cracked rib in the wood canoe made me nervous at the time as I thought it would be difficult to repair.
Later, I found out that I had been the only bidder on the Old Town. I'd bid $50 for it. It would have been a wonderful boat for me and I bet that I'd still have it. Only later did I learn just how simple that replacing a rib would have been. Still, you've got to live with the regrets.
Wednesday, November 4, 2009
Tuesday, November 3, 2009
Mik Storer Visits
Michael ("Mik") Storer is a well known Australian boat designer. Mik has been on a self-described "shoestring" tour of sorts in the United States for a bit and has been posting about it on his own blog here. Some of his more well known designs include the PDR Racer and the Goat Island Skiff. In some regards, I tend to think of Mik's work very much in the same vein as Phil Bolger's designs. They're simple on the surface and very approachable with plywood construction. While they may occasionally look somewhat boxy, they're actually fairly sophisticated designs in their simplicity. Most of these designs can also be made without having sophisticated shop tools which also helps their approachability.
I really can't do justice to his tour - you really need to read it over at his blog as it looks like a fantastic time and the pictures alone are worth the look! He's finishing up his trip with a whirlwind visit up to see Carl Cramer and the folks up at WoodenBoat before heading back to Boston to fly home.
As part of the tail end of Mik's tour here in the US, he gave a talk in Portland, Maine at the workshop of Clint Chase. A nice summary of the talk is on Clint's blog. This talk was followed by a nice bit of a row, paddle and sail on an unusually warm day for the 1st of November! Clint himself is also a very interesting guy. On top of being probably the tallest person at most gatherings regarding boats and boat-building, he is a boatbuilder, designer and the director of the Compass Project in Portland. The Compass Project provides young people with personal growth and teaches responsibility by building, sailing and rowing boats. Truly a fantastic undertaking!
Vote. Please.
Monday, November 2, 2009
Rogue's Gallery
Subscribe to:
Posts (Atom)