
Wednesday, September 30, 2009
Saturday, September 26, 2009
Tech Tip Tuesday
This is a post that I hesitated to put up. For two reasons.
First, I think it has limited interest. It mostly applies to people who need to make multiples of the same thing. (If I was really interested in mass production, I'd be sending things out to someone with a CNC router to make multiple copies.)
Second, because it applies to people who make multiples of the same thing, it can lead to people making copies of something that requires permission to make multiple copies. In this case, a canoe design. When you buy a set of plans or a book, you are generally getting permission to make a single boat. To make others you have to send the designer a royalty. Don't forget, this is how the designer makes a living! I deal with this issue by having my students buy a copy of the book with the design in it - from this information, the could build the boat. Please remember to give the designer what is due to them - don't pirate design work!
When my students prepare their forms to build their canoes on, we try to compress time by not lofting each and every boat that we build. Before class starts I prepare what we refer to as "master patterns". These master patterns are created from 1/2" MDF sheet and are made by tracing the form outlines that are glued to a sheet of cardboard and cut out with scissors. The outlines are either from a set of plans that I've lofted in my computer and printed out, or full size patterns that were purchased.

We then clamp the MDF master patterns on the plywood the student will cut their forms from with the "bottom edge"of the master pattern on the plywood's factory edge and trace the outline. We also put the centerline on the plywood form (very important for setting the forms on the strongback...) and label the forms so we know which is which.

We then use a bandsaw to the forms from the plywood leaving the line and up to 1/8" of material outside the line. We then clamp the master pattern on top of the roughly cut plywood form and use a router with a pattern bit to get an exact copy.

To avoid this issue, I'm trying something new. I've purchased T-Nuts to use as drill bushings. I drill two holes in the master pattern where they will be far enough away from the edge not to interfere with the router. (You need two so that the pattern will not pivot around a single fixed point.) I then drove the T-Nuts into the holes and drilled out the thread. I then purchased some bolts that were not fully threaded and cut the threaded section off with a hacksaw and finished them as can be seen here:

The process went as follows: The bottom edge of the master pattern was aligned with the factory edge on the plywood and clamped into place. Then, using a drill, holes were made in the plywood, using the T-Nuts as bushings. After the holes were drilled, the pins were installed and the patterns traced onto the plywood. The pins were removed and the centerline was drawn. Then, the plywood pattern was rough cut on the bandsaw to within about 1/8" to 1/16" of the line. The master pattern was then stacked on top of the rough-cut plywood and pins were re-installed to align them. The assembly was then clamped to a 2x6 that overhangs from the edge of a table to prevent the router's cutter from hitting the table. A router with a top-follower pattern bit then traces around the master pattern and makes an exact copy on the plywood pattern.
It's a relatively simple system, but we get uniform patterns in a much shorter period of time. Well worth the effort if you have a lot of pieces to make and no CNC router!
First, I think it has limited interest. It mostly applies to people who need to make multiples of the same thing. (If I was really interested in mass production, I'd be sending things out to someone with a CNC router to make multiple copies.)
Second, because it applies to people who make multiples of the same thing, it can lead to people making copies of something that requires permission to make multiple copies. In this case, a canoe design. When you buy a set of plans or a book, you are generally getting permission to make a single boat. To make others you have to send the designer a royalty. Don't forget, this is how the designer makes a living! I deal with this issue by having my students buy a copy of the book with the design in it - from this information, the could build the boat. Please remember to give the designer what is due to them - don't pirate design work!
When my students prepare their forms to build their canoes on, we try to compress time by not lofting each and every boat that we build. Before class starts I prepare what we refer to as "master patterns". These master patterns are created from 1/2" MDF sheet and are made by tracing the form outlines that are glued to a sheet of cardboard and cut out with scissors. The outlines are either from a set of plans that I've lofted in my computer and printed out, or full size patterns that were purchased.

MDF Master Pattern
We then clamp the MDF master patterns on the plywood the student will cut their forms from with the "bottom edge"of the master pattern on the plywood's factory edge and trace the outline. We also put the centerline on the plywood form (very important for setting the forms on the strongback...) and label the forms so we know which is which.

Pattern Before Cutting (Note labels, outline and centerline.)
We then use a bandsaw to the forms from the plywood leaving the line and up to 1/8" of material outside the line. We then clamp the master pattern on top of the roughly cut plywood form and use a router with a pattern bit to get an exact copy.

Roughing a Pattern on the Bandsaw
The MDF is nice as it is inexpensive and has no voids in it. MDF is the abbreviation for Medium Density Fiberboard and is made from very fine wood fibers bonded with a heat-cured resin. The downside to the MDF is that it has a very good finish on the faces making it slippery. We've had problems with the cutter "kicking" the plywood so that the two pieces are not longer in alignment, even with the clamps, ruining the form being prepared.To avoid this issue, I'm trying something new. I've purchased T-Nuts to use as drill bushings. I drill two holes in the master pattern where they will be far enough away from the edge not to interfere with the router. (You need two so that the pattern will not pivot around a single fixed point.) I then drove the T-Nuts into the holes and drilled out the thread. I then purchased some bolts that were not fully threaded and cut the threaded section off with a hacksaw and finished them as can be seen here:

Bolt "Pins" and Uninstalled T-Nuts
The process went as follows: The bottom edge of the master pattern was aligned with the factory edge on the plywood and clamped into place. Then, using a drill, holes were made in the plywood, using the T-Nuts as bushings. After the holes were drilled, the pins were installed and the patterns traced onto the plywood. The pins were removed and the centerline was drawn. Then, the plywood pattern was rough cut on the bandsaw to within about 1/8" to 1/16" of the line. The master pattern was then stacked on top of the rough-cut plywood and pins were re-installed to align them. The assembly was then clamped to a 2x6 that overhangs from the edge of a table to prevent the router's cutter from hitting the table. A router with a top-follower pattern bit then traces around the master pattern and makes an exact copy on the plywood pattern.
It's a relatively simple system, but we get uniform patterns in a much shorter period of time. Well worth the effort if you have a lot of pieces to make and no CNC router!
Phil Bolger Memorial
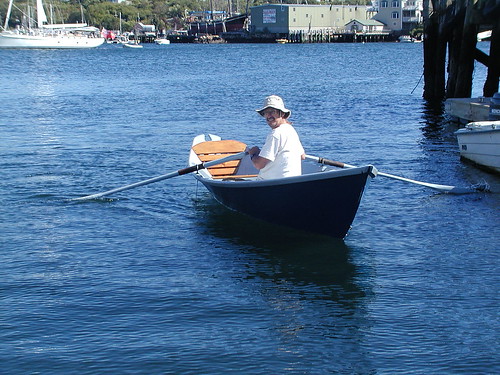
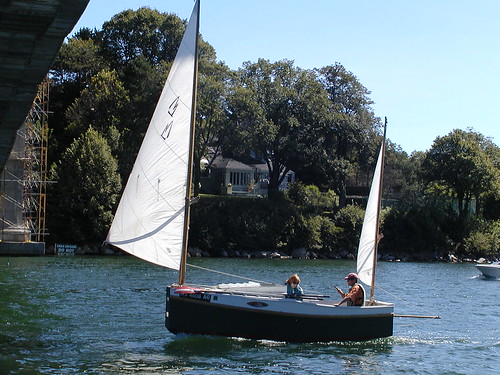
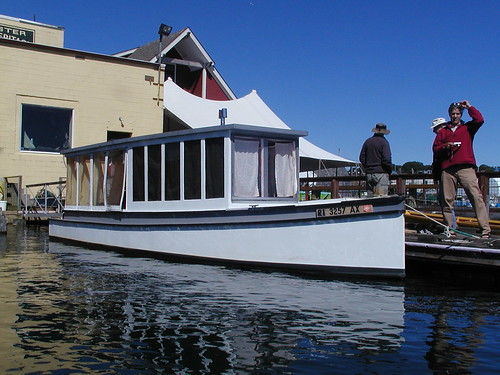
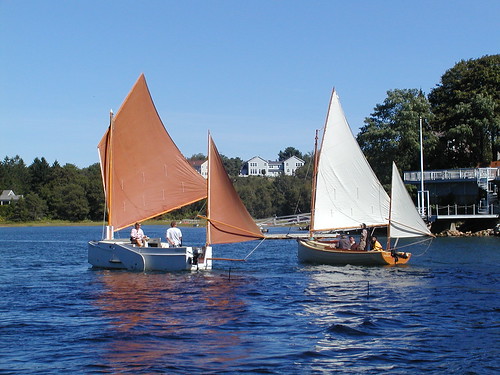
Last weekend in Gloucester a memorial was held for Phil Bolger. It was really more of a celebration of Phil's life and work in the form of a gathering of boats built to his designs on his home waters. While I would have loved to see this gathering I spent the day splitting wood. The pictures below which were taken by Bruce Hallman really shows the variety of Phil's designs. It also looks like it was a beautiful day for the event. I'm sure that somewhere, Phil was smiling to see people enjoying his work.


More pictures at Bruce's Flickr Page. (Thank you, Bruce!)


More pictures at Bruce's Flickr Page. (Thank you, Bruce!)
Thursday, September 24, 2009
If I'm not around...
I went to the woodworking class that I take and used the time to finish up some projects that I've had in the works for some friends and for the canoe building class that I teach.
Two very good friends of mine like to paddle kayaks, so for their birthdays I'm making them some Greenland style "stick" paddles. They're married, so I decided that I'd do something special - the paddles are made from the same piece of cedar so that they look alike.
I also needed to do some work on the forms for the class that I teach. One problem that we've routinely have is that the students don't clamp the MDF master pattern on top of their plywood when they use the router to trace the patterns. The surface of the MDF is slippery and when they slide, the patterns get messed up - badly. To prevent this from happening, I've put some drill bushings in the patterns - two in each pattern. Drill bushings are pretty expensive ($7 each!) so I was, um, frugal, and used T-Nuts ($0.58 each!) that I drilled out after they were installed so that I'll be able to put a bolt through them to keep the patterns from sliding. We'll see how it goes.
I was also surprised with the following left by one of my very generous students:

A Splintered History of Wood by Spike Carlsen. It looks like a very interesting read from what little I've had the time to skim. The cover notes that it was, "an NPR best book of the year". So, if I'm notably absent, I'm probably reading this!
Two very good friends of mine like to paddle kayaks, so for their birthdays I'm making them some Greenland style "stick" paddles. They're married, so I decided that I'd do something special - the paddles are made from the same piece of cedar so that they look alike.
I also needed to do some work on the forms for the class that I teach. One problem that we've routinely have is that the students don't clamp the MDF master pattern on top of their plywood when they use the router to trace the patterns. The surface of the MDF is slippery and when they slide, the patterns get messed up - badly. To prevent this from happening, I've put some drill bushings in the patterns - two in each pattern. Drill bushings are pretty expensive ($7 each!) so I was, um, frugal, and used T-Nuts ($0.58 each!) that I drilled out after they were installed so that I'll be able to put a bolt through them to keep the patterns from sliding. We'll see how it goes.
I was also surprised with the following left by one of my very generous students:
A Splintered History of Wood by Spike Carlsen. It looks like a very interesting read from what little I've had the time to skim. The cover notes that it was, "an NPR best book of the year". So, if I'm notably absent, I'm probably reading this!
Wednesday, September 23, 2009

Monday, September 21, 2009
Wood-B-Good

I'm happy to be moving today. Let me explain...
A friend of mine who heats with wood was unable to bring in his own wood this year and needed some help getting it in. Some mutual friends had the great idea that we should have a "wood party" to do this for my friend. We plotted and planned for food and drink, tools and equipment and prayed for good weather.
The gods intervened on our behalf with what began as a crisp Fall morning. My father joined me to help and we drove up for the expected 9:00 AM start. We arrived at the house at 9:00 AM to find nobody there. We couldn't hear any tools running, but I knew where they would be and grabbed gloves, hearing protection and my chain saw and headed down to the back field where we were to be working. We arrived to find a dump body truck being loaded with split wood and a Ford tractor with a home-made splitter on a piece of i-beam humming away. The splitter was home-made and could accept up to a 4' length of wood. (It was originally intended for splitting long stock to feed to a maple syrup evaporator's firebox.) There was a second trailer-mounted splitter parked next to a dump body trailer attache to a pick-up. A Kubota diesel 4WD utility vehicle with a dump body was nearby.

Another crew was measuring and cutting the trees which had been dragged out of the woods earlier to stove length. Compared with the 26" and 30" bars on the saws they were using made my little 16" Husqvarna (a limbing saw) look like I'd brought a knife to a gun fight.
When my father and I arrived, we had enough people to crew the second splitter. It didn't take long before all the trees had been cut to length and the saw crew took the Kubota into the wood-lot to look for more standing deadwood. They returned twice with more wood ready to split. We took a break for coffee and baked goods about 10:30. The weather had warmed to the high 70's with a light breeze, but was still a gorgeous, sunny, bug-free day. By 11:45, we'd cut and split every piece of wood in sight and loaded the truck and trailer for the second time. We had a vague idea of how much wood we'd cut, but wouldn't be certain until after we stacked it.
We stacked the first load that had been dumped out and stopped for a leisurely lunch. We got started again and dumped and stacked the remaining wood by about 2:30 PM. We'd cut, split and stacked 5 cords of wood. To put this into perspective, this is 640 cubic feet of wood - a block that is 7' tall, 8' deep and 12' wide. It would completely fill a small bedroom.
A good day's work done. My friend and his wife will be warm for the winter.
Then I got the pleasure of cutting out master patterns for the Ranger. But that's another story for another day.
Saturday, September 19, 2009

Wednesday, September 16, 2009
Not Quite Wordless Wednesday
A while back I put up a post showing a canoe as the "original SUV". Here's another video that really brings that home!
Tuesday, September 15, 2009
SCORE!

I was called by a friend the other day to let me know that he'd seen a bunch of old WoodenBoat magazines at a tag sale. As I was headed out anyway, I made my way by. I found some gentlemen holding the tag sale who were alumni of the WoodenBoat school and who built and repaired boats. They appeared to really enjoy their boat work with a canoe preparing to be repaired, a Cat's Paw dinghy in progress and a peapod under consideration.
What they had was a cardboard box filled with what a quick perusal showed to be WoodenBoat magazines dating from the late 70's through the 80's - editions that I didn't have. (I once made the mistake of loaning out a bunch of magazines from that time frame and they sadly didn't find their way back to me.) After some discussion they offered me a boat-builder's mafia deal that I just couldn't refuse.
In the box are copies from issue 20 through about issue 76 with some gaps and some duplicates, but generally in good condition. It contains some very dated information and advertising, but also has nuggets of timeless information from designers, builders and experts who are sadly no longer with us. One thing that I find that I really enjoy from these early issues is the illustrations from the technical articles by folks like Maynard Bray and John Gardner. I was particularly tickled to find an article with a picture of a (very!) young Jerry Stelmok in an article about Mick Fahey. Some of this material I've not seen elsewhere.
I also used to be a subscriber to the relatively short-lived Small Boat Journal from the 80's. That's another set of old magazines that I'd like to find as well.
It's awful to be a pack-rat, but some of these things will not come this way again.
Monday, September 14, 2009
Bits and Pieces
No images at the moment - apologies. Pictures to follow!
Foam Box Beam Construction
I put together the foam box beam. Construction involved assembly of the deck to one of the sides to keep the deck flush with the top of one luan side panel and the bottom blocks to the same luan panel. I then spread a layer of the foam adhesive using a notched spreader, bonding the foam to the luan and to itself, placing the foam between the top and the bottom blocks. The notched spreader made for a consistent thickness of adhesive. I had allowed 1/16" for each adhesive layer. Unfortunately, the thickness of the adhesive seemed to be greater than allowed for and the sides bulged.
I also glued the patches to the outer layer of the luan at the center join. After curing, I supported the 16' beam at the ends 2" above the floor. I then stood in the middle of the beam. My roughly 160 pound weight deflected the beam about 3/4". Not bad, really.
Still, I wasn't happy about the bulge and the time to deal with the adhesive.
Foam-less Box Beam Construction
I then tried a similar construction. A piece of 1/2" thick plywood for the deck, 8" wide. Two 6" wide 1/4" thick luan side panels. To join the top and sides, I used 8" long blocks of 2x6" dimensional lumber. While I only made an 8' section, I was pleased with the results. Simply supported at the ends, my 160 pounds in the middle deflected it 1/4". I think it was good, easier to assemble, cheaper and lighter.
Ranger Plans
Plans came in. (*WHEW!*) Master patterns will be prepared from the drawings this weekend. Looking good. I'm hoping to shorten the overall height of the patterns to make the forms less awkward to move. We'll see how I do.
Sign-Up
Tonight was the sign-up for the school where I teach. I have to say that I've never seen a crowd like we had tonight. Let me paint the picture for you. The school offers a variety of classes for a variety of interests. My canoe building class is only one of many. Sign-up runs from 6-7:30 PM in the evening and I figured I was arriving fairly early showing up at 5:00 PM. I dodged through cars parked on both sides of the street and managed to find a parking spot nowhere near the building. People were waiting in two lines - one stretched all the way across the parking lot, the other stretched from the front of the building, down to the street and along the street past the next two houses. I was gobsmacked, to be honest.
Even more surprising for me - according to one of the school's trustees, two of the students who came to take my class had been waiting in line since 1:00 PM and another was waiting since 3:00 PM. Also, my class rarely fills up at sign-up. This time I was full in the first 15 minutes. Amazing. I look forward to another great and interesting year with some new challenges.
Saturday, September 12, 2009
And I blame the kids for fingerprints on the window...

I was sitting in a chair in my living room last night working on a material list for a canoe last night. The chair just happens to be in front of the window above. As I was sitting, I heard some strange noise like a LARGE bird or moth banging against the window. It wasn't until I got up from my chair and looked behind me that I saw the frog on the window.

Thursday, September 10, 2009
Darned if I know...

We've been growing vegetables in garden boxes on our front porch this year. Mostly tomatoes, cucumbers, summer squash and zucchini. Recently we found the oddity shown in the picture above in one of the bushes. It is growing on a zucchini plant but looking like a half-and-half summer squash/zucchini. Is this an accident of cross pollination? Has anybody ever seen anything like it?
We've been referring to most of what we're growing as "stealth vegetables". You don't see them one day and then all of a sudden you find a giant whatever-it-is ready to pick!
We've even got a stealth melon growing out in our front flower beds by our driveway. It must have been a seed that was in the compost I dressed into the ground in the spring. At any rate, a vine appeared and I let it grow out of curiosity. At the moment we have a large melon (8" or so in diameter) of indeterminate variety growing out there. It could be a watermelon, cantelope or honeydew - I just can't tell yet!
Wednesday, September 9, 2009

Tuesday, September 8, 2009
Tech-Tip Tuesday

As I've mentioned before, there has been great interest in from future students to build tandem canoes. For the most part, we've built solo boats because they are smaller, lighter and use less material and therefore are less expensive. One of the unique challenges that my class has is that we have no "fixed" workshop to leave our boats in as they are built. We need to carry the boats in from a storage barn and back out again every week. To be able to do this without altering the shape of the canoes as they are built, the strongback and forms must be very rigid and strong enough to take the abuse of moving them around.
While the 15 foot long canoe would only about 1-1/2' longer than the Wee Lassie II, it is about 7" wider. Also, the 15-footer is probably at least a third heavier in both forms and boat. Not insignificant weight. For this reason, I have shied away from offering a tandem canoe design.
This year, I'm finally relenting and trying a 15' canoe. I'm doing everything that I can think of to put both the forms and strongback on a diet. First, is the strongback. I'm thinking of using a box-beam design. It is a lighter-weight approach, but I need it to be rigid for moving the boats. Box-beams are just that - a beam with a box-shaped cross section and are usually hollow. Because of this configuration, they are not always rigid in torsion (read: twisting). I'm trying to avoid this twisting by using rigid foam for the beam's core.
The picture at the top shows the materials that I'm using. At the top is 5.5mm thick Luan plywood sheet. In the middle is a 2" thick foam insulation board. At the bottom is a piece of 2x4 framing lumber. Some 1/2" plywood (not shown) will be the top for mounting the patterns.
First, I squared up the foam's edge (it had a tongue-and-groove feature) and then cut pieces 3-1/2" wide that were 8' long. There were 6 pieces. I then took two of the full length pieces and cut 2' from the end. The goal here is to stagger the joints when I laminate the foam together. In the picture below, I've pulled the joints open to emphasize their location and show the spacing. There are three 2" wide laminations showing here.

The next step was to cut some blocks from the 2x4 for the bottom of the beam - about 5-3/4" long blocks - these are to keep the beam from spreading and to give something rugged to clamp to and screw to when in use. I'm envisioning this beam sitting on workbenches or sawhorses as the canoes are being built. The picture below shows the pieces sitting on the foam. At this point, the beam is upside-down.

The next step was to rip the Luan sheet. I made the sides 5-1/2" wide to allow for the 2x4, the foam and the 1/2" plywood deck. There are 4 pieces. As the butt joint between is in the middle of the beam, I made up some 5" wide 2 foot long butt blocks to glue to the sides. I made it 5" wide so that I had room to put a square up against the sides of the beam for setting up patterns. The bottom edge of the butt block will be at the bottom edge of the beam. (Where the 2x4 is...)

This picture shows the dry-fit of the beam in its proper orientation- foam core, Luan sides, plywood deck and 2x4 bottom blocks. Tomorrow, I'll assemble the pieces using the foam adhesive in the tube below. The sides will be screwed to the deck and the blocks to keep things together while the adhesive sets.

Stay tuned!
Saturday, September 5, 2009
A little bit of progress
Well, I've been making progress on a few fronts lately. It's been coming slowly, but it has been coming. First, I've made the decision to build the Chestnut Prospector "Ranger" canoe for the tandem boat in my class and ordered the plans. In order to protect the intellectual property of the designer, I'll have to ask my students to buy the book which contains the plans, but that's not a bad trade-off, really as the book contains a lot of great information. It's a 15' long canoe that's just shy of 3' at it's widest point. It should feel stable but still be fairly easily paddled. A good compromise.
I'm still working on making the strongback and forms for this design lighter. I'm planning on a foam-filled box beam for the strongback that will be set on either sawhorses (stackable or folding) or benches in the shop. The top will be 3/4" plywood to allow us to screw down the patterns and the sides will be luan ply. In between will be layers of foamular insulation that are laminated to each other and the luan with construction adhesive. Periodically, there will be 2x4 or 2x6 blocks to improve the torsional rigidity. I went to the lumberyard this morning to get the materials that I wanted only to find them closed. I then went to our local "big-box" store to see if they had what I wanted. They do, but I didn't buy them there - I was planning on using construction adhesive to assemble the beam, but hadn't considered the fact that the adhesive might be incompatible with the foam. Dang. A bit more research. The forms will also be "lightened" by the removal of material where it isn't necessary from the patterns. I need to keep this light so we're not moving 140 pound of boat and strongback around. My goal is to get a prototype built before next weekend is out so I can have a material list ready for sign-up on the following Monday. The other trick is going to be organizing the shop this year to accomodate the different stages of build that are going on. We'll see how that goes as time goes on.
I've got the majority of the frame complete and put two coats of semi-gloss polyurethane on it. I think things look pretty nice, actually:


I also picked up black nylon rope, webbing, hardware, grommets, elastic and such for deck rigging. I need to bore some holes in the frame to allow me to attach carry loops at the bow and stern, deck rigging and hatch straps. My next major task is to build the foot braces and to finish up the coamings and hatch.
I'm not impressed with my first attempt at the rear hatch - the wood was wet with boiling water and then using a steam iron and damp cloth, it was steamed around a plywood form to get the oval shape. I broke the first one due to wild grain, but the second went better with no fractures. After the wood dried, I removed it from the form to apply glue, but I couldn't manage to get it as back on the frame as tightly as I'd like. The picture below is the first attempt. There are gaps between the laminations that I'm not happy with. I need two of these - one slightly larger than the other - as the hatch rim and the other for the hatch cover.

I also need another piece for the coaming, but the radii are much bigger (as is the part) and I anticipate fewer problems. I'd purchased some ratcheting straps to try to pull things onto the rim, but I think I'll go "low-tech" with a Spanish windlass to try to clamp the wood around the form as it's gluing. Sometimes the simplest ways are the best.
Tomorrow is another day and I'll take another stab at the coaming and the cover rims.
Wednesday, September 2, 2009

Tuesday, September 1, 2009
Sorry, no Tech Tip Tuesday this week...
But, I hope you'll be pleased with the posting just the same.
The wooden boats we build aren't meant for sitting around and looking at - they're built to be used. Yeah, that involves a few scratches and scrapes, but you built the boat, so it can't be that hard to put on a bit of epoxy and varnish when you need it, right?
This little trip was started with a phone call from a friend of mine about a week and a half ago. He'd just been paddling on a little piece of water nearby that is generously called a river and thought that I'd be interested in paddling it as well. I've lived in this area for nearly my entire life, driven over and past this piece of water, but had never thought to paddle it because I couldn't figure out where to put in. After much to-ing and fro-ing over the past week, we finally connected and planned to hit meet at about 5:00PM and hit the water. I also got in touch with DaGoof to invite him as well.
Because the put-in location was so difficult to get to we met at a local car dealership to follow my first friend. We arrived and parked in a decently sized parking lot that was very close to the river.

When we got closer to the river, we saw the following - a dam that controls the river flow downstream from this location.

Upstream, there is a very busy bridge of a state highway the crosses the river. There are a few houses that are along the river bank. The friend who called me was introduced to this stretch of the river by the fellow who owns the house on the left. Tough location if you love to paddle, eh?

What always amazes me is that there are these little hidden gems that are an oasis in the middle of very urban locations. This river runs literally right through the center of a large town.

We carried the boats down to the bank and prepared to put in when the home-owner arrived from work and disappeared into his house arriving with several bottles of restorative beverages for the group. After some Q&A about the canoes and some instruction about the river itself, he provided a boat for our mutual friend to paddle.

We paddled for about 5 minutes upstream at which point almost all trace of civilization seemed to disappear. The unfortunate trace of civilization that didn't disappear was trash along the river. - mostly in the form of floating debris. I wasn't thinking or I would have packed a trash bag to help to reduce the trash that I found. I fully intend to go back and help to remove some of the trash along the way. It is vitally important to be a good steward to your local waterways to encourage more people to enjoy the water and become good stewards themselves.
We were treated to a visit by a beaver swimming in the river until we got to close and it retreated with a slap of its tail on the water. The gentleman who owned the house told us of a variety of wildlife that he was along the river including a bobcat on an overhanging branch.
The trip was wonderful and there was an amazing quiet to the whole trip a remarkable remoteness between a busy state highway and a busy street. There were overhanging branches and trees with small sandbanks and lush foliage that was just showing the first tinges of fall.
Two large trees that completely blocked the waterway finally brought us to a halt. We could have gotten out of the canoes to carry over the trees, but opted to turn back owing to the fading light.

On our return, we were greeted by the gentleman who owned the house along with another friend of his who he'd called to come see the canoes. One of the few problems with a wooden boat is that you need to plan an extra 1/2 hour on either end of the trip to explain the boats to people who have an interest in your boats!
Sometimes the most surprising wilderness is actually the one in your backyard!
Subscribe to:
Posts (Atom)


